[Update: This was last updated 3 May 2014.]
[Want to skip all this and look at finished code instead? Here’s the download link (ZIP) for this example code with all the associated assets on GitHub.]
Before I get too far into this guide, make sure you have the following things ready to go:
Requirements:
- The Phaser 2.0.x JavaScript game library
- Tiled 0.9.1, a map editor
- NetBeans IDE 8.x (choose HTML5 & PHP bundle)
- These assets: level.png and character.png
Creating the Project in NetBeans:

Open NetBeans and go to File->New Project…

If it isn’t already, select HTML5 and, under Projects, “HTML5 Application.”
Click “Next >”
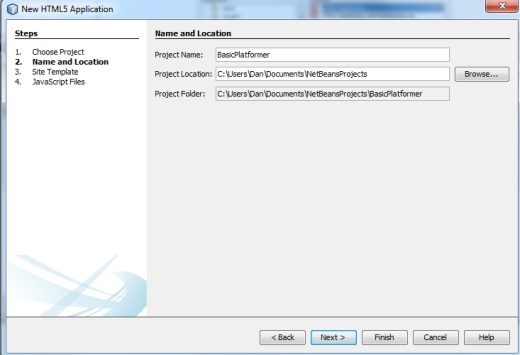
For this example, I will be naming the project “BasicPlatformer”.
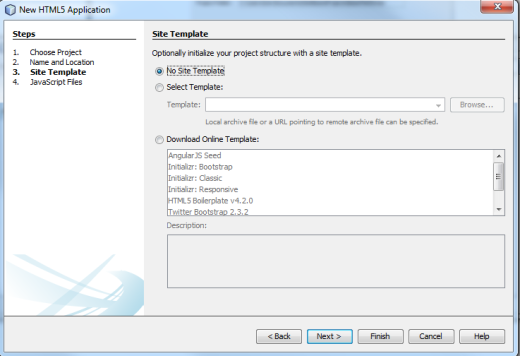
Make sure “No Site Template” is selected and then click “Next >”

Without selecting any of the libraries, click “Finish”

Once NetBeans has created the project, right-click on “Site Root” and select New and then click on Folder.
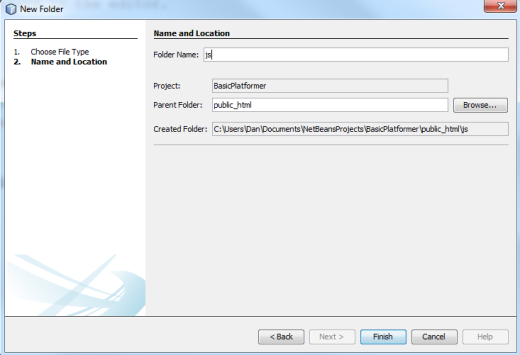
Name this new folder “js” (as it will hold the JavaScript files) and then click Finish.
One more time, right-click on Site Root, choose New and then Folder.

This time, name this new folder “assets” (as it will hold the image assets) and click Finish again.

There should now be two folders, “js” and “assets”, under the Site Root with the “index.html” file.
Adding the Assets:
If you haven’t already, now is the time to download the “level.png” and “character.png” files.
From where you have downloaded them, either move the file themselves into the “assets” folder within the “public_html” folder of the NetBeans project, or use the next step. (The NetBeans project folder will be found wherever it was created initially. This is usually under the Documents folder for Windows users.)
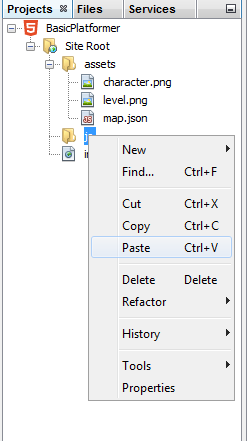
One of the quickest ways to move files when using NetBeans is to copy them into the program itself. Simply select the files from some folder and copy them using the keyboard shortcut Ctrl-C or from the right-click file menu.
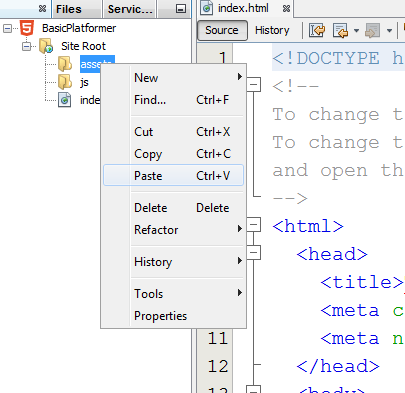
Then, right-click on a folder within the Projects pane where you want them to go and click on Paste. This will copy the files directly into the project, creating them within the structure.

Regardless of the method used, the “level.png” and “character.png” files should now be in the “assets” folder under the Site Root within NetBeans.
Creating the level with Tiled
Open Tiled.

From either the File menu or the icon menu, select New.
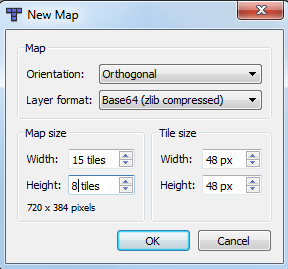
Set the width to be 15 and the height to be 8 tiles. The individual tile size should be 48 by 48 px. The orientation should remain “Orthogonal” and the Layer format should be “Base64 (zlib compressed)”.
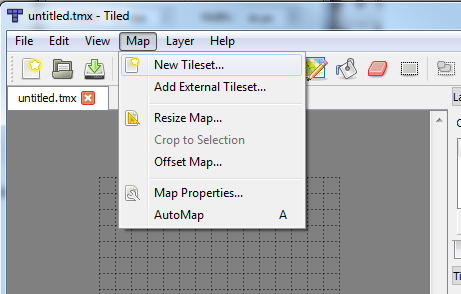
Once the empty map has been created, go to the Map from the top-level menu and select “New Tileset…”
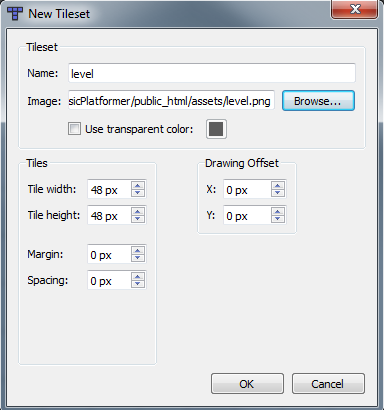
Click on “Browse..” and find the “level.png” file. Select the file, click “OK” and then, when back to the “New Tileset” window, click “OK” once more.
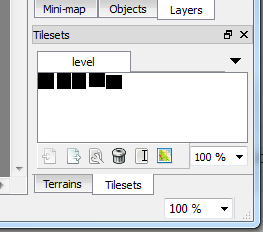
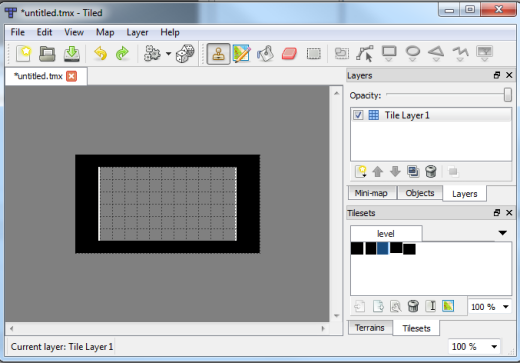
The “level” tileset should now be loaded within the Tileset.
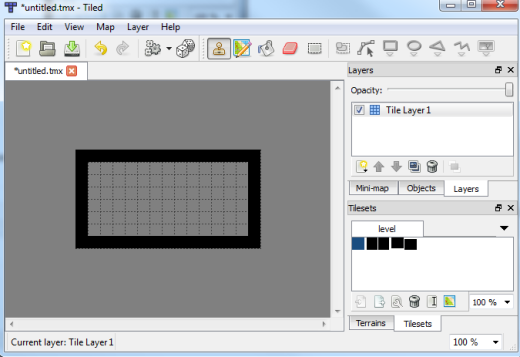
From here, click on the first square in the set and draw a square around the outermost edge of the map. This will serve as the boundaries for the level.
Using the second and then third tiles in the set, draw columns one row in on each side.

Now, using the second-to-last and the last tiles in the set, replace the tiles on the top and bottom edges, stopping each time at the previously created columns. The map should now look like a black square with and inner white rim. This will be the level for the platformer.
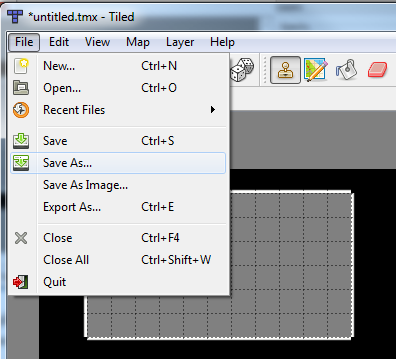
As a final step in this process, select “Save As…” from the File top-level menu.
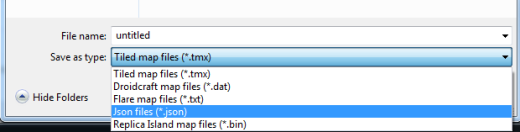
From the drop-down “Save as type” menu, pick “Json files (*.json)”.
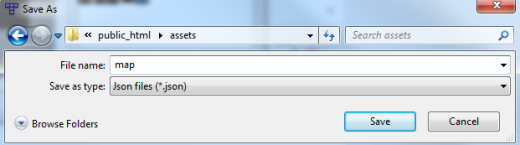
Name the file “map” and save it in the folder with the other assets.
Adding the Phaser library to the Project:
If you haven’t already downloaded, we will do that now.
 From the Phaser project page on GitHub, locate the “Download ZIP” button on the right-hand side. Click it.
This will download the latest version of all of the code.
Extract the contents of the ZIP file and then enter the “build” folder.
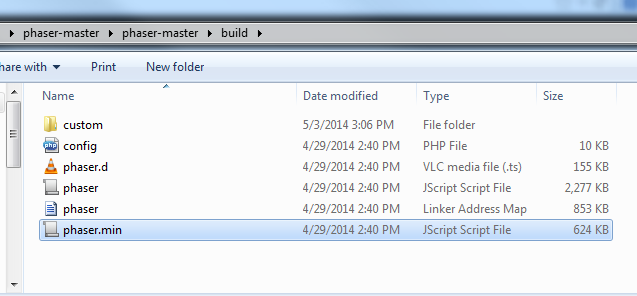
Select the “phaser.min.js” file and, using either the Ctrl-C keyboard shortcut or from the right-click context menu, copy the file.
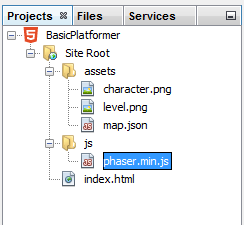
Within NetBeans, right-click on the “js” folder within the Projects view. Select “Paste” to move a copy of the library into the project.
Writing the Code:
Now that we have added the assets and created a level, we can actually write the code finally.

Highlight all of the HTML within “index.html” and press Delete on the keyboard.
Copy and paste the following code:
| <!DOCTYPE html> | |
| <html> | |
| <head> | |
| <title>Basic Platformer game</title> | |
| <meta charset="UTF-8"> | |
| <meta name="viewport" content="width=device-width"> | |
| <script src="js/phaser.min.js"></script> | |
| </head> | |
| <body> | |
| <div id="phaser-game"></div> | |
| <script type="text/javascript"> | |
| (function() { | |
| var game = new Phaser.Game( | |
| 720, 384, // The width and height of the game in pixels | |
| Phaser.AUTO, // The type of graphic rendering to use | |
| // (AUTO tells Phaser to detect if WebGL is supported. | |
| // If not, it will default to Canvas.) | |
| 'phaser-game', // The parent element of the game | |
| {preload: preload, // The preloading function | |
| create: create, // The creation function | |
| update: update}); // The update (game-loop) function | |
| function preload() { | |
| // Load the 'map.json' file using the TILDED_JSON special flag | |
| game.load.tilemap('map', 'assets/map.json', null, Phaser.Tilemap.TILED_JSON); | |
| // Load the image 'level.png' and associate it in the cache as 'level' | |
| game.load.image('level', 'assets/level.png'); | |
| // Load the spritesheet 'character.png', telling Phaser each frame is 30x48 | |
| game.load.spritesheet('character', 'assets/character.png', 30, 48); | |
| } | |
| var map; // The tilemap | |
| var layer; // A layer within a tileset | |
| var player; // The player-controller sprite | |
| var facing = "left"; // Which direction the character is facing (default is 'left') | |
| var cursors; // A reference to the keys to use for input detection | |
| var jumpButton; // A reference to the button used for jumping | |
| var hozMove = 160; // The amount to move horizontally | |
| var vertMove = -120; // The amount to move vertically (when 'jumping') | |
| var jumpTimer = 0; // The initial value of the timer | |
| function create() { | |
| // Make the background color of the game's stage be white (#FFFFFF) | |
| game.stage.backgroundColor = '#FFFFFF'; | |
| // Start the physics system ARCADE | |
| game.physics.startSystem(Phaser.Physics.ARCADE); | |
| // Add the tilemap 'map' to the game | |
| map = game.add.tilemap('map'); | |
| // Add the tileset image 'level' to the map | |
| // (The name must match both an image in Phaser's cache | |
| // and the name of an image withi the 'map.json' | |
| // list of tilesets too.) | |
| map.addTilesetImage('level'); | |
| // Create a layer from the 'map.json' file | |
| // based on 'Tile Layer 1' from the available tiles. | |
| layer = map.createLayer('Tile Layer 1'); | |
| // Set the collision range | |
| // Here, the range is from 1 (the first tile) to the fifth (last tile). | |
| map.setCollisionBetween(1, 5); | |
| // Tell the layer to resize the game 'world' to match its size | |
| layer.resizeWorld(); | |
| // Create and add a sprite to the game at the position (2*48 x 6 *48) | |
| // and using, in this case, the spritesheet 'character' | |
| player = game.add.sprite(2 * 48, 6 * 48, 'character'); | |
| // By default, sprites do not have a physics 'body' | |
| // Before we can adjust its physics properties, | |
| // we need to add a 'body' by enabling | |
| // (As a second argument, we can specify the | |
| // physics system to use too. However, since we | |
| // started the Arcade system already, it will | |
| // default to that.) | |
| game.physics.enable(player); | |
| // Set the amount of bounce on the physics body of the 'player' sprite | |
| player.body.bounce.y = 0.1; | |
| // Set the amount of gravity to apply to the physics body of the 'player' sprite | |
| player.body.gravity.y = 96; | |
| // Tell the game's camera to follow the 'player' sprite | |
| game.camera.follow(player); | |
| // Have the game create cursor keys (usually arrow keys) | |
| // and save the reference to 'cursors' | |
| cursors = game.input.keyboard.createCursorKeys(); | |
| // Add a specifically named key to the input checked for. | |
| // In this case, it is the Keyboard.SPACEBAR | |
| jumpButton = game.input.keyboard.addKey(Phaser.Keyboard.SPACEBAR); | |
| } | |
| function update() { | |
| // Using the physics.arcade system, check if 'player' is colliding | |
| // with any tiles within 'layer'. If so, seperate them. | |
| game.physics.arcade.collide(player, layer); | |
| // Reset the x (horizontal) velocity | |
| player.body.velocity.x = 0; | |
| // Check if the left arrow key is being pressed | |
| if (cursors.left.isDown) | |
| { | |
| // Set the 'player' sprite's x velocity to a negative number: | |
| // have it move left on the screen. | |
| player.body.velocity.x = -hozMove; | |
| // Check if 'facing' is not "left" | |
| if (facing !== "left") | |
| { | |
| // Set 'facing' to "left" | |
| facing = "left"; | |
| } | |
| } | |
| // Check if the right arrow key is being pressed | |
| else if (cursors.right.isDown) | |
| { | |
| // Set the 'player' sprite's x velocity to a positive number: | |
| // have it move right on the screen. | |
| player.body.velocity.x = hozMove; | |
| // Check if 'facing' is not "right" | |
| if (facing !== "right") | |
| { | |
| // Set 'facing' to "right" | |
| facing = "right"; | |
| } | |
| } | |
| // Check if the jumpButton (SPACEBAR) is down AND | |
| // if the 'player' physics body is onFloor (touching a tile) AND | |
| // if the current game.time is greater than the value of 'jumpTimer' | |
| // (Here, we need to make sure the player cannot jump while alreay in the air | |
| // AND that jumping takes place while the sprite is colliding with | |
| // a tile in order to jump off it.) | |
| if (jumpButton.isDown && player.body.onFloor() && game.time.now > jumpTimer) | |
| { | |
| // Set the 'player' sprite's y velocity to a negative number | |
| // (vertMove is -90) and thus have it move up on the screen. | |
| player.body.velocity.y = vertMove; | |
| // Add 650 and the current time together and set that value to 'jumpTimer' | |
| // (The 'jumpTimer' is how long in milliseconds between jumps. | |
| // Here, that is 650 ms.) | |
| jumpTimer = game.time.now + 650; | |
| } | |
| // Check if 'facing' is "left" | |
| if (facing === "left") { | |
| // Set the 'player' to the second (1) frame | |
| // ('facing' is "left") | |
| player.frame = 1; | |
| } else { | |
| // Set the 'player' to the first (0) frame | |
| // ('facing' is "right"). | |
| player.frame = 0; | |
| } | |
| } | |
| }()); | |
| </script> | |
| </body> | |
| </html> |
(The project is now complete. Click on the Run Project icon or press F6 to see it in action.)
Explaining the Code:
This section is a breakdown of the code by concepts.
| <head> | |
| <title>Basic Platformer game</title> | |
| <meta charset="UTF-8"> | |
| <meta name="viewport" content="width=device-width"> | |
| <script src="js/phaser.min.js"></script> | |
| </head> |
Because Phaser is running in a browser environment, it needs to be loaded as part of the HEAD section of a HTML page. I am also using a META tag to tell other devices, usually mobile ones, to set the viewport to the full ‘device-width’ here too.
| <body> | |
| <div id="phaser-game"></div> | |
| <script type="text/javascript"> | |
| (function() { | |
| ... | |
| }()); | |
| </script> | |
| </body> |
The BODY itself is somewhat straightforward too. There is a DIV called “phaser-example” that will be the parent element of the game and a SCRIPT tag as well.
Within the SCRIPT tag, there is a function scope created using a JavaScript closure. By using this, we can define all the variables we want without them also becoming part of the global scope and possibly interfering with another library or function with the same name.
| var game = new Phaser.Game( | |
| 720, 384, // The width and height of the game in pixels | |
| Phaser.AUTO, // The type of graphic rendering to use | |
| // (AUTO tells Phaser to detect if WebGL is supported. | |
| // If not, it will default to Canvas.) | |
| 'phaser-game', // The parent element of the game | |
| {preload: preload, // The preloading function | |
| create: create, // The creation function | |
| update: update}); // The update (game-loop) function |
The first step to creating a game in Phaser is to do exactly that: create a Phaser.Game object. For its instantiation, we pass its dimensions, which graphics rendering to use, the name of the parent element, and then three functions: the preload, create, and update functions.
| function preload() { | |
| // Load the 'map.json' file using the TILDED_JSON special flag | |
| game.load.tilemap('map', 'assets/map.json', null, Phaser.Tilemap.TILED_JSON); | |
| // Load the image 'level.png' and associate it in the cache as 'level' | |
| game.load.image('level', 'assets/level.png'); | |
| // Load the spritesheet 'character.png', telling Phaser each frame is 30x48 | |
| game.load.spritesheet('character', 'assets/character.png', 30, 48); | |
| } |
Preload is where all loading will take place. Whatever needs to be grabbed and processed by Phaser before the game starts goes here.
| var map; // The tilemap | |
| var layer; // A layer within a tileset | |
| var player; // The player-controller sprite | |
| var facing = "left"; // Which direction the character is facing (default is 'left') | |
| var cursors; // A reference to the keys to use for input detection | |
| var jumpButton; // A reference to the button used for jumping | |
| var hozMove = 160; // The amount to move horizontally | |
| var vertMove = -120; // The amount to move vertically (when 'jumping') | |
| var jumpTimer = 0; // The initial value of the timer |
Between the Preload and Create functions, we take some space to create references to the variables we will be using within the Create function itself. Because we will need to reference them in both the Create function and later in the Update function, they need to exist outside of both of them. This is also where the JavaScript closure comes into play too, keeping these variables within the larger scope of the game code, but outside of any one function so as to be available to any of them.
| function create() { | |
| // Make the background color of the game's stage be white (#FFFFFF) | |
| game.stage.backgroundColor = '#FFFFFF'; | |
| // Start the physics system ARCADE | |
| game.physics.startSystem(Phaser.Physics.ARCADE); | |
| // Add the tilemap 'map' to the game | |
| map = game.add.tilemap('map'); | |
| // Add the tileset image 'level' to the map | |
| // (The name must match both an image in Phaser's cache | |
| // and the name of an image withi the 'map.json' | |
| // list of tilesets too.) | |
| map.addTilesetImage('level'); | |
| // Create a layer from the 'map.json' file | |
| // based on 'Tile Layer 1' from the available tiles. | |
| layer = map.createLayer('Tile Layer 1'); | |
| // Set the collision range | |
| // Here, the range is from 1 (the first tile) to the fifth (last tile). | |
| map.setCollisionBetween(1, 5); | |
| // Tell the layer to resize the game 'world' to match its size | |
| layer.resizeWorld(); | |
| // Create and add a sprite to the game at the position (2*48 x 6 *48) | |
| // and using, in this case, the spritesheet 'character' | |
| player = game.add.sprite(2 * 48, 6 * 48, 'character'); | |
| // By default, sprites do not have a physics 'body' | |
| // Before we can adjust its physics properties, | |
| // we need to add a 'body' by enabling | |
| // (As a second argument, we can specify the | |
| // physics system to use too. However, since we | |
| // started the Arcade system already, it will | |
| // default to that.) | |
| game.physics.enable(player); | |
| // Set the amount of bounce on the physics body of the 'player' sprite | |
| player.body.bounce.y = 0.1; | |
| // Set the amount of gravity to apply to the physics body of the 'player' sprite | |
| player.body.gravity.y = 96; | |
| // Tell the game's camera to follow the 'player' sprite | |
| game.camera.follow(player); | |
| // Have the game create cursor keys (usually arrow keys) | |
| // and save the reference to 'cursors' | |
| cursors = game.input.keyboard.createCursorKeys(); | |
| // Add a specifically named key to the input checked for. | |
| // In this case, it is the Keyboard.SPACEBAR | |
| jumpButton = game.input.keyboard.addKey(Phaser.Keyboard.SPACEBAR); | |
| } |
Create is where all the creation takes place. Whatever variables need to be created or values set go here.
| function update() { | |
| // Using the physics.arcade system, check if 'player' is colliding | |
| // with any tiles within 'layer'. If so, seperate them. | |
| game.physics.arcade.collide(player, layer); | |
| // Reset the x (horizontal) velocity | |
| player.body.velocity.x = 0; | |
| // Check if the left arrow key is being pressed | |
| if (cursors.left.isDown) | |
| { | |
| // Set the 'player' sprite's x velocity to a negative number: | |
| // have it move left on the screen. | |
| player.body.velocity.x = -hozMove; | |
| // Check if 'facing' is not "left" | |
| if (facing !== "left") | |
| { | |
| // Set 'facing' to "left" | |
| facing = "left"; | |
| } | |
| } | |
| // Check if the right arrow key is being pressed | |
| else if (cursors.right.isDown) | |
| { | |
| // Set the 'player' sprite's x velocity to a positive number: | |
| // have it move right on the screen. | |
| player.body.velocity.x = hozMove; | |
| // Check if 'facing' is not "right" | |
| if (facing !== "right") | |
| { | |
| // Set 'facing' to "right" | |
| facing = "right"; | |
| } | |
| } | |
| // Check if the jumpButton (SPACEBAR) is down AND | |
| // if the 'player' physics body is onFloor (touching a tile) AND | |
| // if the current game.time is greater than the value of 'jumpTimer' | |
| // (Here, we need to make sure the player cannot jump while alreay in the air | |
| // AND that jumping takes place while the sprite is colliding with | |
| // a tile in order to jump off it.) | |
| if (jumpButton.isDown && player.body.onFloor() && game.time.now > jumpTimer) | |
| { | |
| // Set the 'player' sprite's y velocity to a negative number | |
| // (vertMove is -90) and thus have it move up on the screen. | |
| player.body.velocity.y = vertMove; | |
| // Add 650 and the current time together and set that value to 'jumpTimer' | |
| // (The 'jumpTimer' is how long in milliseconds between jumps. | |
| // Here, that is 650 ms.) | |
| jumpTimer = game.time.now + 650; | |
| } | |
| // Check if 'facing' is "left" | |
| if (facing === "left") { | |
| // Set the 'player' to the second (1) frame | |
| // ('facing' is "left") | |
| player.frame = 1; | |
| } else { | |
| // Set the 'player' to the first (0) frame | |
| // ('facing' is "right"). | |
| player.frame = 0; | |
| } | |
| } |
Update is a function that defines the update-loop for the game. Those values that need to change as a result of pressing buttons or collisions between sprites happens here.
Suggestions:
- Within Tiled, use the Map-> “Resize Map…” option to change the length of the map. Make it much longer and use the tiles to paint the level in different patterns, remembering to ‘close’ the level at all points so the character does not fall out of the world. (Remember to save the file and then reload the web page to test the results too.)
- Change the dimensions of the game world. Instead of 720 by 384, make the length shorter or level smaller. Test various numbers and combine this with the above suggestion to create different perspectives of levels.
- Change the amount of gravity to a larger or smaller number. (It is set using player.body.gravity.y.)
- Make the ‘player’ sprite bounce more by increasing the corresponding player.body.bounce.y number.
- Add to or change the look of the tiles in “level.png”. Because Tiled checks the file itself while it is running, it will auto-update the look.
- Consider having some tiles that the character can pass-through by setting a new collision range for the tiles after changing or adding to the original tileset. (This is an easy way to have some tiles be part of the background.)
- Add some threats by introducing new assets, calling game.add.sprite on them, and enabling their physics bodies. Then, test if ‘player’ collides with them during the Update function.
