

Twine 1.4 represents the best of what Twine has to offer so far. With massive improvements to multiple internal systems as well as additional functionality, 1.4 unites both the work done to improve Twine through its 1.3.5 release and the up-to-date wants of its community — it even has a wiki now! It is cleaner, simpler, and easier to use. However, it still has a bit of a learning curve.

If you are starting a new Story or opening a new one, you will start with the File top-level menu. Through it, you can access any Story you may have recently opened, save your Story, and Import or Export different formats.

Twee is the internal language and system Twine uses to parse things and produce HTML files. From the Import option of the File menu, you can have Twine import Twee source code directly or, if you have already created a HTML file, have Twine read that as an input. Either options allows you to bypass copying content over and have Twine read directly from an alternative source.

Like the Import option, Export allows you create Twee code directly instead of the normal HTML file. You can also create what is known as a “Proofing Copy” too. This is all the text of a Story without its corresponding code. If you want to copy-edit your words, or even have someone else look at them too, this is the easiest way to do this.

The Edit top-level menu is rather straightforward. All the cut, copy, or paste options are there. So is the ability to Find certain words or phrases, even across the entire story. Edit also allows access to the Preferences.

If you often work in low-light settings, as I sometimes do myself, having the ability to make text larger or change its color can be an eye-saver. I often go looking for just such options after opening programs and like to know I have the ability to tweak things to match the visual style I like for writing before I get too far into a project.
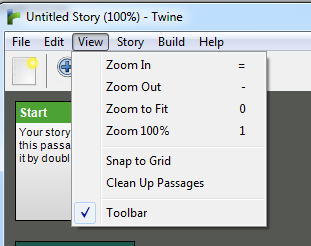
Like the Edit menu, the View top-level menu allows you to do access general options related to its label. If needed, you can zoom in or out on the content. You can even, as the keyboard shortcuts show, bypass opening this menu and just press the related keys. If wanted, you can dismiss the icon toolbar too.

The Story top-level menu is where the most changes have appeared in Twine 1.4. Unlike previous versions, you can now create a specific type of Passage, delete one, or add things like fonts and images directly. You can even create the various Special Passages without having to know or reference their names now. And, of course, Story Formats can be changed.
(A Passage is the smallest unit of a Story. Through linking various Passages together, an author creates different paths through a Story for a player.)

From the New option of the Story menu lets you create passage of different types. In previous versions of Twine, these would be the keywords used in the “tag” field of a passage to instruct Twine how to parse its content. Now, you can create normal passages, those with programming code (Script), or even those with additional style information (Stylesheet). You can also create a type of passage called Annotation that holds information about the Story, but is not strictly a part of a Story. If you want to include notes to yourself or others working on a Story, this is the passage to use.

The ability to import images directly into Twine is a new feature of 1.4. Now, you can choose a local file or link to an image out on the web somewhere to use in your Story.
(Obligatory warning: If you don’t own or have permission to use an image, maybe don’t use it. Always make sure, if you are using an image from the web, to check its source or, if available, with its creator. There are lots of free and creative commons images out there to use. It is not worth getting in trouble over a copyrighted image when a better one might be out there, one where you are perfectly within your rights to use for your Story.)

By using this functionality, the image will become a passage within the story and can be referenced by the Twee code listed in the information window after importing it. If you ever forget what you called an image, the name to include it in a passage will always be its own passage name.

The Special Passages are those that provide extra features through their “title” field. By default, Twine 1.4 creates the “StoryTitle” and “StoryAuthor” passages, allowing quick access to changing that information for a Story. If wanted, a “StorySubtitle” can be added too. You can also add content to the menu by adding or editing the “StoryMenu” passage.

The “StorySettings” passage introduces more granular choices for advanced functionality into Twine 1.4. From here, you can instruct Twine to turn off the ability to “undo” moves, revoke the ability for users to “bookmark” passages, or even obfuscate the content of a story while it is in HTML form. If wanted, you can even have Twine include the jQuery or Modernizr JavaScript libraries.
(Note: While useful in different situations and for various purposes, generally, most users will not want to change these settings.)

“StoryIncludes” is another new feature. With this passage, you can link to Twee source code from other projects or on a website. However, as with “StorySettings,” it is another advanced feature many users may not have a need for or even ever use. It remains, though, functionality that is very helpful in some specific ways and to build on the work of others.

Story Statistics from the Story top-level menu shows you just that: statistics about the Story. It displays the current word count, how many links exist, and if any are broken. It can be a great tool for helping keep an author to a word count, or just seeing how complex your current Story might be at any one moment.

The Story Formats options allows you to change the visual templates for the Story. Each has a different way of representing passages, emphasizing different ways of showing content and the links between passages.

Sugarcane, the default format, shows white text on a black background. It has the menu on the left-hand side, with the option to Restart the Story or Bookmark the current position. Sugarcane also replaces the currently shown passage with another when a link is clicked. Only the most recently clicked content will be shown to the player.

The Jonah format uses grey and black text on a light grey background. The Restart Story link remains in a fixed position in the upper right-hand corner at all time. The Jonah format, unlike Sugarcane, shows all clicked passages, loading the most recently clicked passage’s link under the previously viewed one. This creates a stacking effect, vertically layering the passages seen by the player over time.

Responsive is aimed more at different resolutions and especially mobile experiences with black text on a white background for passages and white text on a darker grey background for the menu. The placement of the Restart and Bookmark link move according to the relative size of the screen too. On lower resolutions, both buttons appear under the “StoryTitle” and “StorySubtitle” content. On higher, they shift to the right and appear vertically parallel to the titles.
 Tw and Tw2 are copies of the TiddyWiki formats, those used to create a wiki experience for users. While not as commonly used to create stories, they can be deployed as part of using Twine to create webpages instead of stories.
(Note: Clicking on the “About Story Format” option within the Story Format menu under the Story top-level menu opens the corresponding wiki page on the subject. It’s an easy way to get more information about different aspects of the story formats.)

The Build top-level menu allows access to various options for ‘building’ your Story into a HTML file. Using the “Test Play” option, for example, compiles and runs the Story as a temporary file, opening it your default web browser for quick testing. The same with “Test Play From Here,” which opens the currently selected content passage as a temporary Story, letting you see any style or content changes as they would appear to a player.
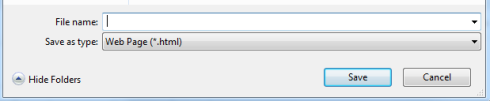
Clicking on “Build Story…” for the first time will prompt you to save a copy of the compiled HTML file somewhere. Immediately after that, Twine will open the new file in a new tab or window in your default web browser. It will also enable the the “Rebuilt Story” and “View Last Build” options under the Build top-level menu.

Once your content has been changed, either by adding or removing some content, you will need to ‘rebuild’ your Story. This puts everything together for you, overwriting the old build with the new content, settings, or code. However, if there is a problem with the new build, you can use the “View Last Build” to view what your compiled HTML filed looked like, hopefully providing you some indication of what new change might be causing an issue for you.
(Note: While the ‘Build’ and ‘Rebuilt’ Story options update the HTML file, it is also good practice to save the Story file itself frequently. From the File menu, the ‘Save’ or ‘Save As’ options do this. In Windows, you can also press Cntrl-S to do the same thing as a keyboard shortcut.)
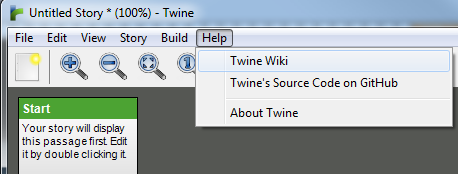
The Help top-level menu’s contents links to Twine resources. The first, Twine Wiki, links out to the wiki itself. The “Twine’s Source Code on Github” option is exactly that, a link to the GitHub page, providing a way to report issues, bugs, and even suggest future functionality.

The About Twine option of the Help top-level menu opens up details about the License details and who the current Developers are on the program. (Great work, everyone!)
