Note: While this guide should help you get HTML5 projects up and running on the Ouya using CocoonJS for testing purposes, you can’t sell any project created with CocoonJS yet. That should change in the coming weeks, though.
Required:
- An Ouya system with either
- Network access (easy way)
- A USB-to-MicroUSB cable (hard way)
- The Android Development Tools bundle.
- A Ludei account
While I will show where to download the Android Development Tools bundle (ADT) and how to setup an account with Ludei, you must have some connection to an Ouya system in order for this to work. I recommend using the network setup, and will show how to use the USB connected approach as well, but in order to side-load (install applications remotely), you must have access to the system.
(Note: Since I use a Windows environment, I wrote this guide from that point of view. All of the screenshots and most of the instructions will reference Windows environment locations and settings.)
Since installing the Android Development Tools bundle can take the longest of all these steps, we will start there.
Installing the Android ADT Bundle
Visit the Android SDK page.
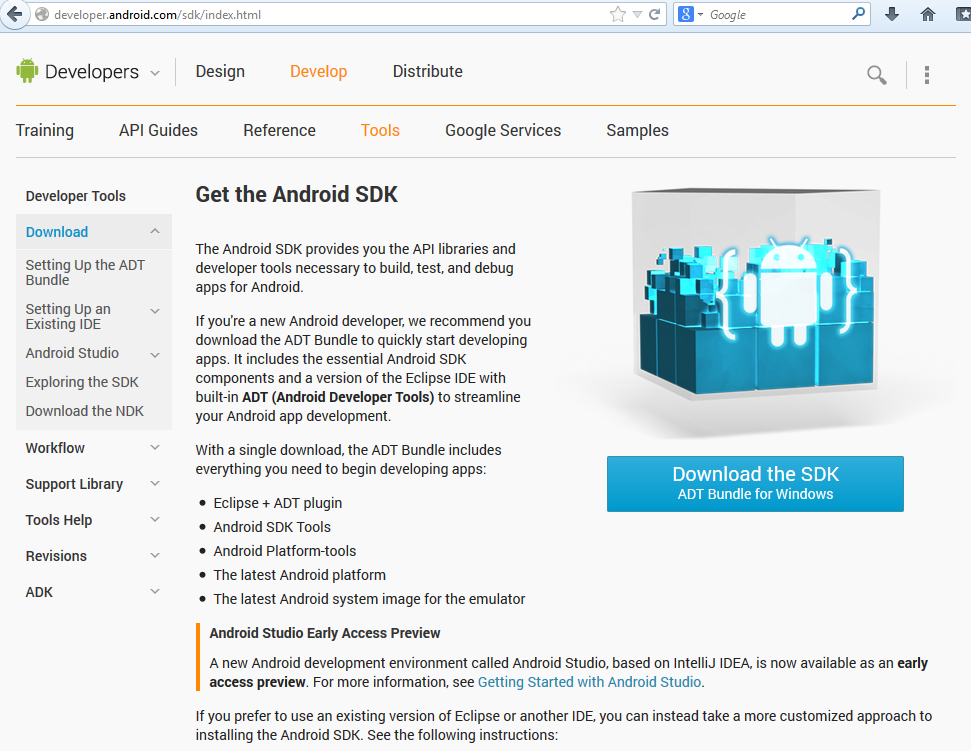
On the right-hand side is a big button labeled “Download the SDK”. Click it.
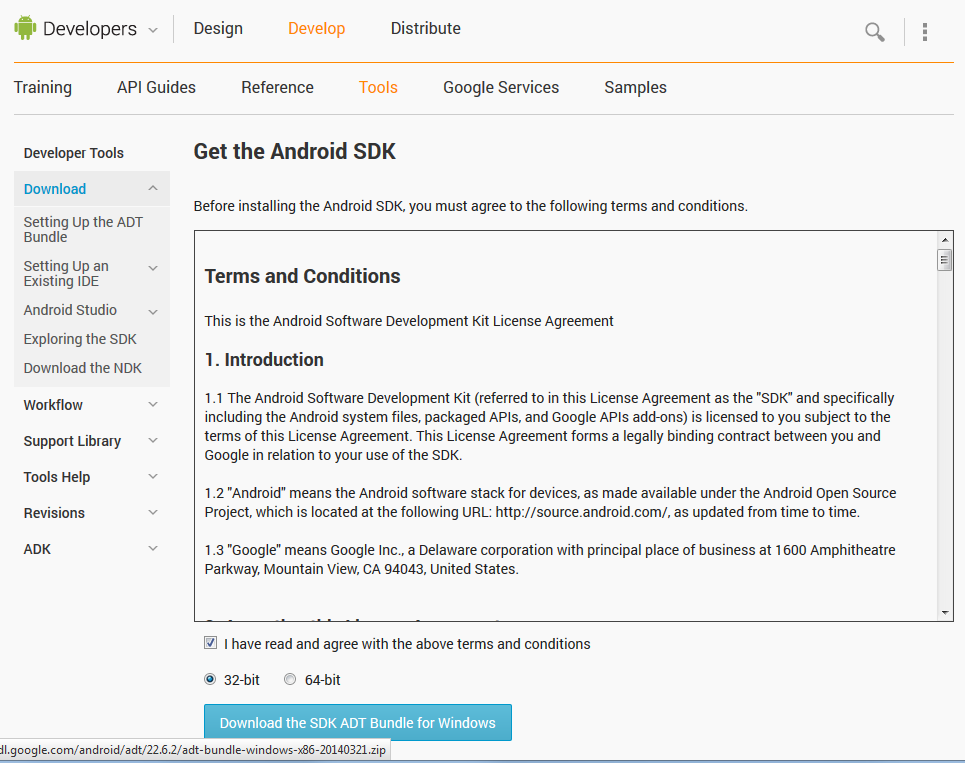
Read the Terms and Conditions.
Depending on your system, pick either the 32-bit or 64-bit version.
(Note: The SDK is designed for the compiling of code. We won’t be using that functionality in this guide, but you might want to later. Make sure you pick the correct version for your system.)
Finally, click that you have read and agree with the terms and conditions. Then, click on the button to download the ADT bundle.
Because the bundle is 510 MB zipped, it can take some time to download. Depending on your network speed, you might want to pause here and take care of some other tasks before continuing.
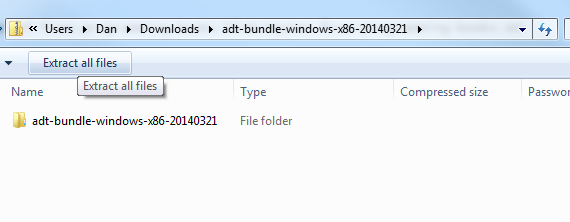
When the download is finally done, it will be in your Downloads folder for your username. (For me, that was “Dan.” Hello.)
Double-click this file to open the ZIP file functionality inside Windows Explorer.
You should see a “Extract all files” button. Click this.
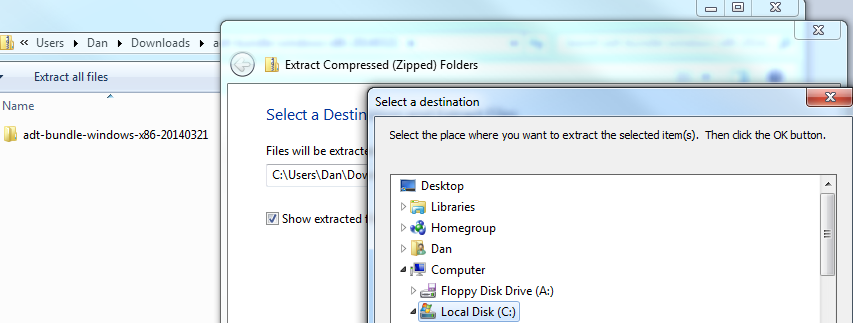
Instead of accepting the default position, click on “Browse” to select a new one.
Now, I am going to recommend that, if this is your first time using the ADT, that you place it in the root folder of your default drive. For most users, that will be “C” and selecting it from the “Select a destination” window will be enough.
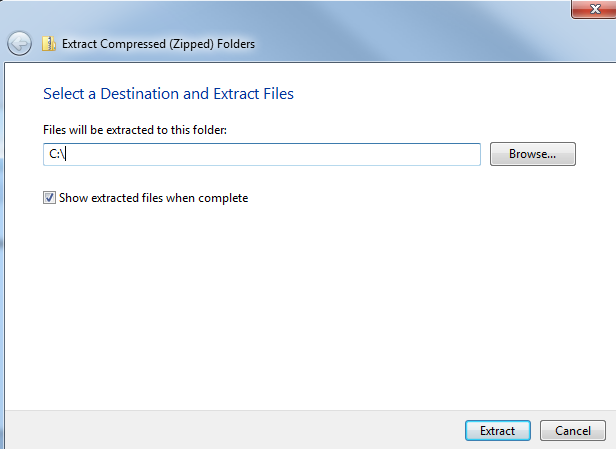
Having selected “C:” from the previous window, you can now click on “Extract” to unzip the files into that directory.
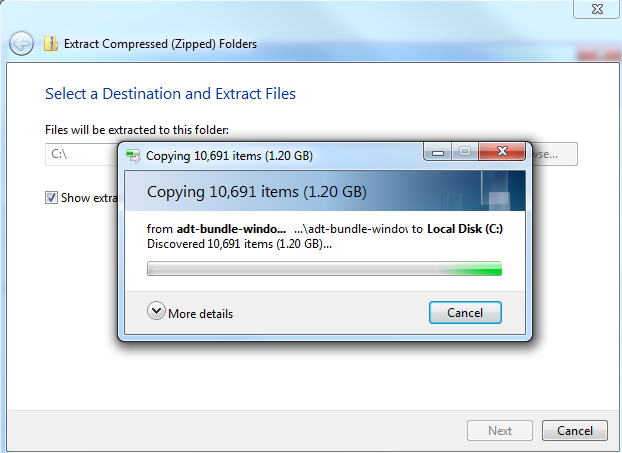
This next step can take a substantial amount of time. Depending on your computer’s overall speed, and other factors like what is running at the same time, this can take up to hours to finish.
While is going on, we are going to prepare for the next step.
If you don’t have an account with Ludei, now is the time to create one.
Creating a Ludei account
Visit their sign up page.
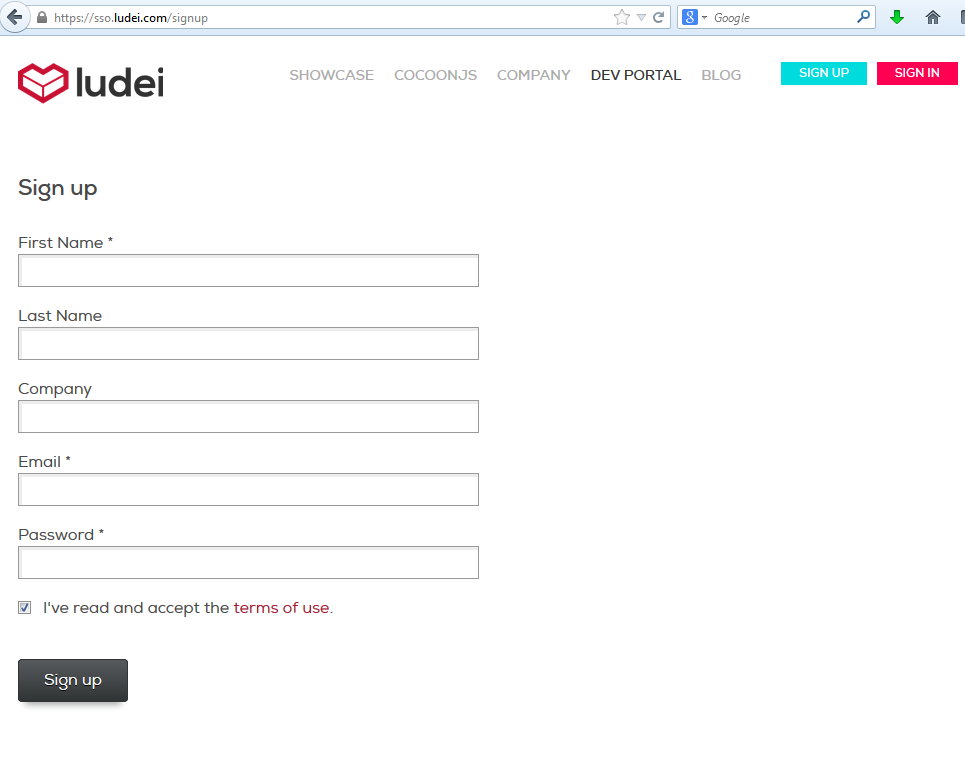 Fill out the required information and, before you finally sign up, read their terms of use.
Once you have an account and have confirmed your e-mail, sign in with your account name.
Once signed in, go to the “Dev Portal”
Creating a project and requesting a Custom Launcher.
 Click on the “+ New Project” button to create a new project.
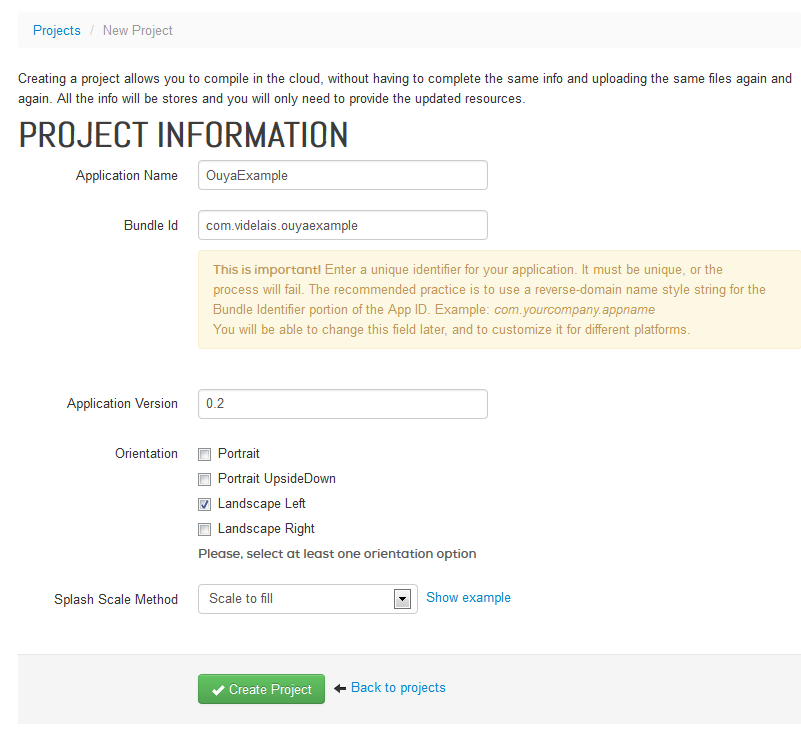
Fill out the required information. (If you prefer, you can use what I wrote instead. However, for the bundle id field, consider putting in something that matches your own needs.)
Once done, click on the “Create Project” button.
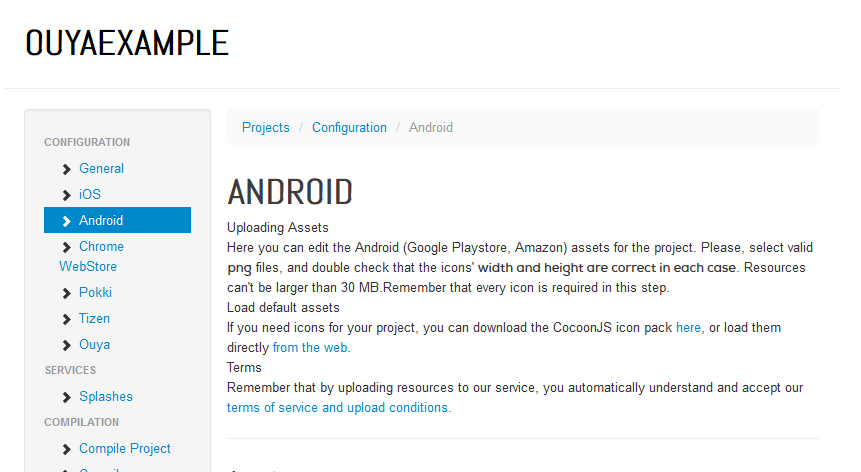
From the left-hand set of links, click on “Android”
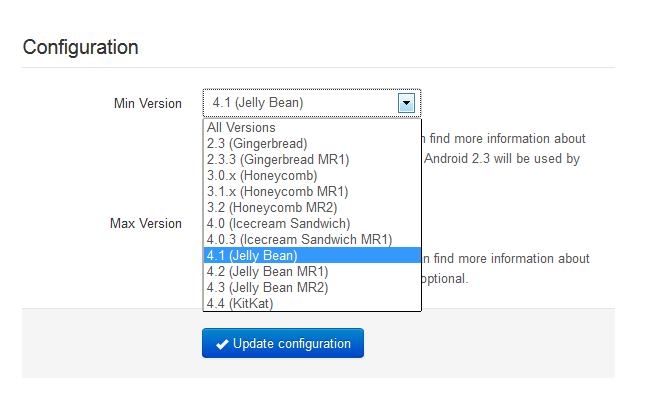
Because the Ouya runs Android 4.1, we need to make sure that minimal version is selected.
Select that and then click on “Update configuration.”
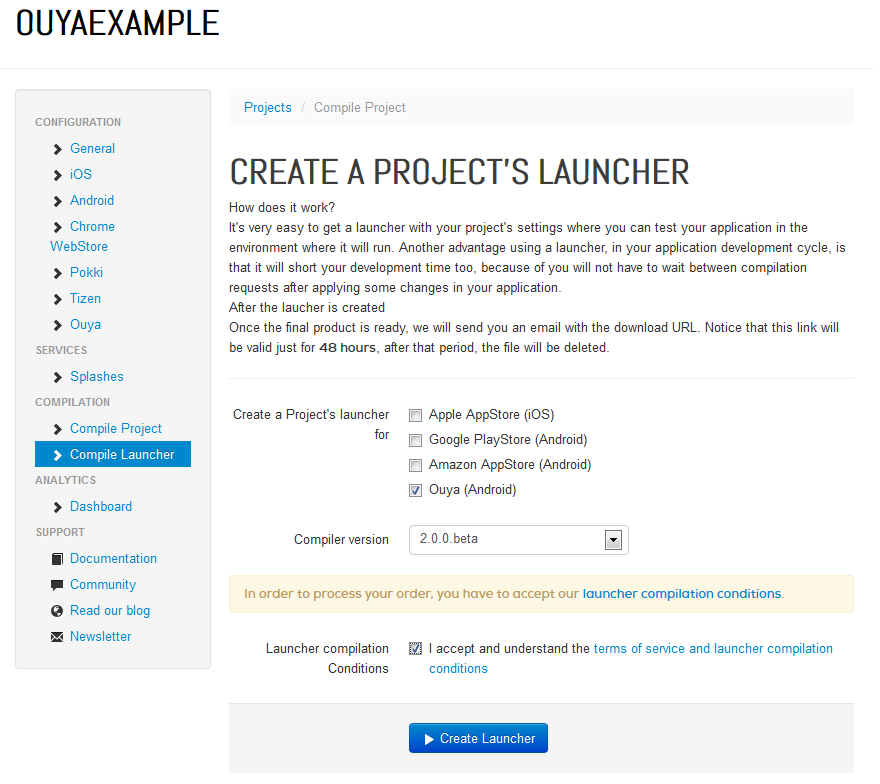
From the left-hand set of links, this time click on “Compile Launcher.”
From the “Create a Project’s launcher for” options, make sure “Ouya (Android)” is selected and the others are not.
If you didn’t before, read the terms of service and upload conditions.
Finally, click that you accept and then the “Compile project” button.
Now we wait for the compilation e-mail to arrive. (Depending on number of other concurrent projects being processed, the time to wait can be as little as five minutes or as long as several hours.)
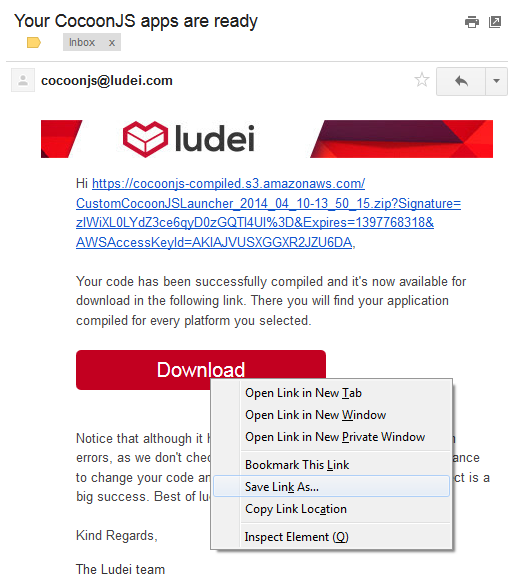
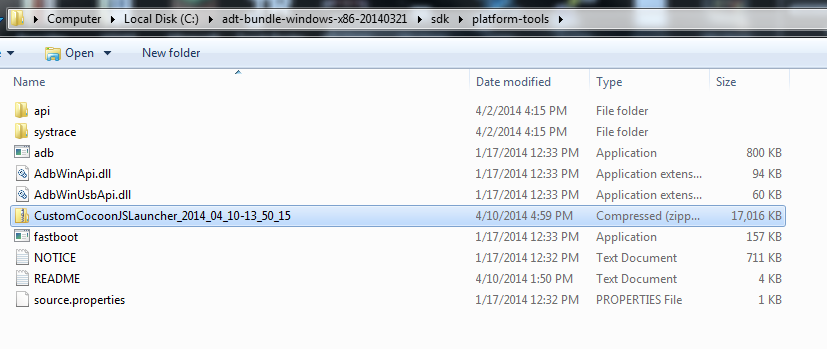
Right-click on either the “Download” image or the link in the e-mail itself. Select “Save Link As…” and, from the window, select the “platform-tools” folder under “sdk” under the unzipped folder created from the ADT bundle. (If you have been following this guide, it should be “C:\adt-bundle-windows-x86-20140312\sdk\platform-tools”.)
Now that we have the Launcher, we need to set up the Ouya system to use it.
If you haven’t already, power on the Ouya system.
Instructions for connecting with USB-to-MicroUSB cable (the hard way)
If your system does not have network access, or you do not wish to use that method at this time, you will now need the USB-to-MicroUSB cable I mentioned at the top.
Connect the Ouya to your Windows computer using this cable.
Windows will attempt to install drivers and then ultimately fail.
Visit the Windows USB driver download page.
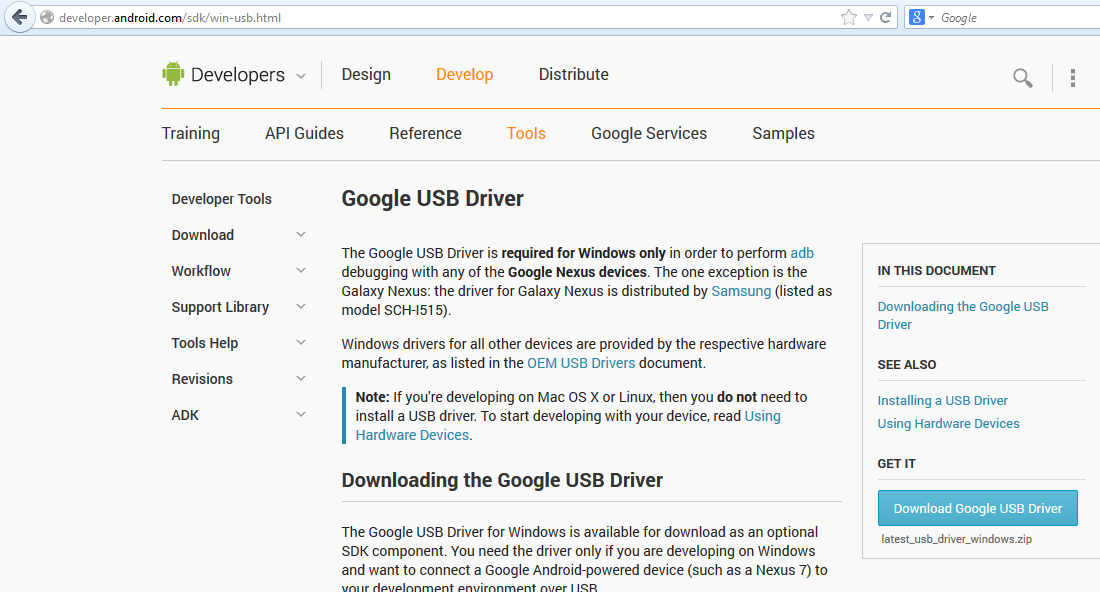
Click on the button on the right-hand side labeled “Download Google USB Driver.”
Once it has downloaded, locate it in your Downloads folder. Double-click it.
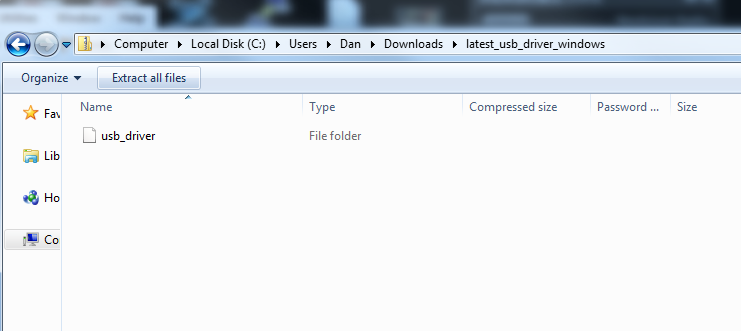
Click on “Extract all files.”
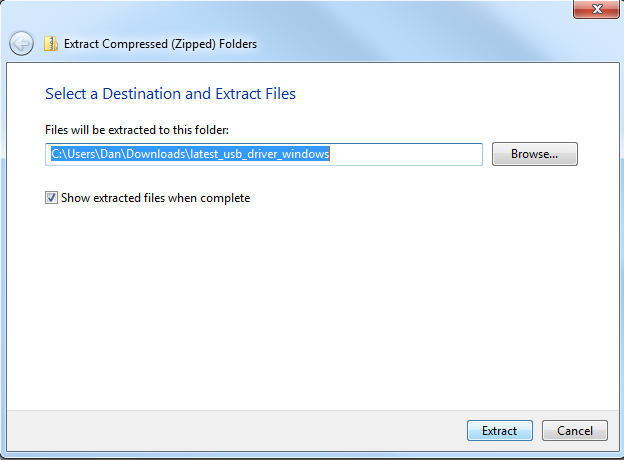
Click on “Extract.”
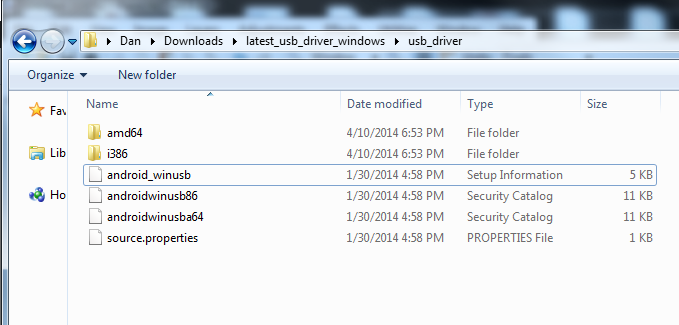
After the process is complete and the window open with the extracted files, double-click on the “usb_driver” folder to open it.
Right-click on the “android_winusb” file. Choose “Open with…”
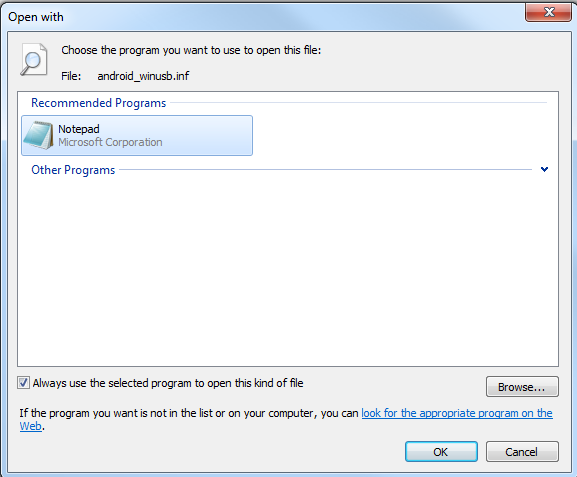
If “Notepad” is not select, click on it. Click on “OK” at the bottom.
Add the following lines to the [Google.NTx86] and [Google.NTamd64] sections:
;OUYA Console
%SingleAdbInterface% = USB_Install, USB\VID_2836&PID_0010
%CompositeAdbInterface% = USB_Install, USB\VID_2836&PID_0010&MI_01
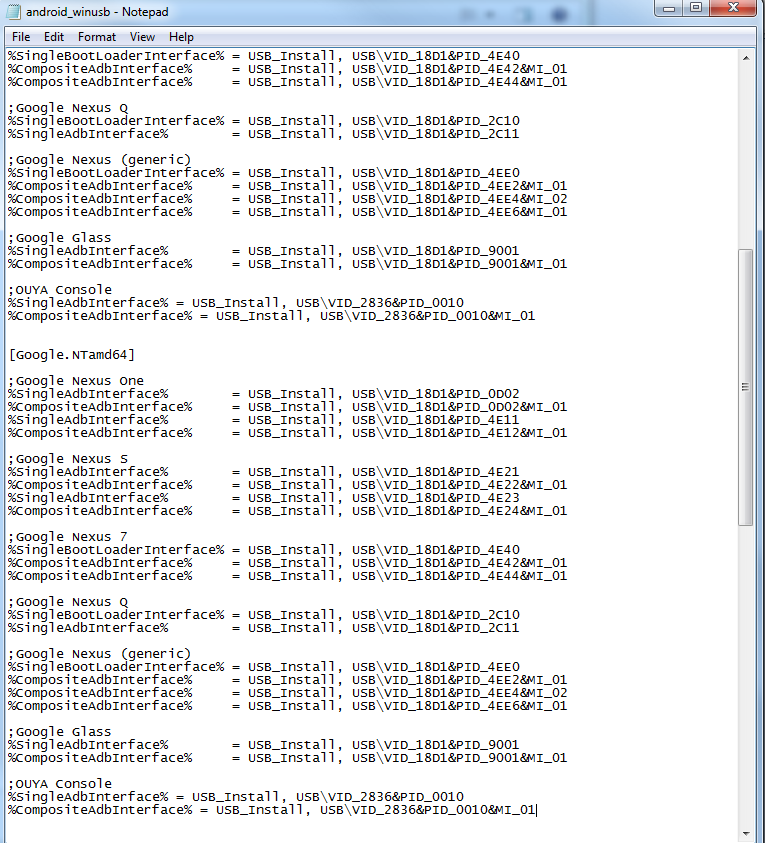
From the Notepad menu, go to File-> Save.
Close the file.
Open the Control Panel. Open the System menu. Go to Device Manager.

Find the device labeled “OUYA”.
Right-click on it.
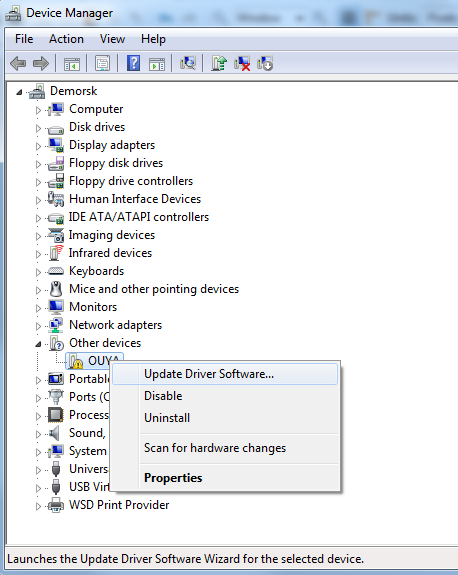
Click on “Update Driver Software…”
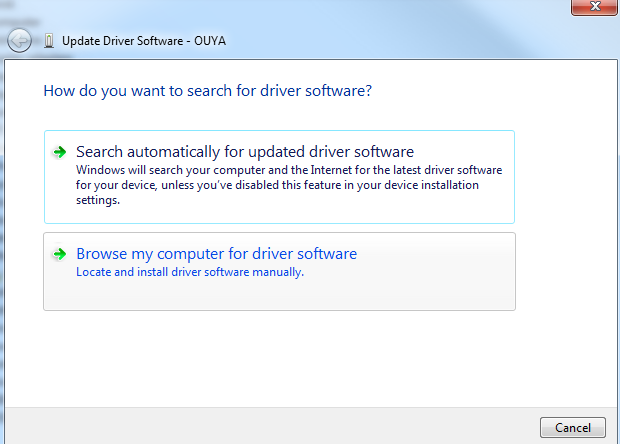
Click on “Browse my computer for driver software.”
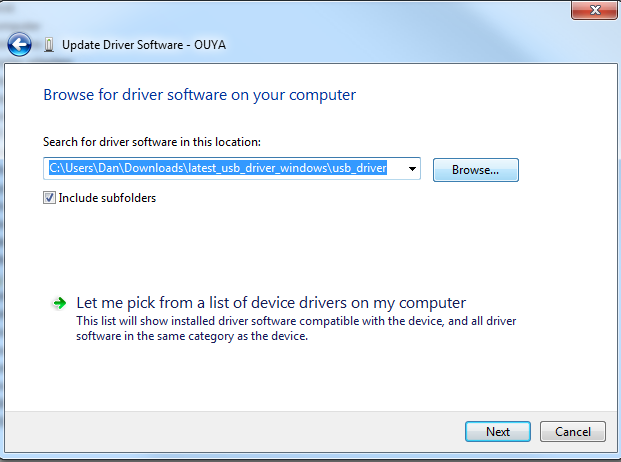
Click on “Browse…” and search for the USB drivers downloaded earlier. (In you have been following this guide exactly, they should be in a similarly named folder as the one in the picture. Just change for your username.)
Click “Next.”
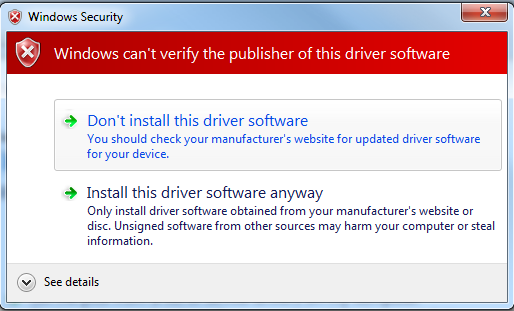
Windows will throw a security warning. Click on “Install this driver software anyway.”

If everything went okay, you should now be ready.
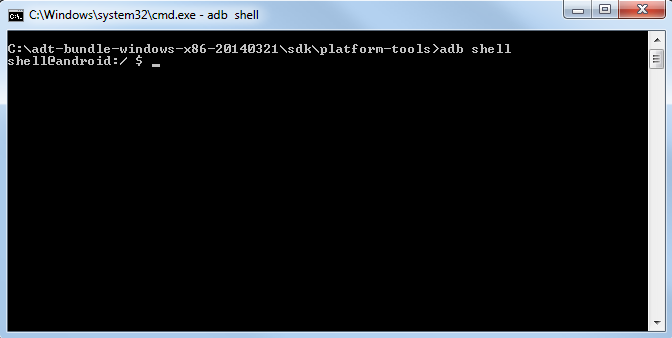
Open a Command window. (From the Start or Run menu, type in “cmd” and press enter.)
From this window, navigate to the installation folder of the ADT bundle.
cd C:\adt*2014*\sdk\platform-tools

Once there, type the following:
adb devices
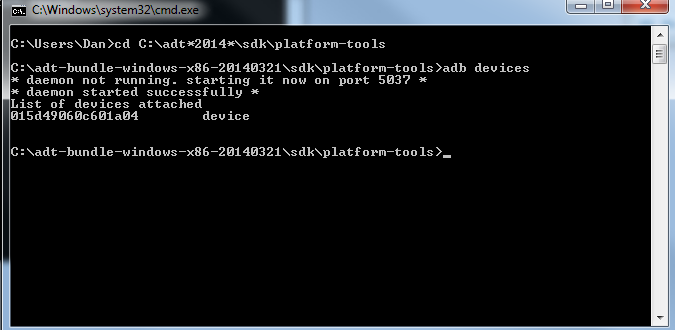
If you see something like the above, with the Android Debug Bridge (ADB) starting up and listing one connected device (Ouya), you are now ready to move to the next step, installing the Launcher. (Skip over the network connection section.)
Instructions for connecting via network (the easy way)
Assuming your Ouya has either wired or wireless network connectivity, you can enable remote access and use the Android Debug Bridge (ADB) tools to connect to it.
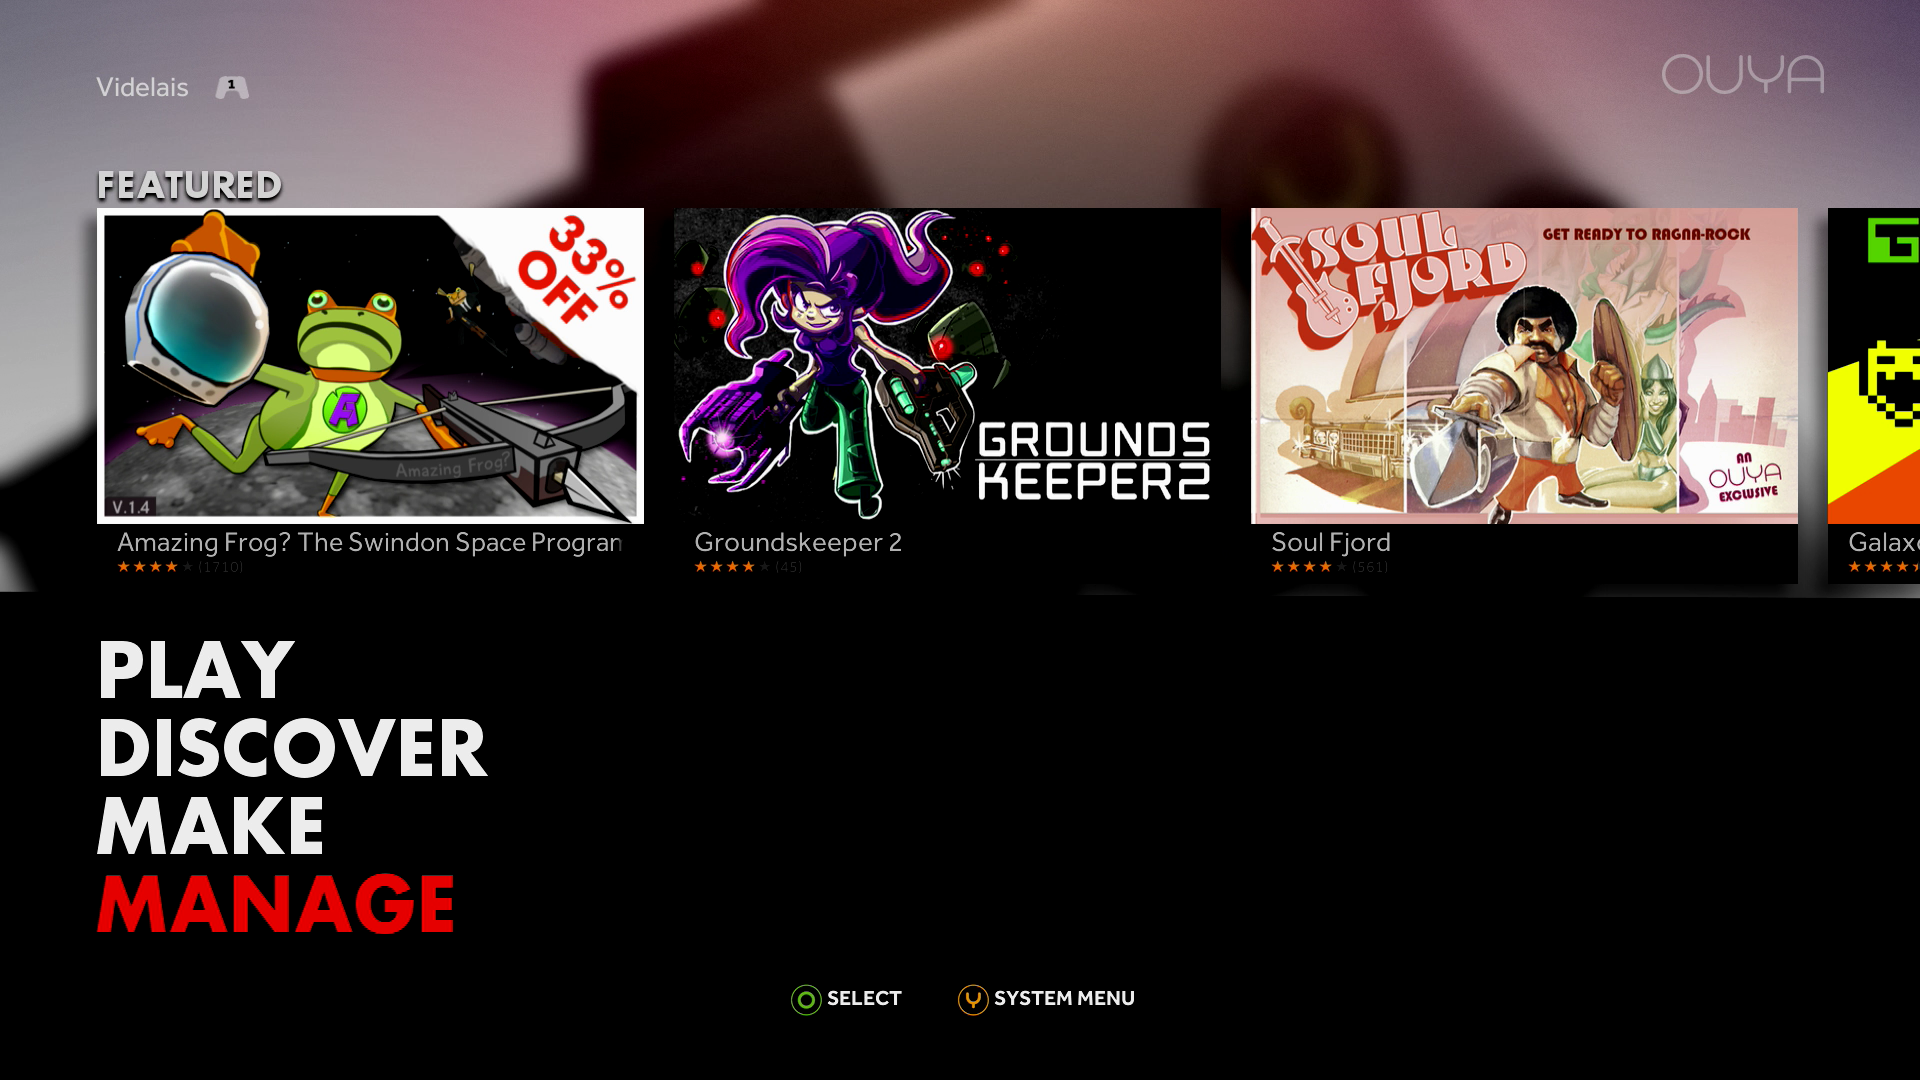
From the main menu, navigate to and select “Manage.”
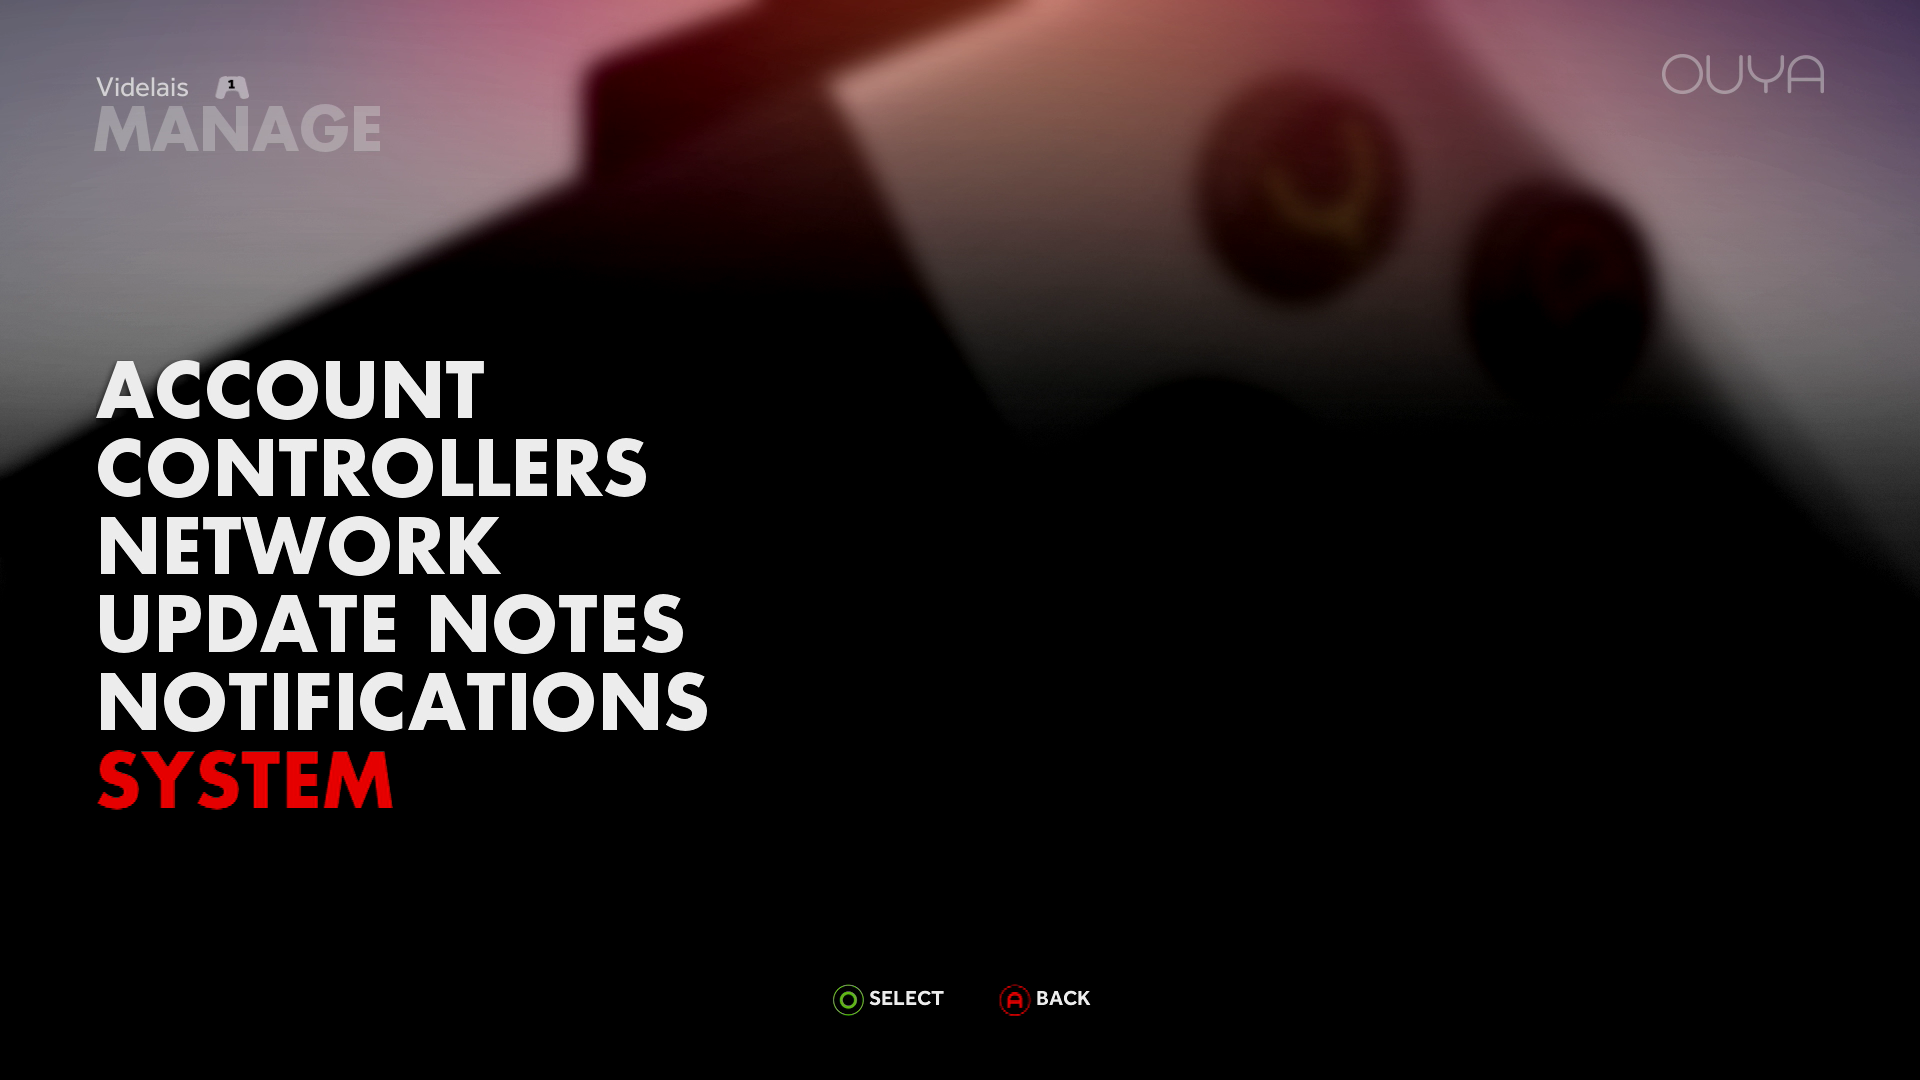
Navigate to and select “System.”
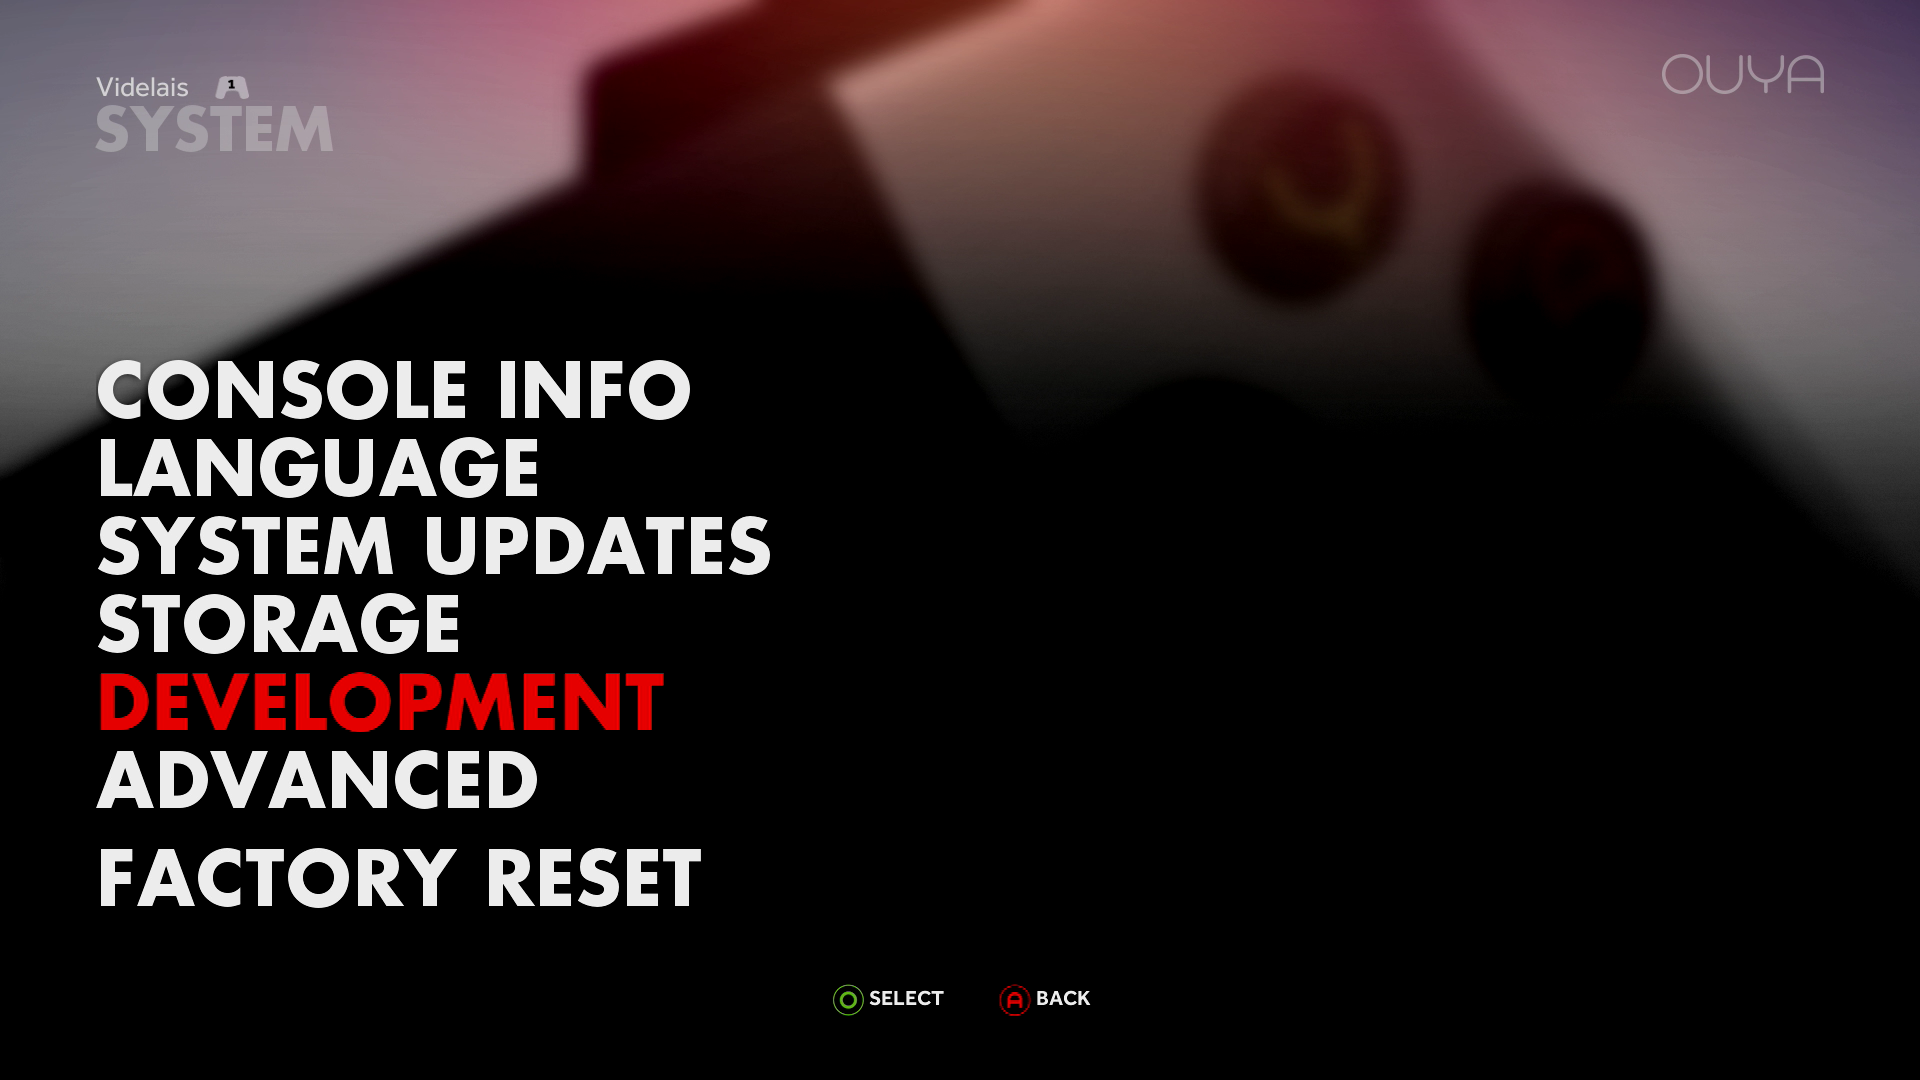
Navigate to and select “Development.”

Navigate to and select “ADB OVER NETWORK: OFF.”
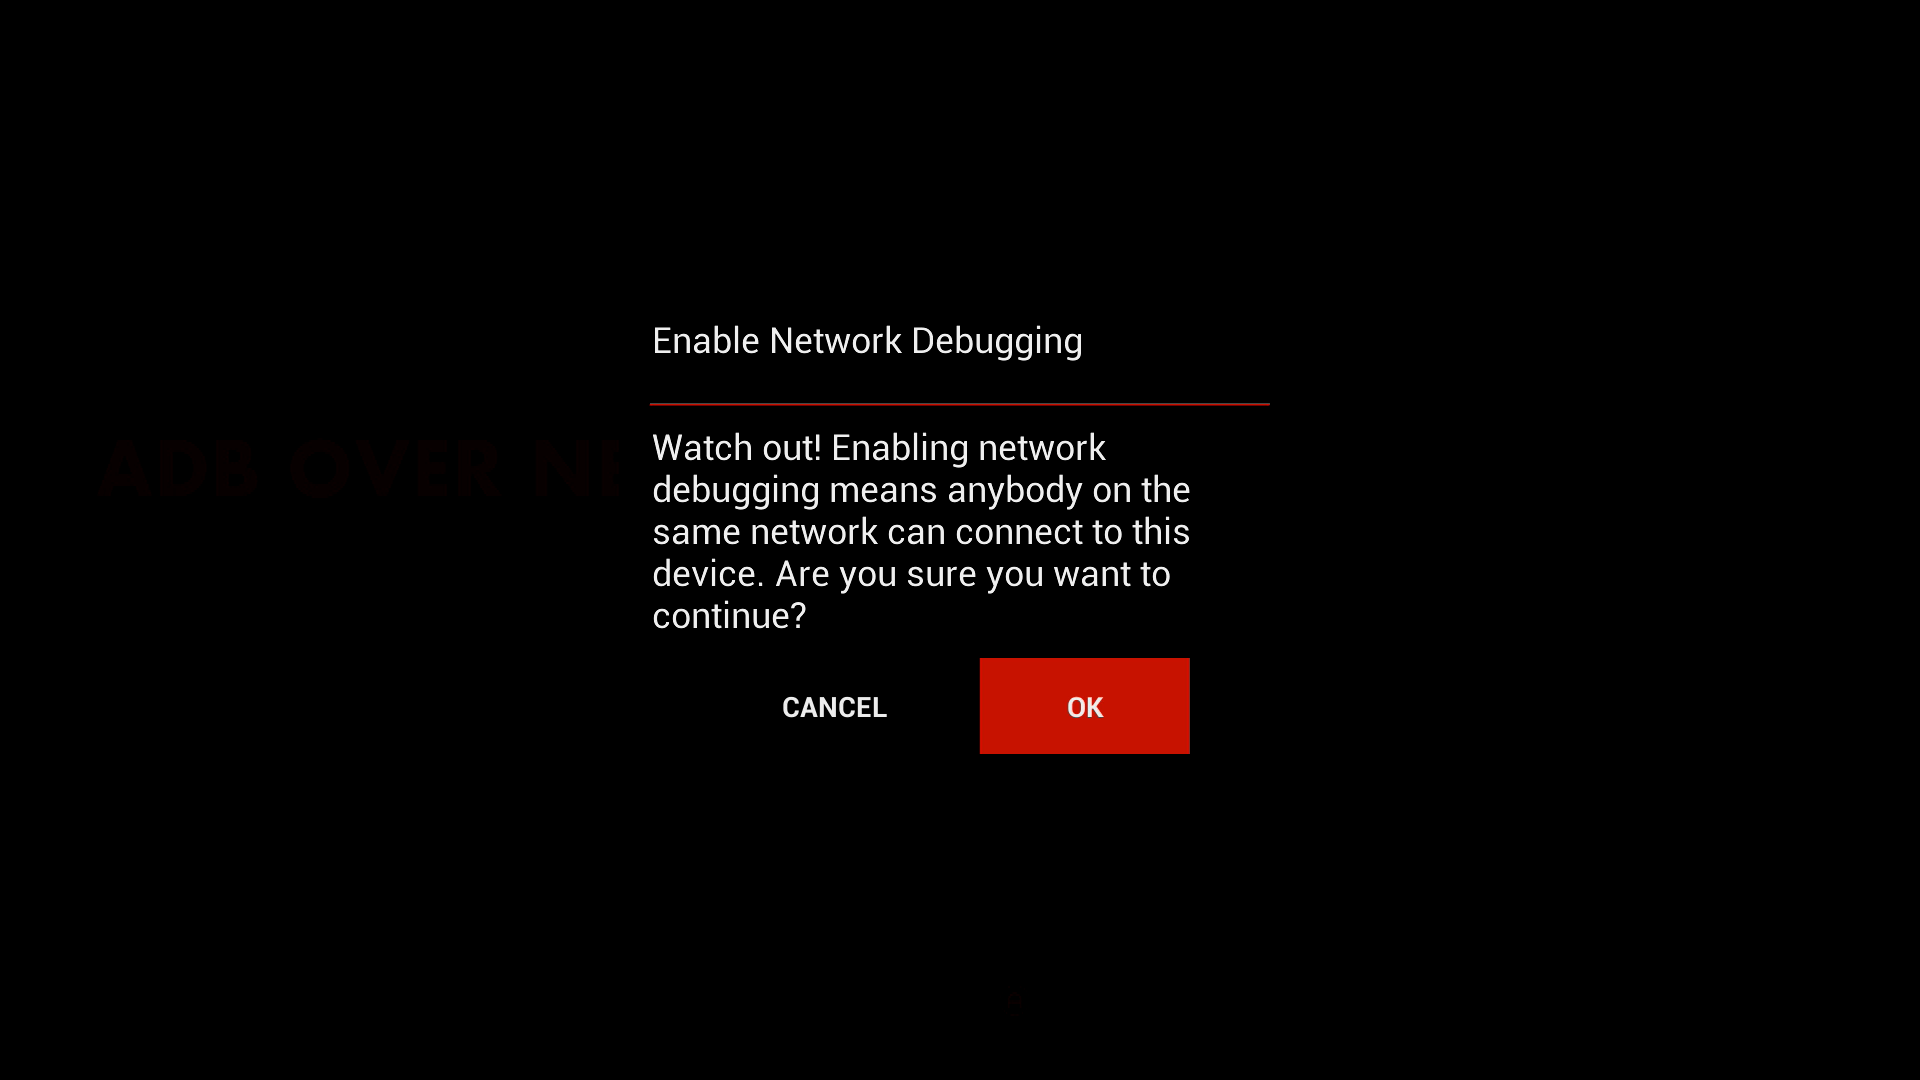
When asked about enabling network debugging, navigate to and select “OK.”
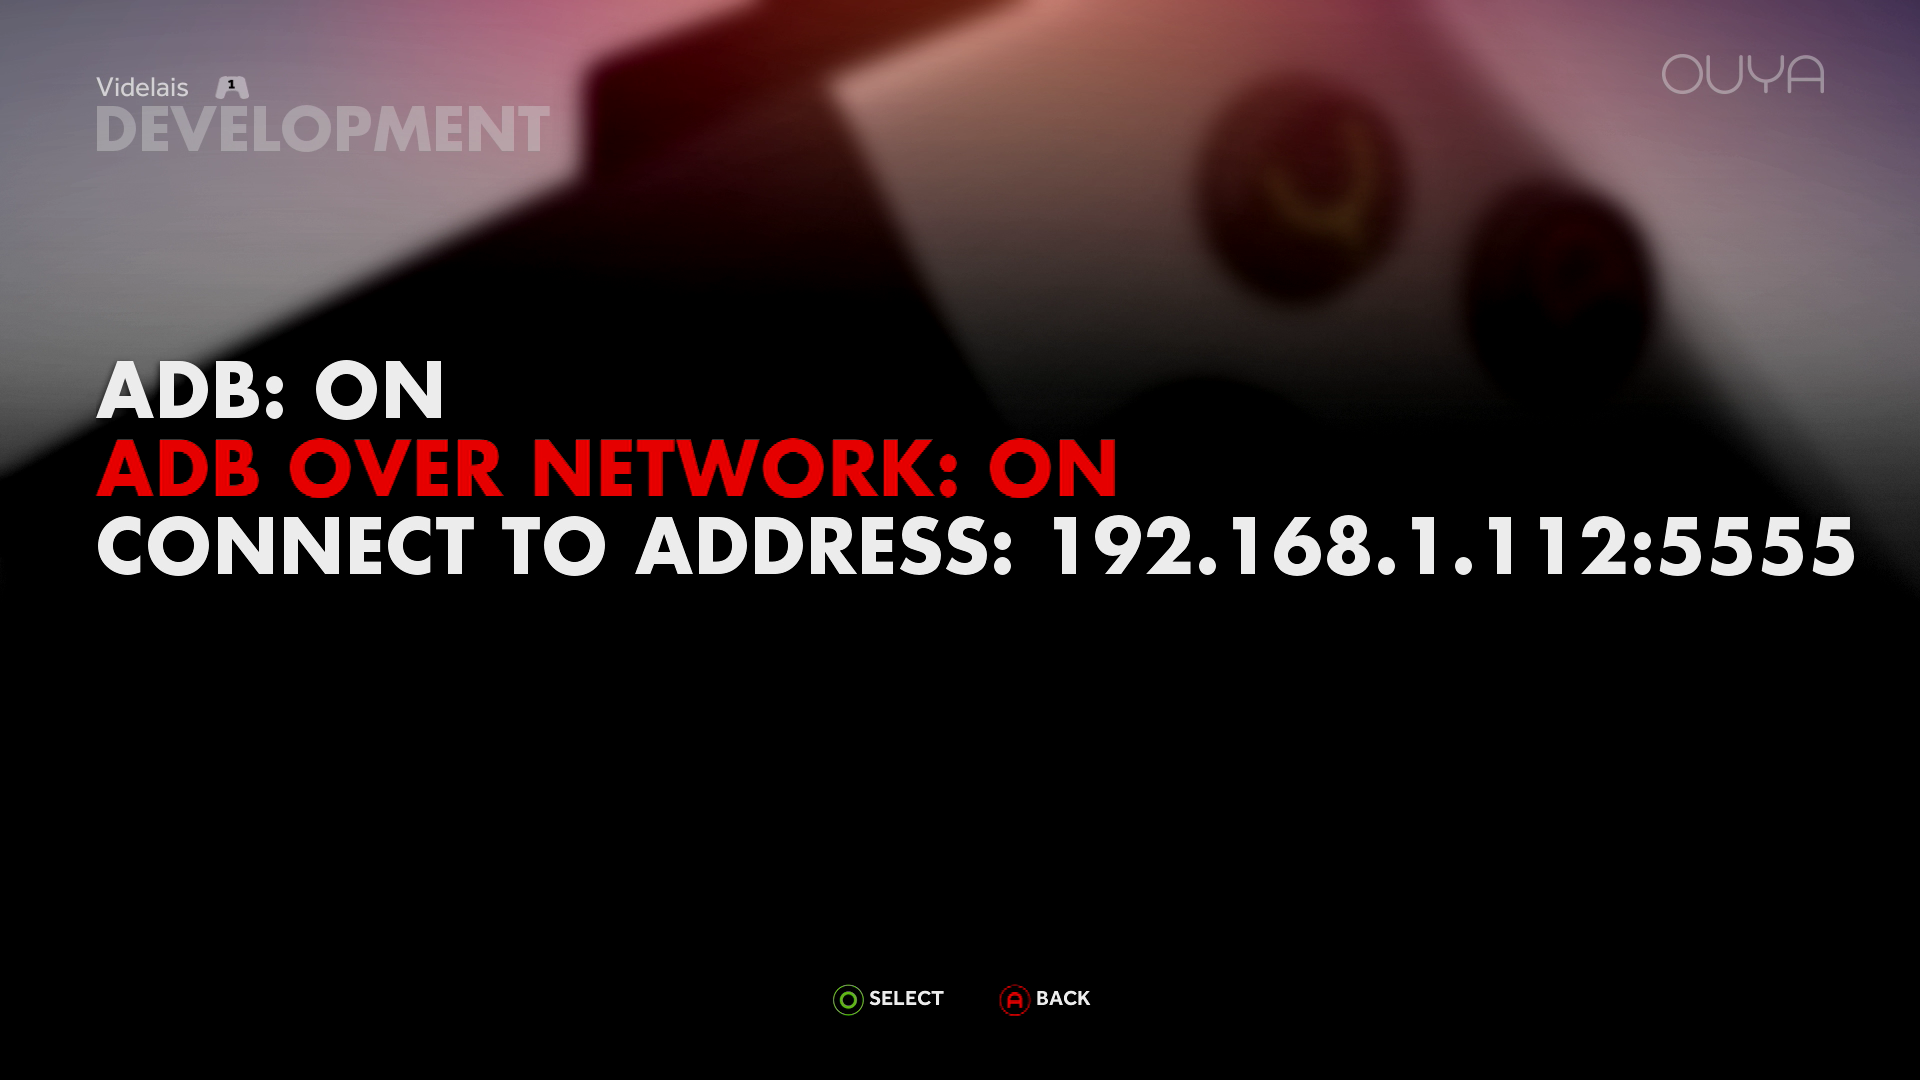
Once enabled, ADB on the Ouya will list the IP address and port number to connect to for debugging.
Open a Command window. (From the Start or Run menu, type in “cmd” and press enter.)
From this window, navigate to the installation folder of the ADT bundle.
cd C:\adt*2014*\sdk\platform-tools
Once there, type the following:
adb connect 192.168.1.112
(Note: If the IP address displayed on your Ouya is different than mine, use that instead.)

Installing the CocoonJS Compile Launcher
Now that you have a connection to the Ouya, it is time to extract and then load the Compile Launcher.
Open the folder containing the Compile Launcher. (In you have been following this guide, it should be “C:\adt-bundle-windows-x86-20140321\sdk\platform-tools”.)
 Double-click on the file to open it.

Click on “Extract all files.”
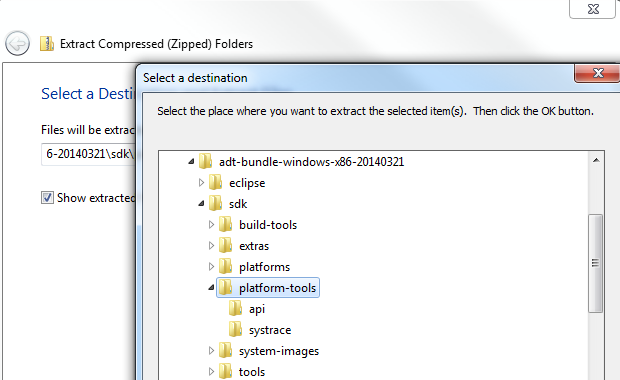
Instead of accepting the default location, click on “Browse.” Find the “platform-tools” folder under “sdk” under “adt-bundle-windows-x86-20140321.”
Click “Extract.”
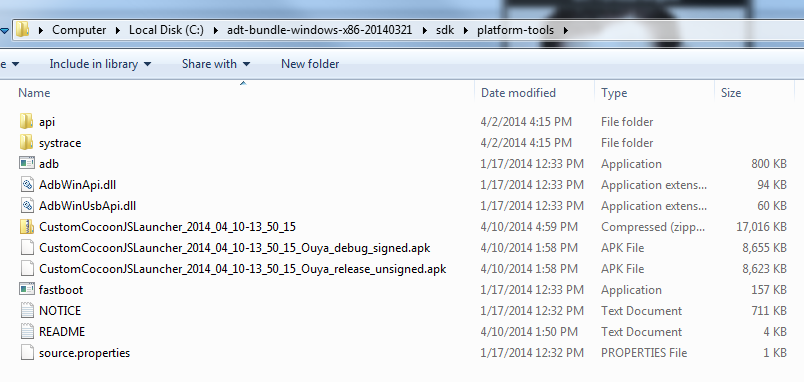
The contents of the folder should look like the above image, with two APK files in the same location as the “adb.exe” tool.
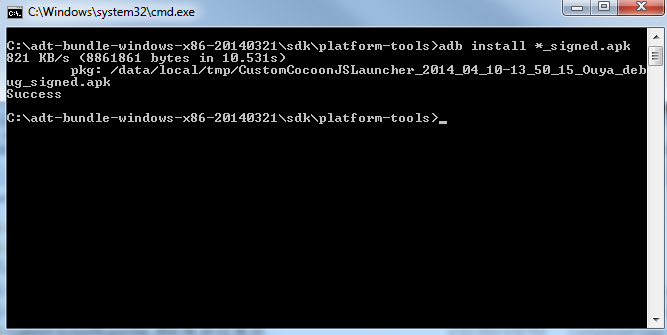
Back at the command window, run the following:
adb install *_signed.apk
This will install the signed version of the compile launcher on the Ouya system.
If the last line read “Success,” you are now ready to start testing code.
Running the Compile Launcher
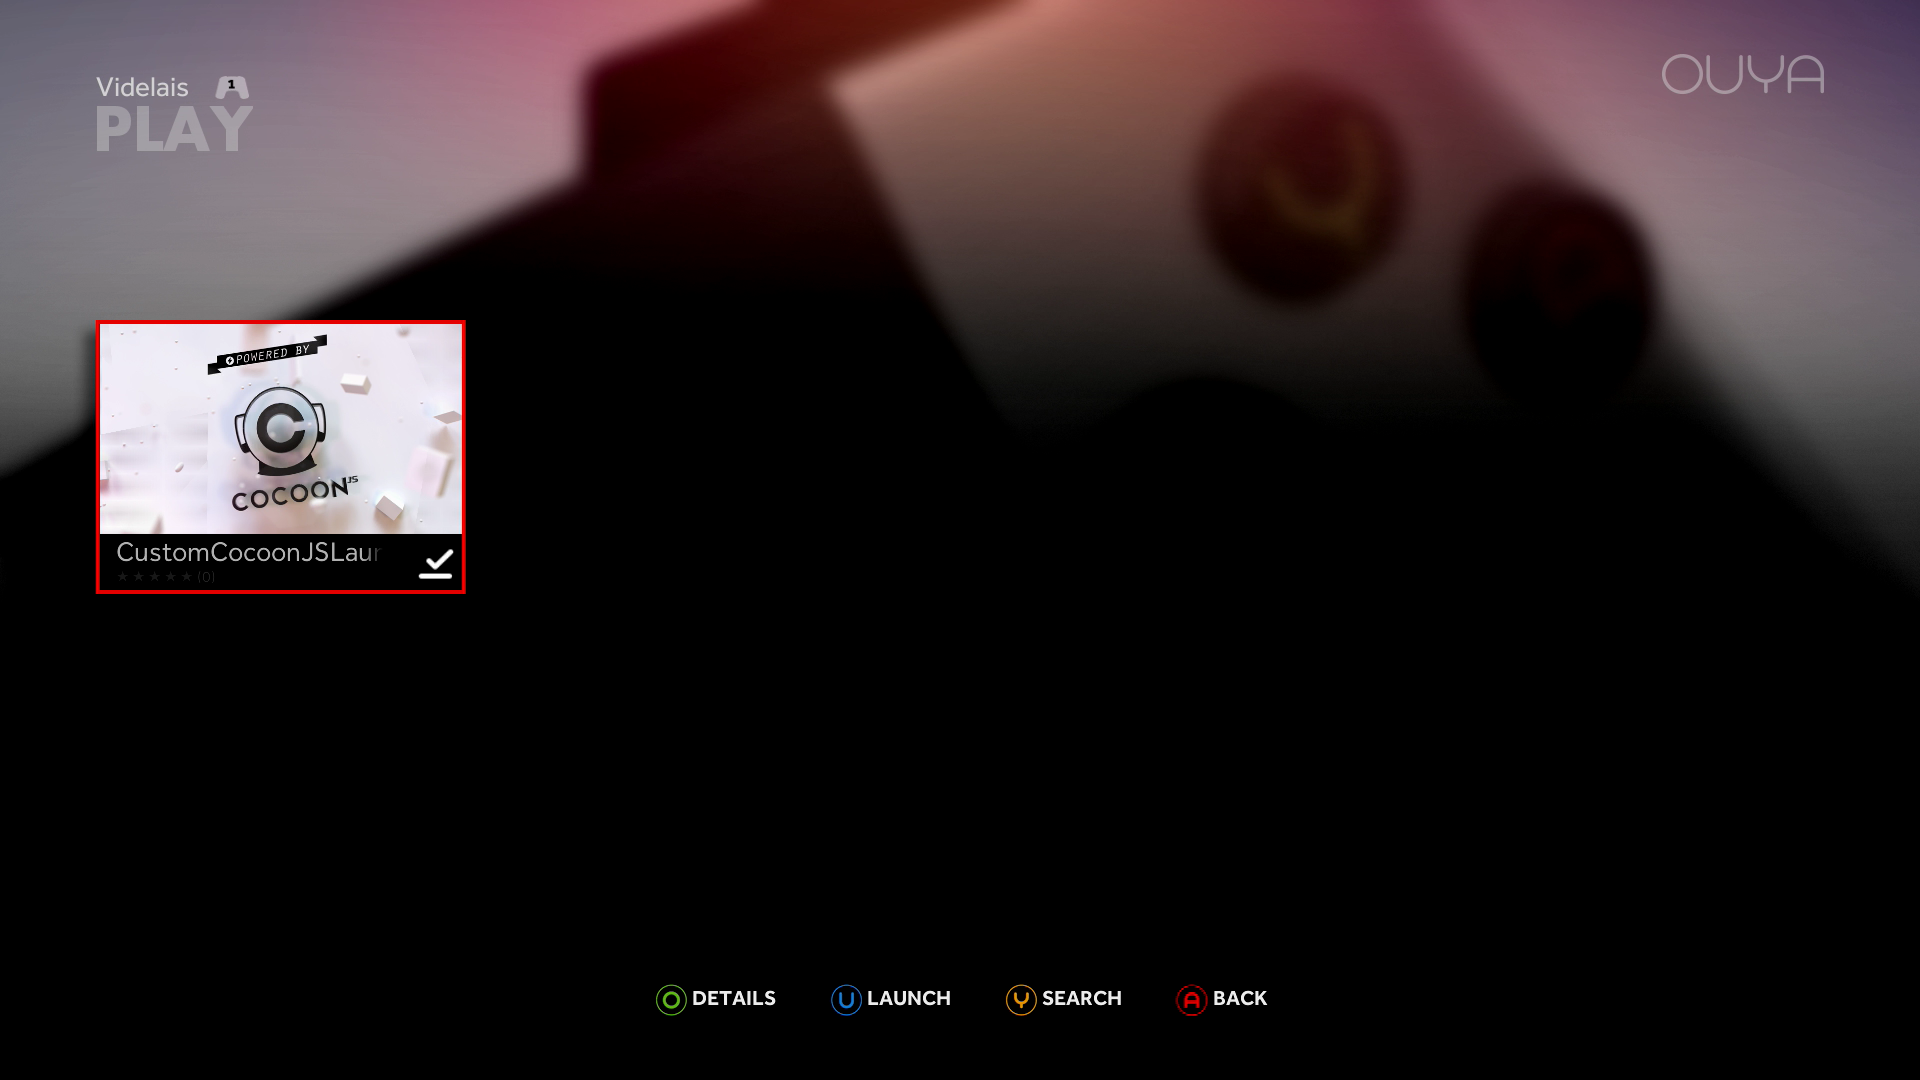
If the Compile Launcher is installed on the Ouya system, it will be under the “Play” menu.
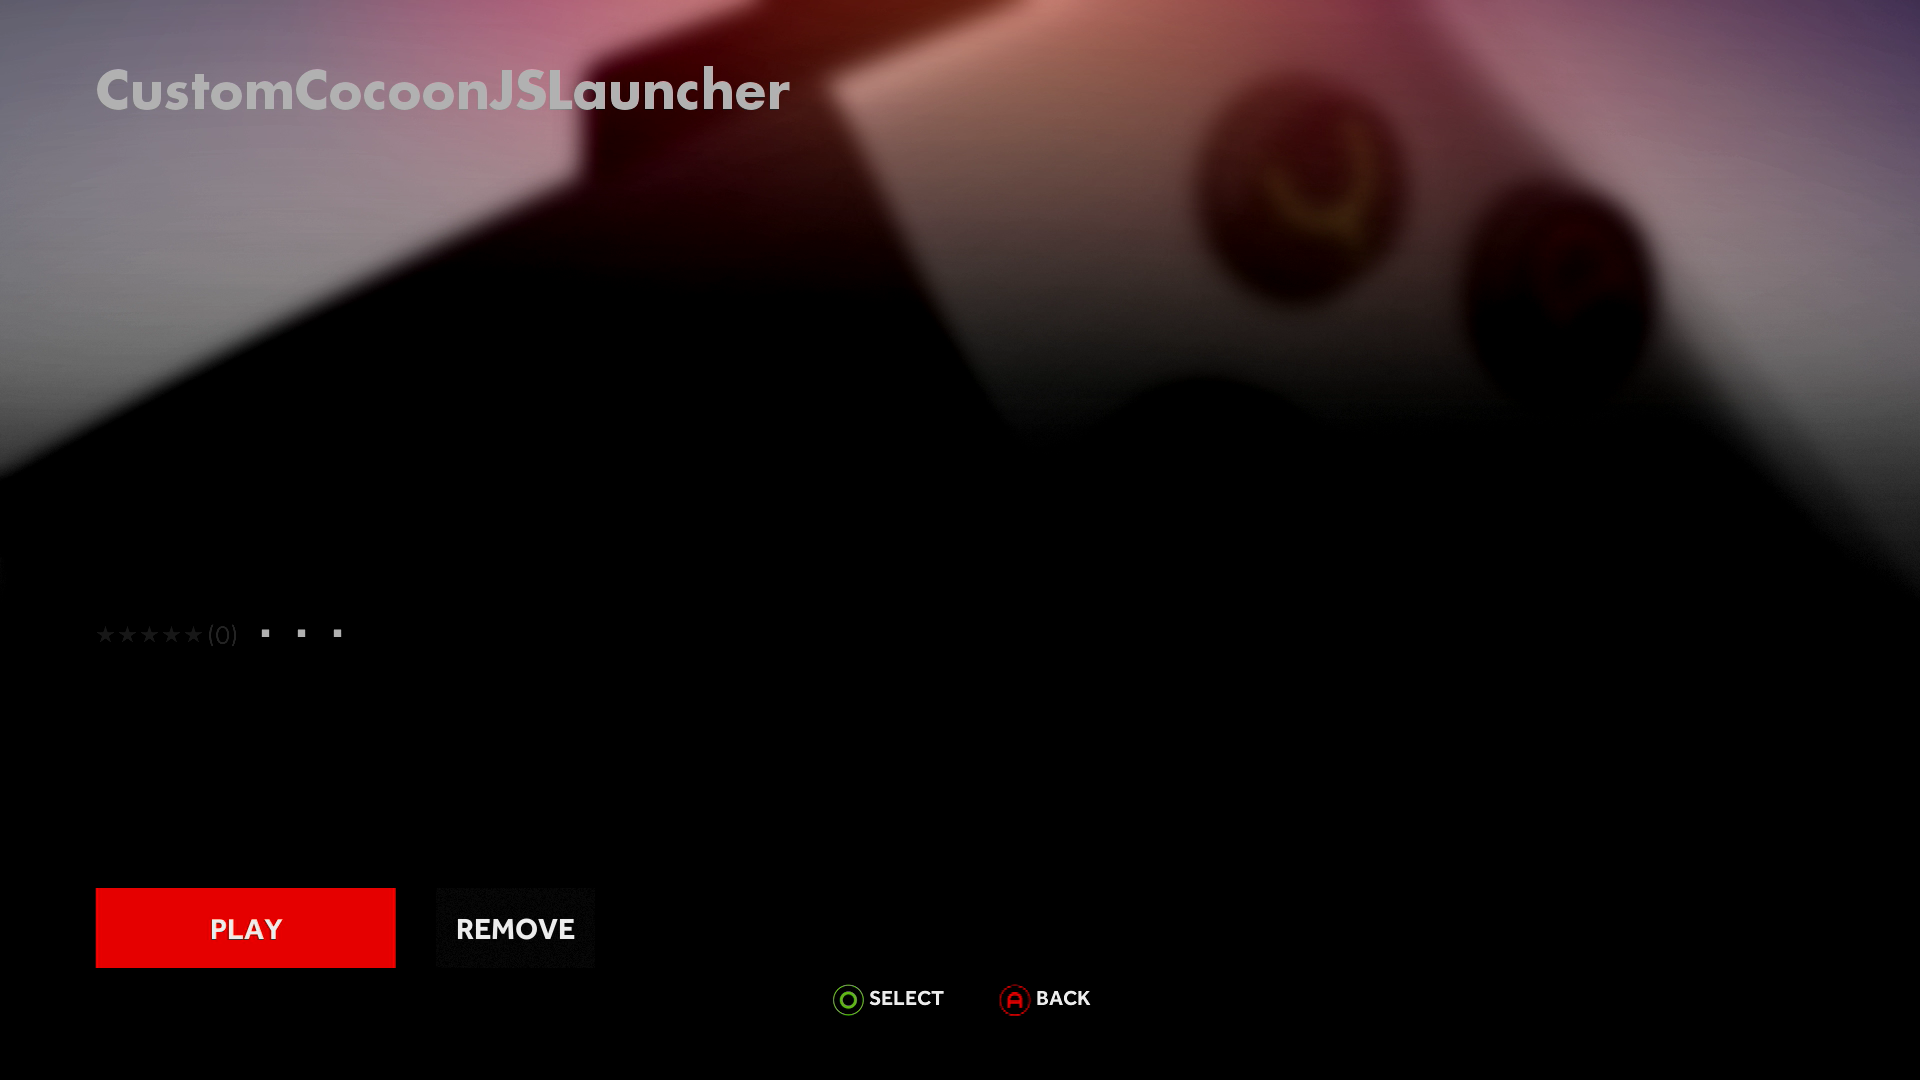
Pressing ‘O’ on the controller will bring up its details. (As the previous screen stated, pressing ‘U’ would have launched it directly.)
Press ‘O’ again to ‘play’ the launcher.
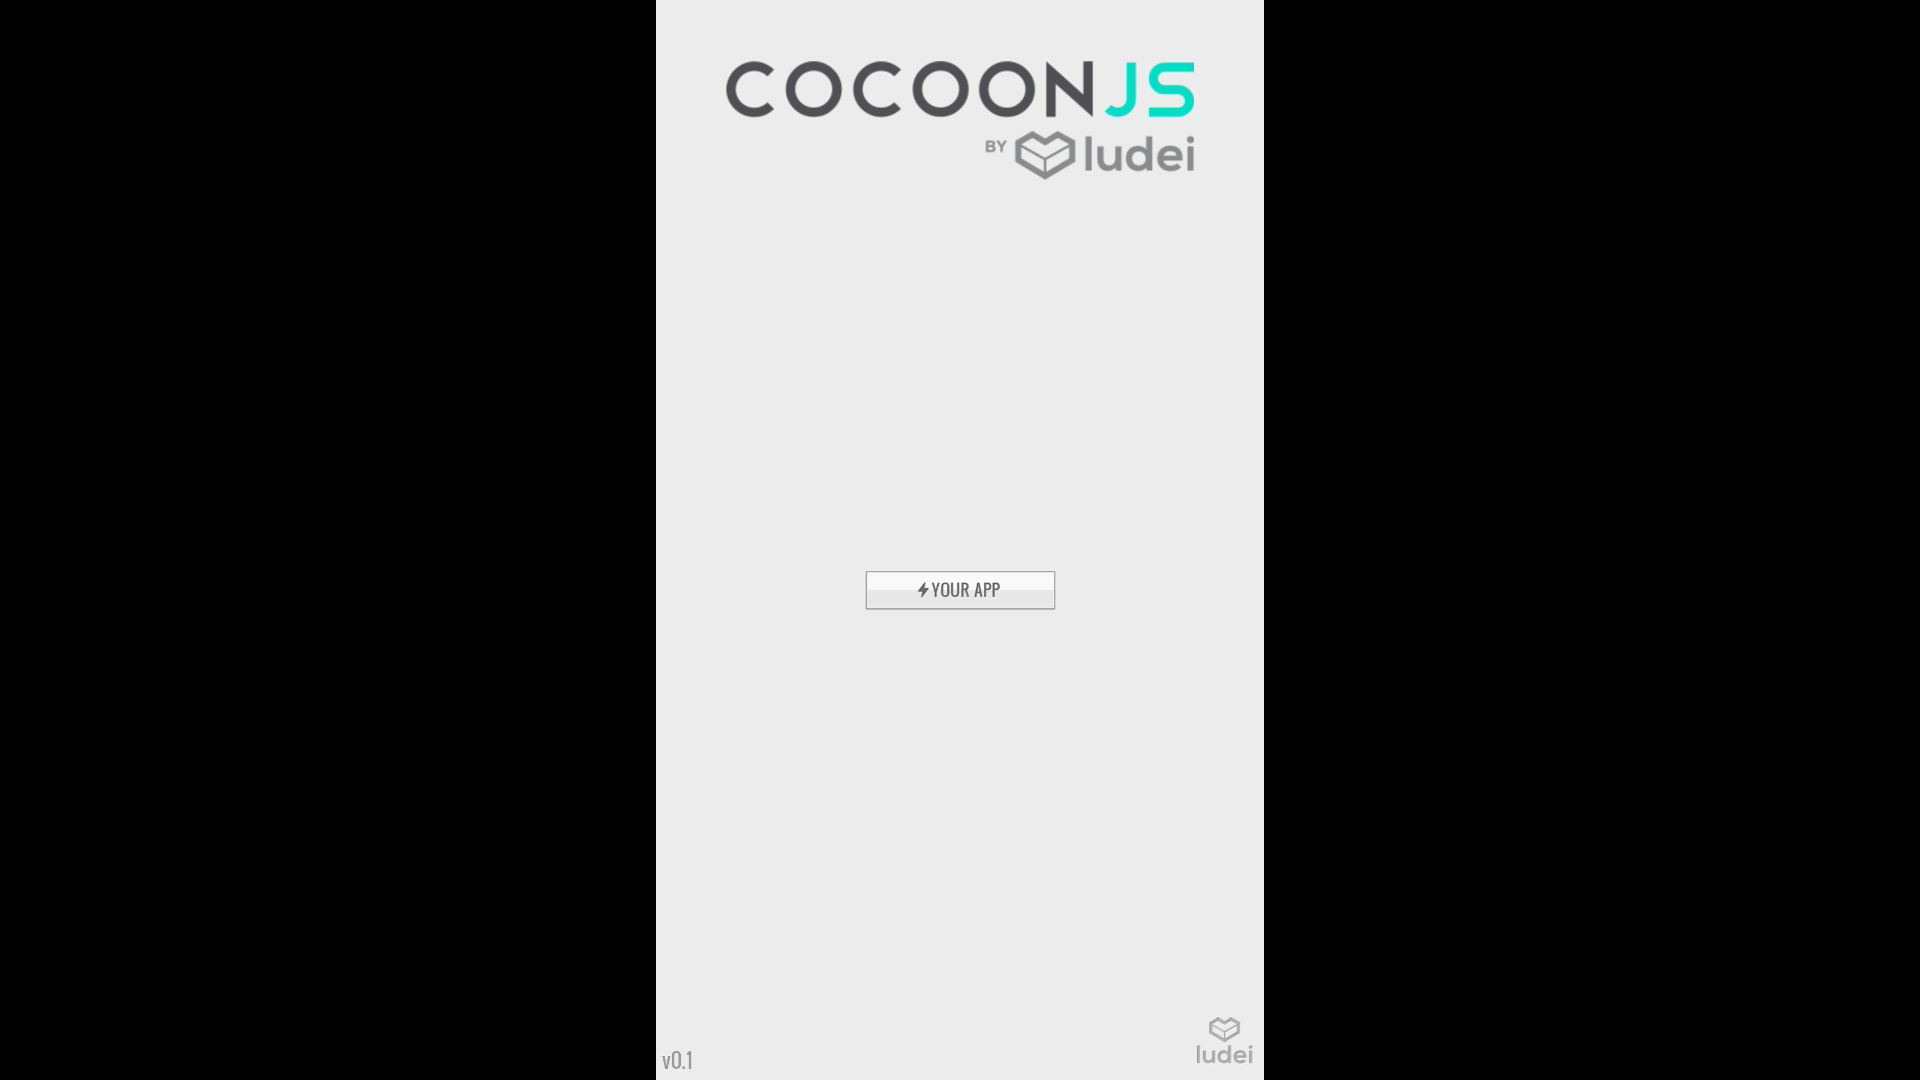
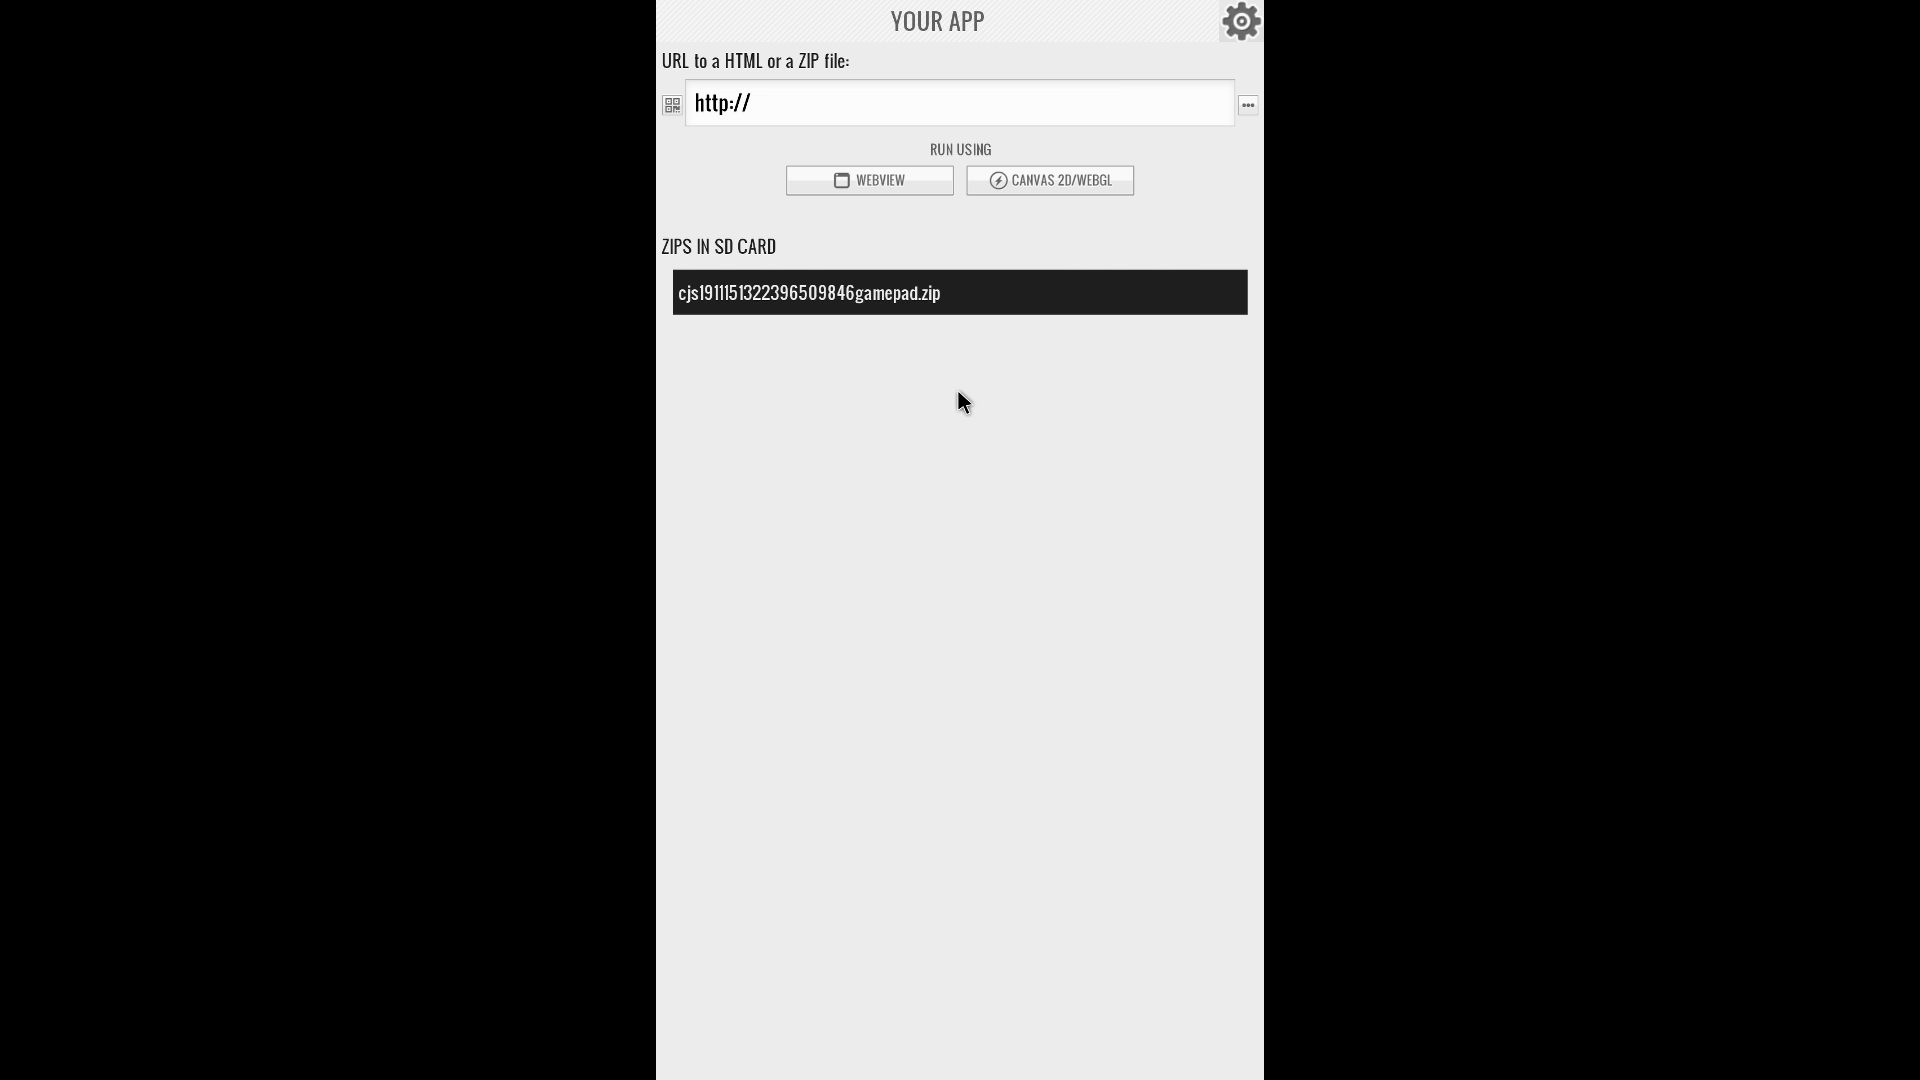
When run, you will need to use the cursor of the Ouya controller to navigate to and ‘click’ (tap) on the “YOUR APP” button in the middle of the screen.
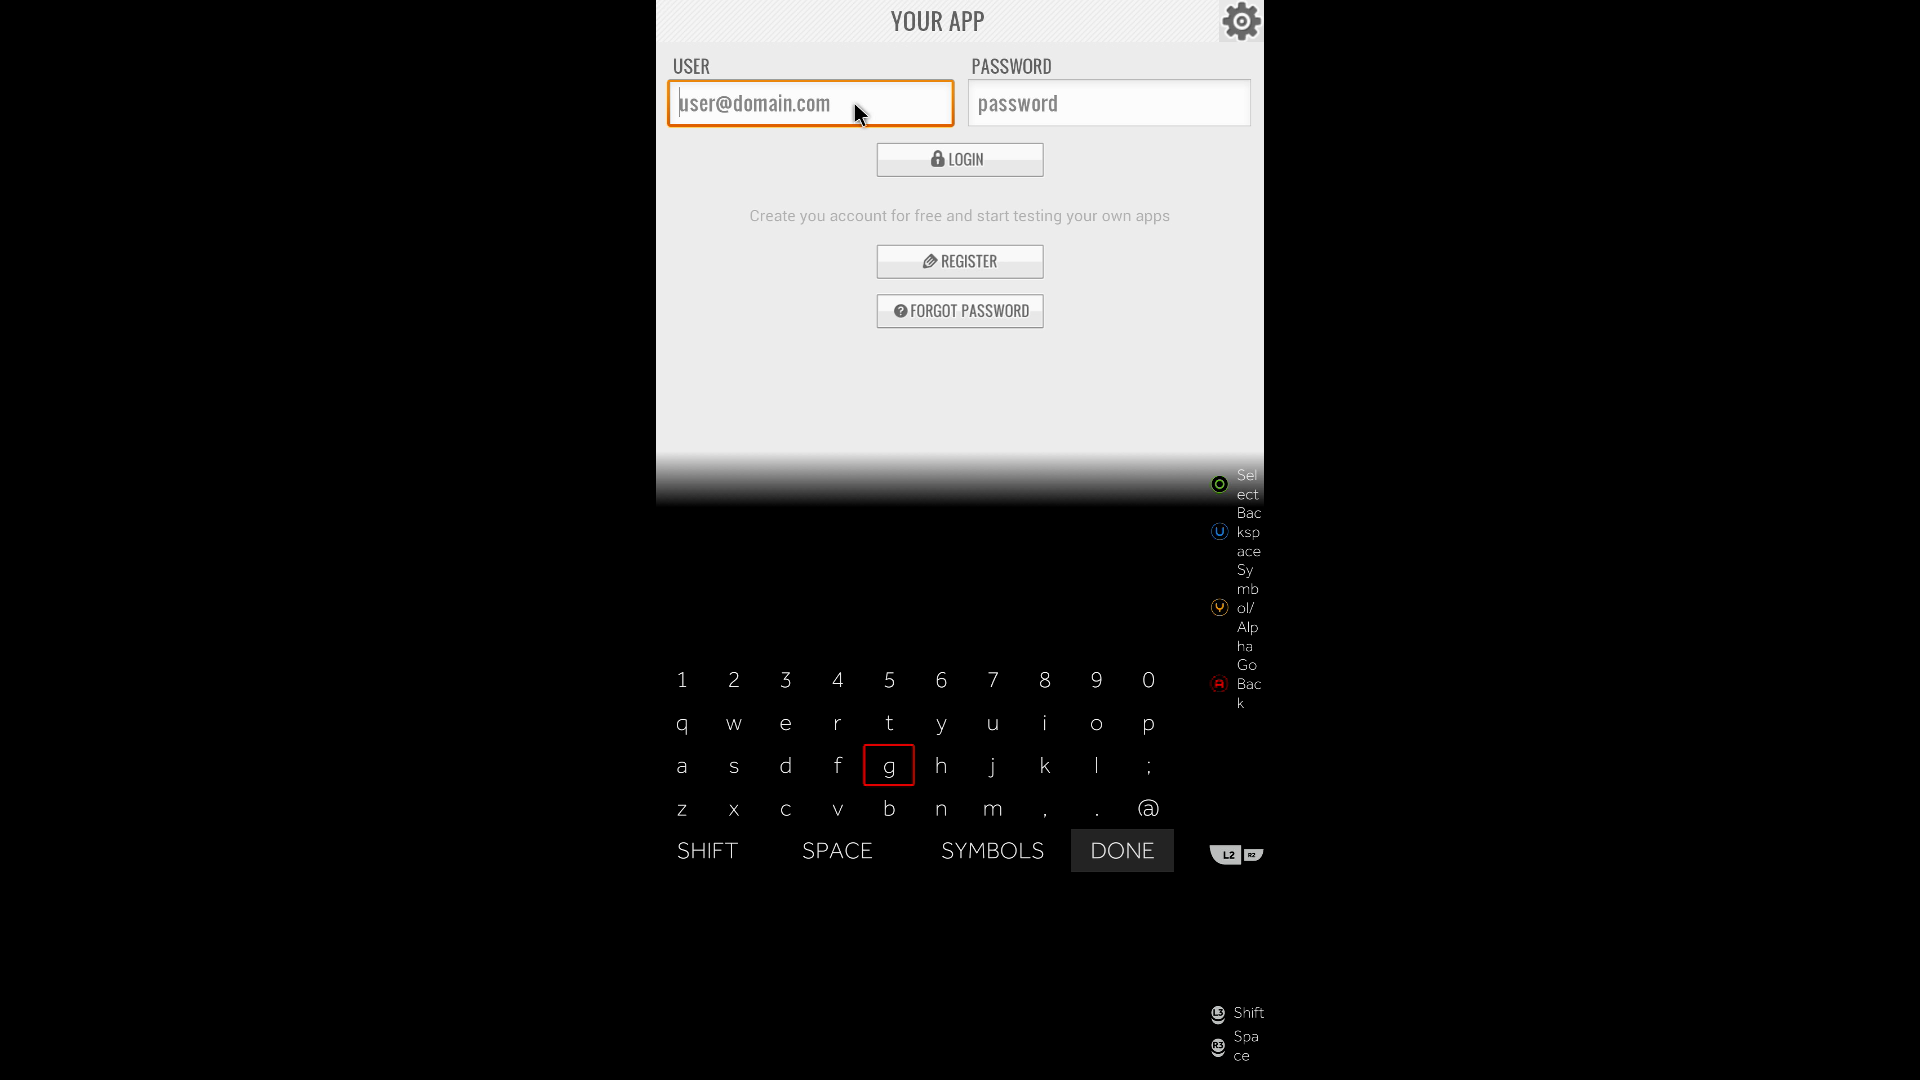
When run for the first time, it will ask for your login credentials. These are the same as your account name and password used to log into the Ludei site.
To enter information into these firms, use the cursor to ‘click’ (tap) on each in order. Once highlights, the Ouya on-screen keybaord will appear. You can use the d-pad on the controller to move between letters and select them with ‘O’.
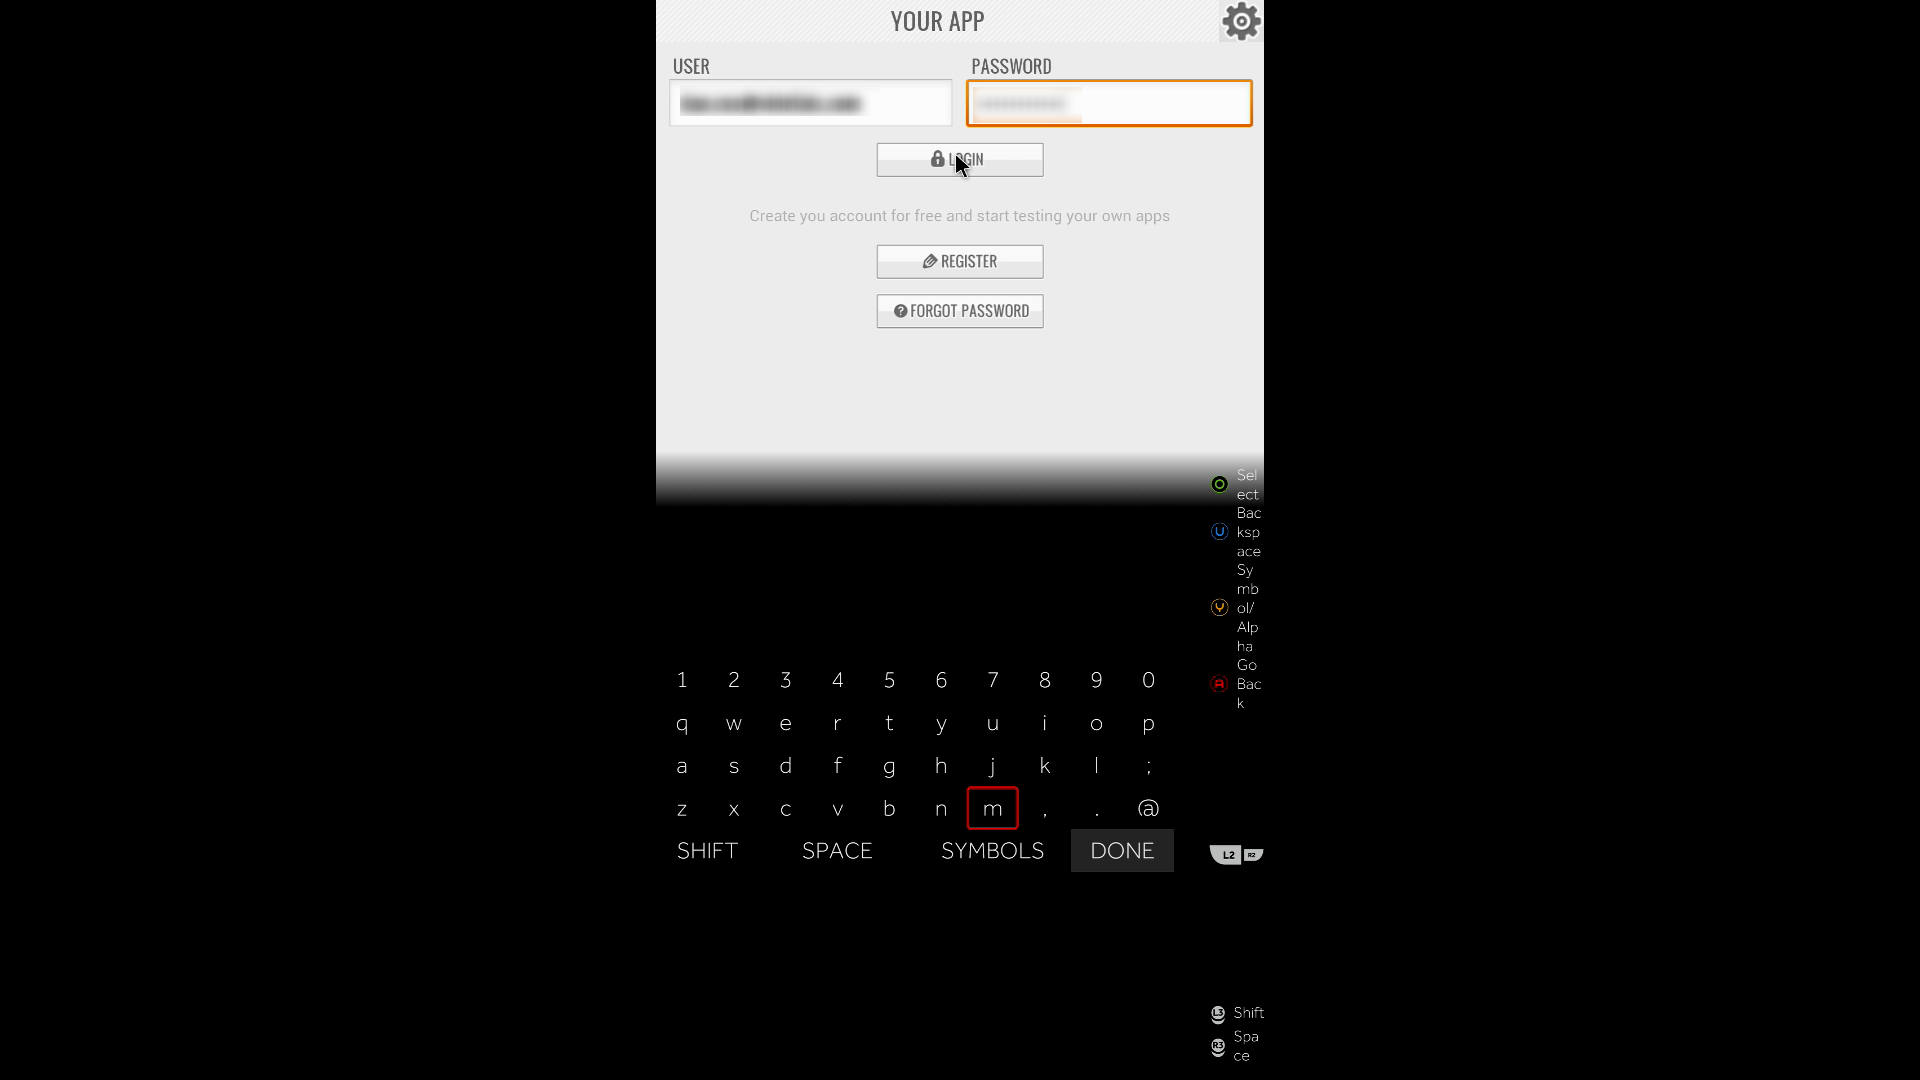
Once you have filled in both fields correctly, ‘click’ (tap) on the “LOGIN” button.
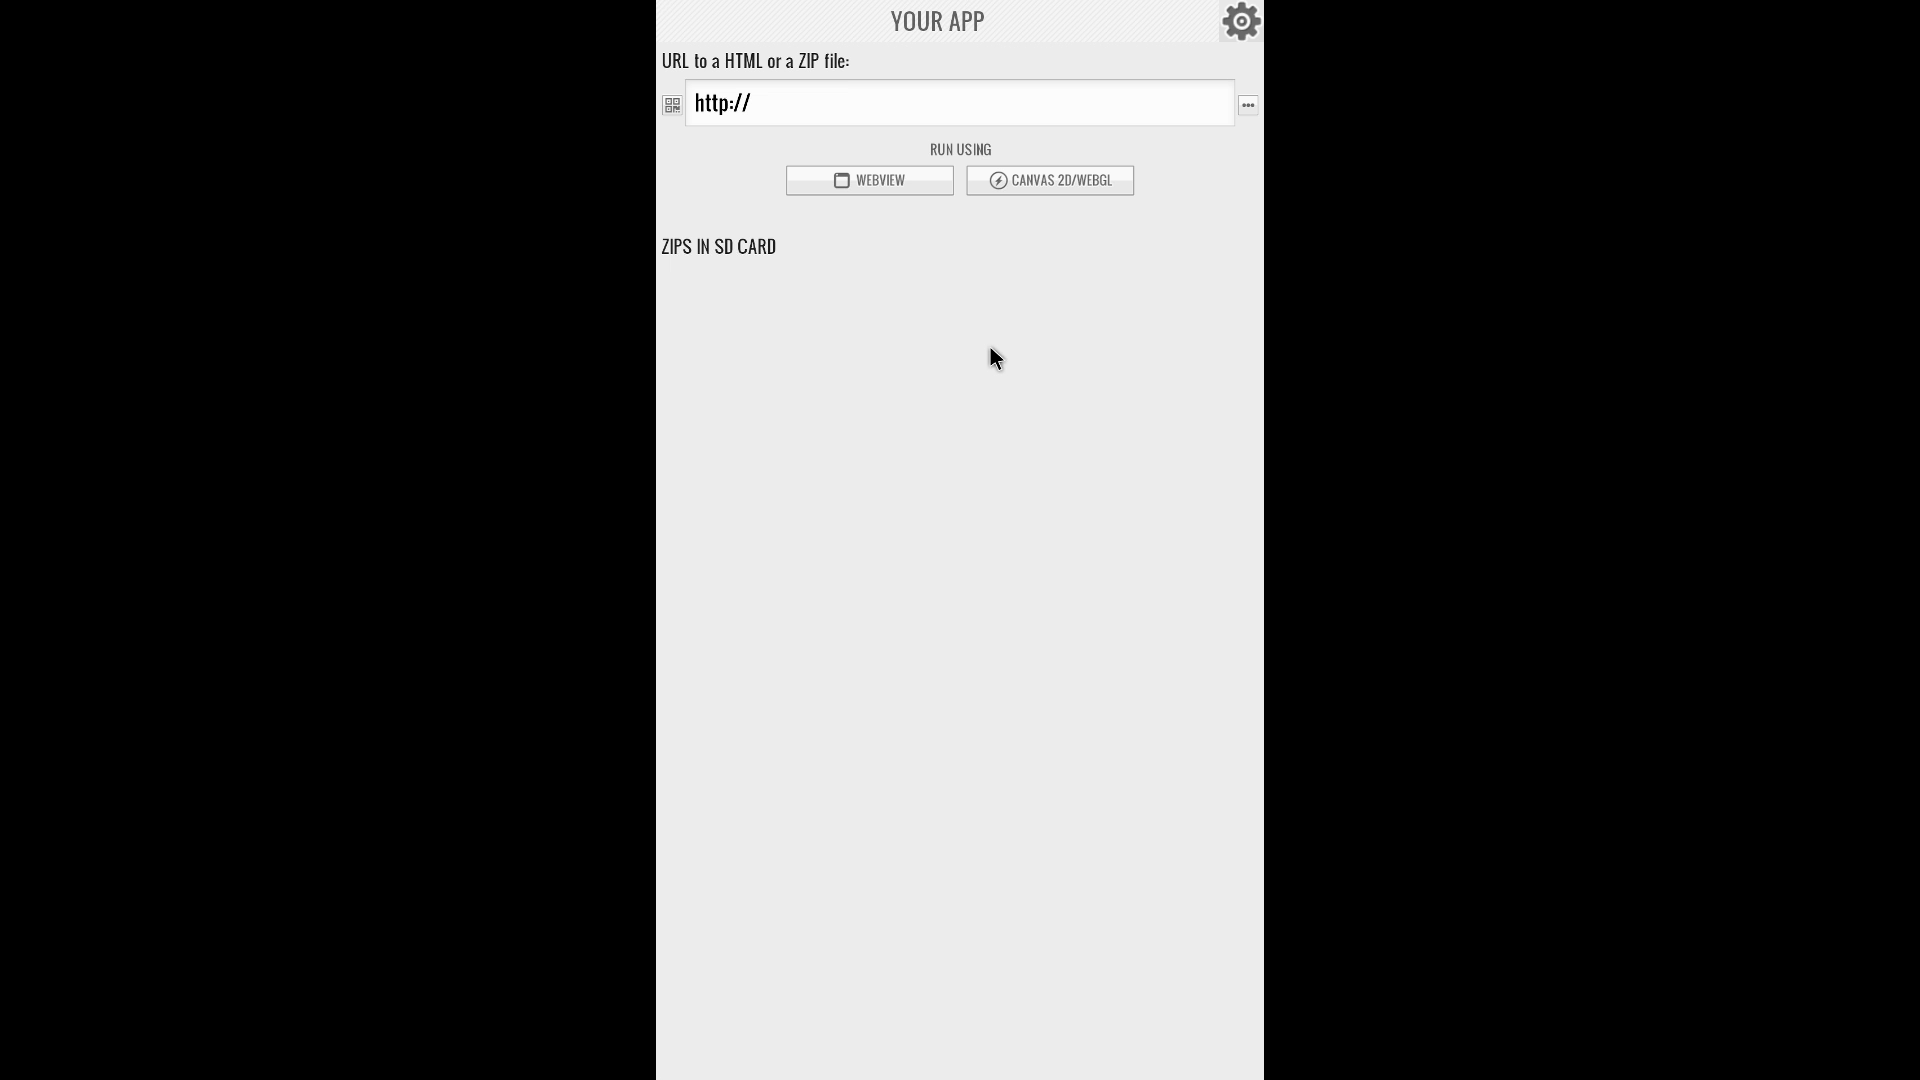
If you have logged in correctly and see the above screen, you are now ready to start ‘pushing’ files and testing them.
As the first test, navigate to the CocoonJS Demo List page.
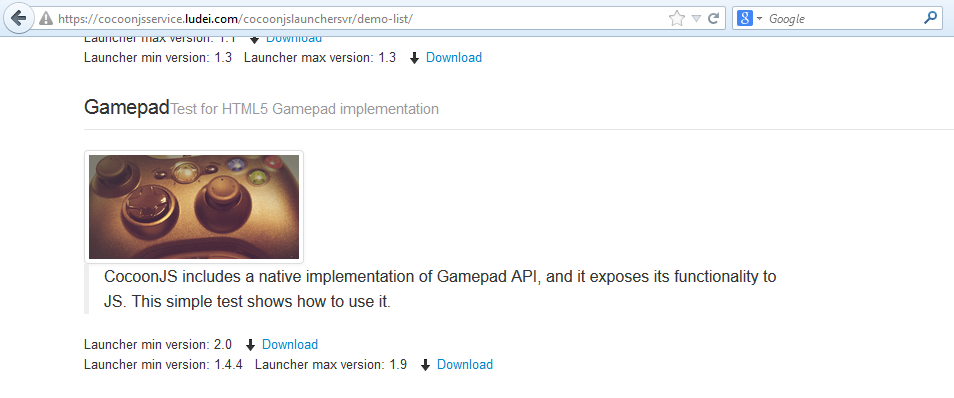
Scroll down the page until you see the “Gamepad” demo.
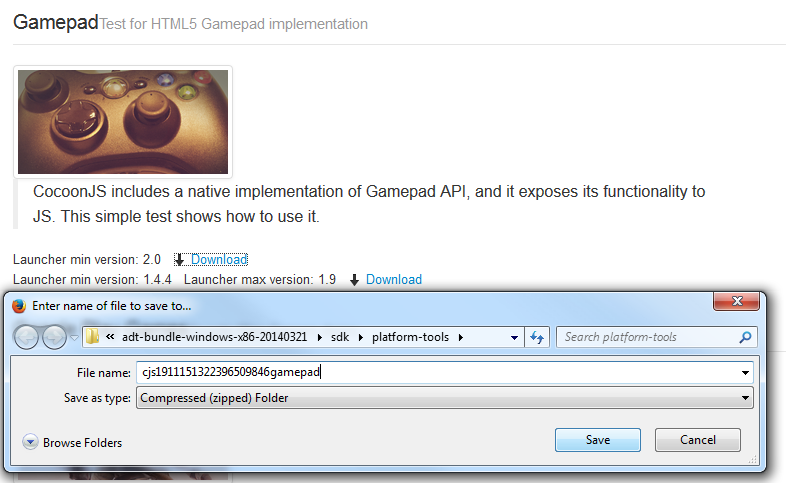
Right-click on the 2.0 version link, select “Save link as…”
Navigate to the “platform-tools” folder and save it there.
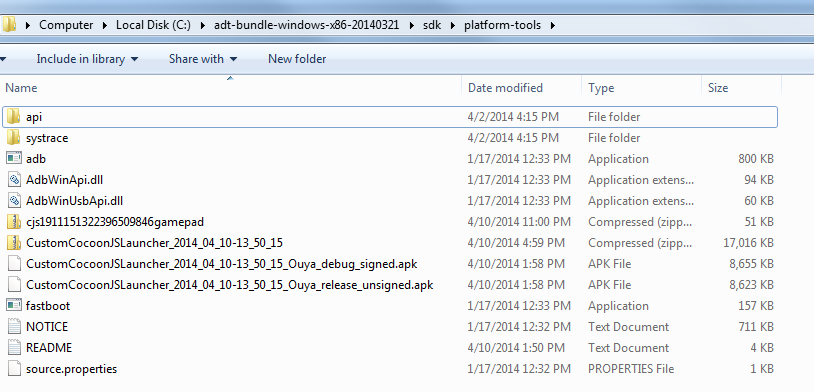
The contents of the folder should now include the gamepad demo. (Its filename will start with “cjs” and end with “gamepad.”)
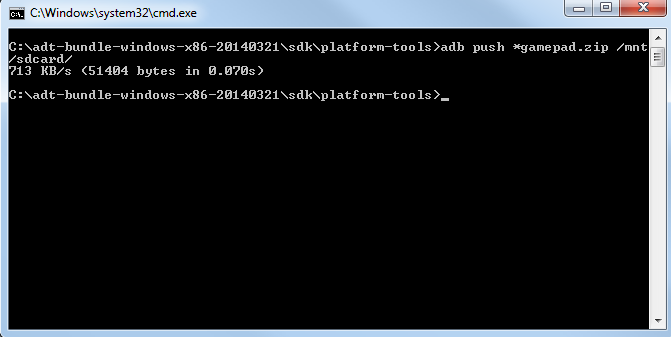
Back in the command window, run the following:
adb push *gamepad.zip /mnt/sdcard/
This will ‘push’ (move) the file to the Ouya system in its “/mnt/sdcard/” directory. (This is the directory the Launcher looks for files.)
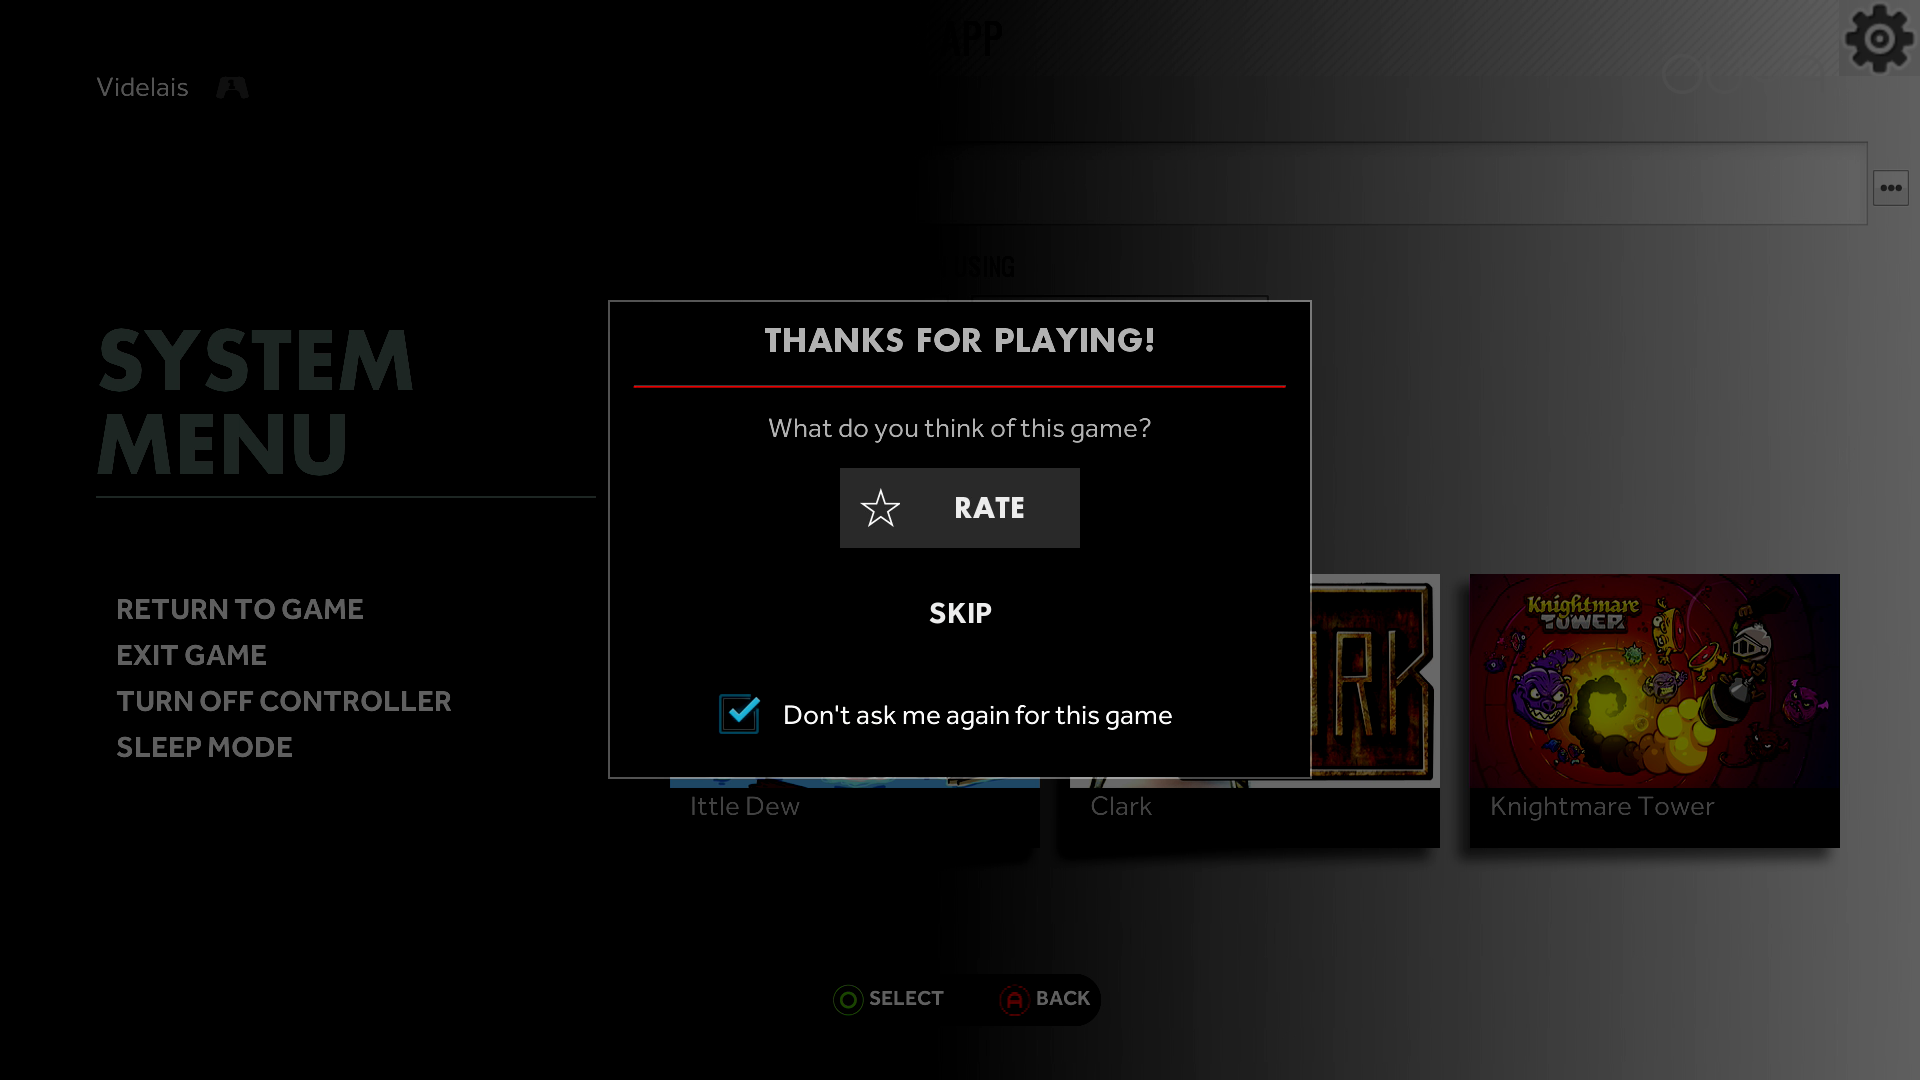
Double-tapping the Ouya button on the controller will bring up the System Menu on the Ouya. (The ‘Ouya’ button is the center button on the controller. Pressing it twice in quick succession opens the System Menu from any running game.)
The first time this is done, you will see the “THANKS FOR PLAYING!” message. I suggest you navigate down to the “Don’t ask me again for this game” and select it. Then, choose “SKIP.”
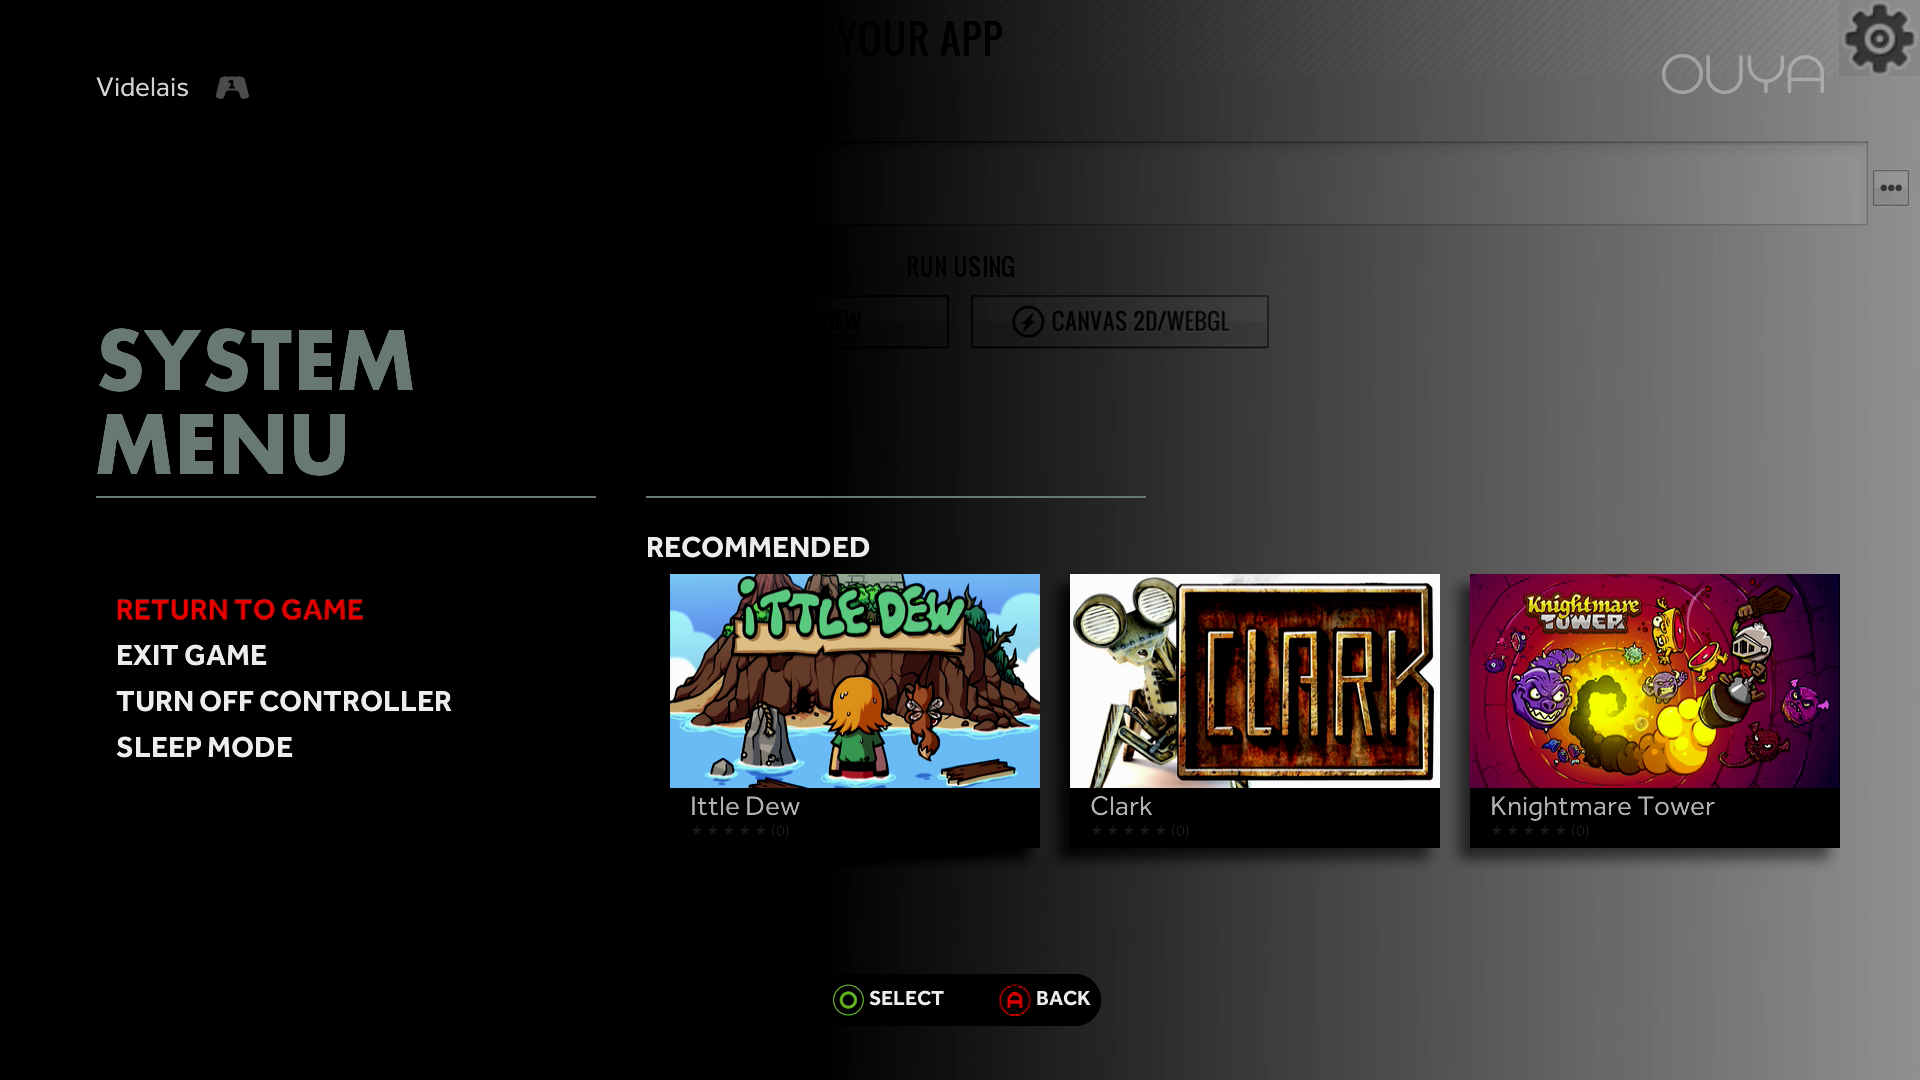
Navigate to and select “RETURN TO GAME.” (Alternatively, pressing the Ouya button once will close the System Menu.)

Once the System Menu is closed, you should now see a refreshed listing of the ZIP files found in the “/mnt/sdcard/” directory.
To run the gamepad demo, ‘click’ (tap) on it with the Ouya controller cursor.

Once clicked, you will have the options of selecting either “Accelerated Canvas/WebGL” or “System WebView.”
(Note: You will nearly always want to the use “Accelerated Canvas/WebGL” with the Ouya. The “System WebView” is exactly as its name states. It is a ‘WebView’ using the system’s browser. However, because the Ouya’s current browser isn’t very good, you will rarely want to use it.)
Click on “Accelerated Canvas/WebGL.”
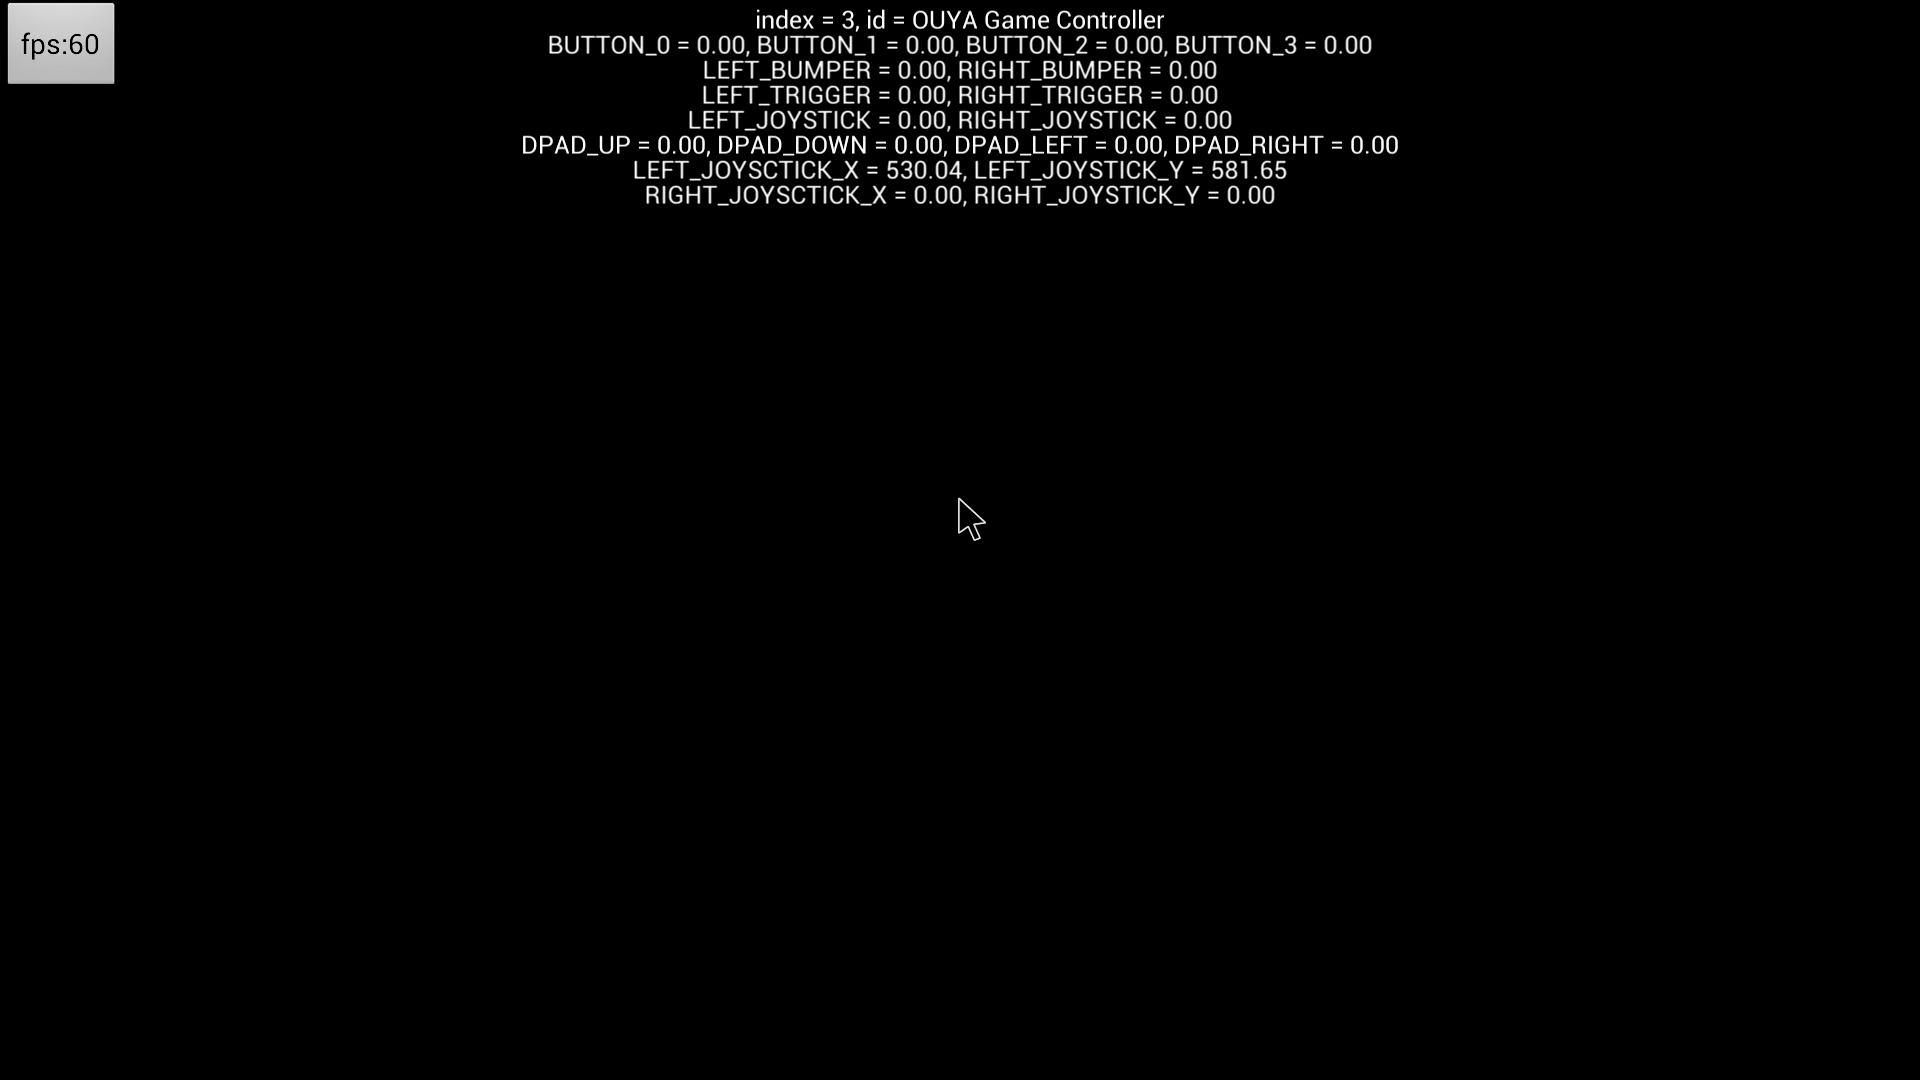
Once loaded, you will do doubt notice something strange right away. The cursor triggers the LEFT_JOYSTICK values for its X and Y. (This is a known bug.)
Pressing the various buttons on the Ouya controller will show their values of either -1 (for all the way left or up on the joysticks or triggers) or 1 for fully pressed (or for all the way right or down on the joysticks or triggers).
(Note: There are a few more known bugs with the CocoonJS gamepad code on the Ouya. I’m going to note them at the bottom of this post and cover them in-depth in another post entirely.)
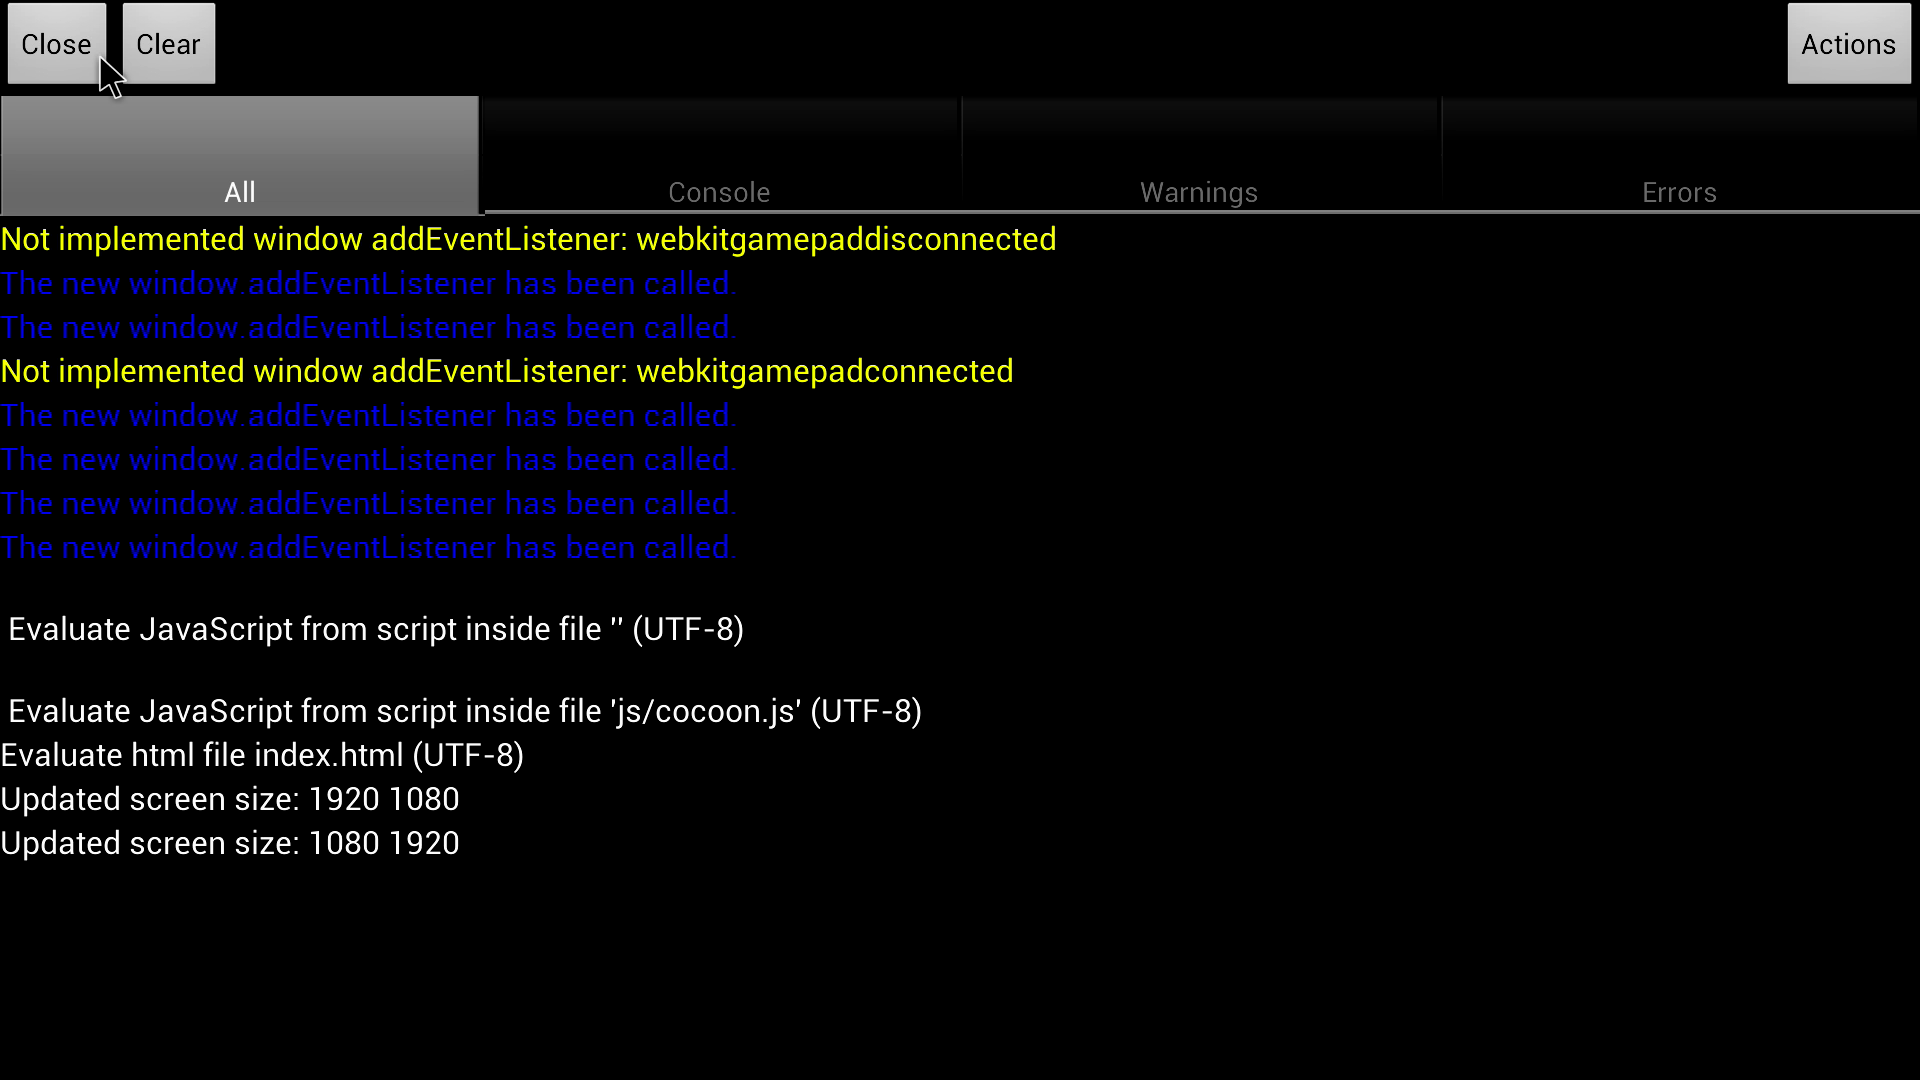
Clicking on the “FPS” button in the top left-hand corner opens the developer window with access to the different Console, Warnings, and Errors window listings. (CocoonJS also helpfully color-codes them for you too.)
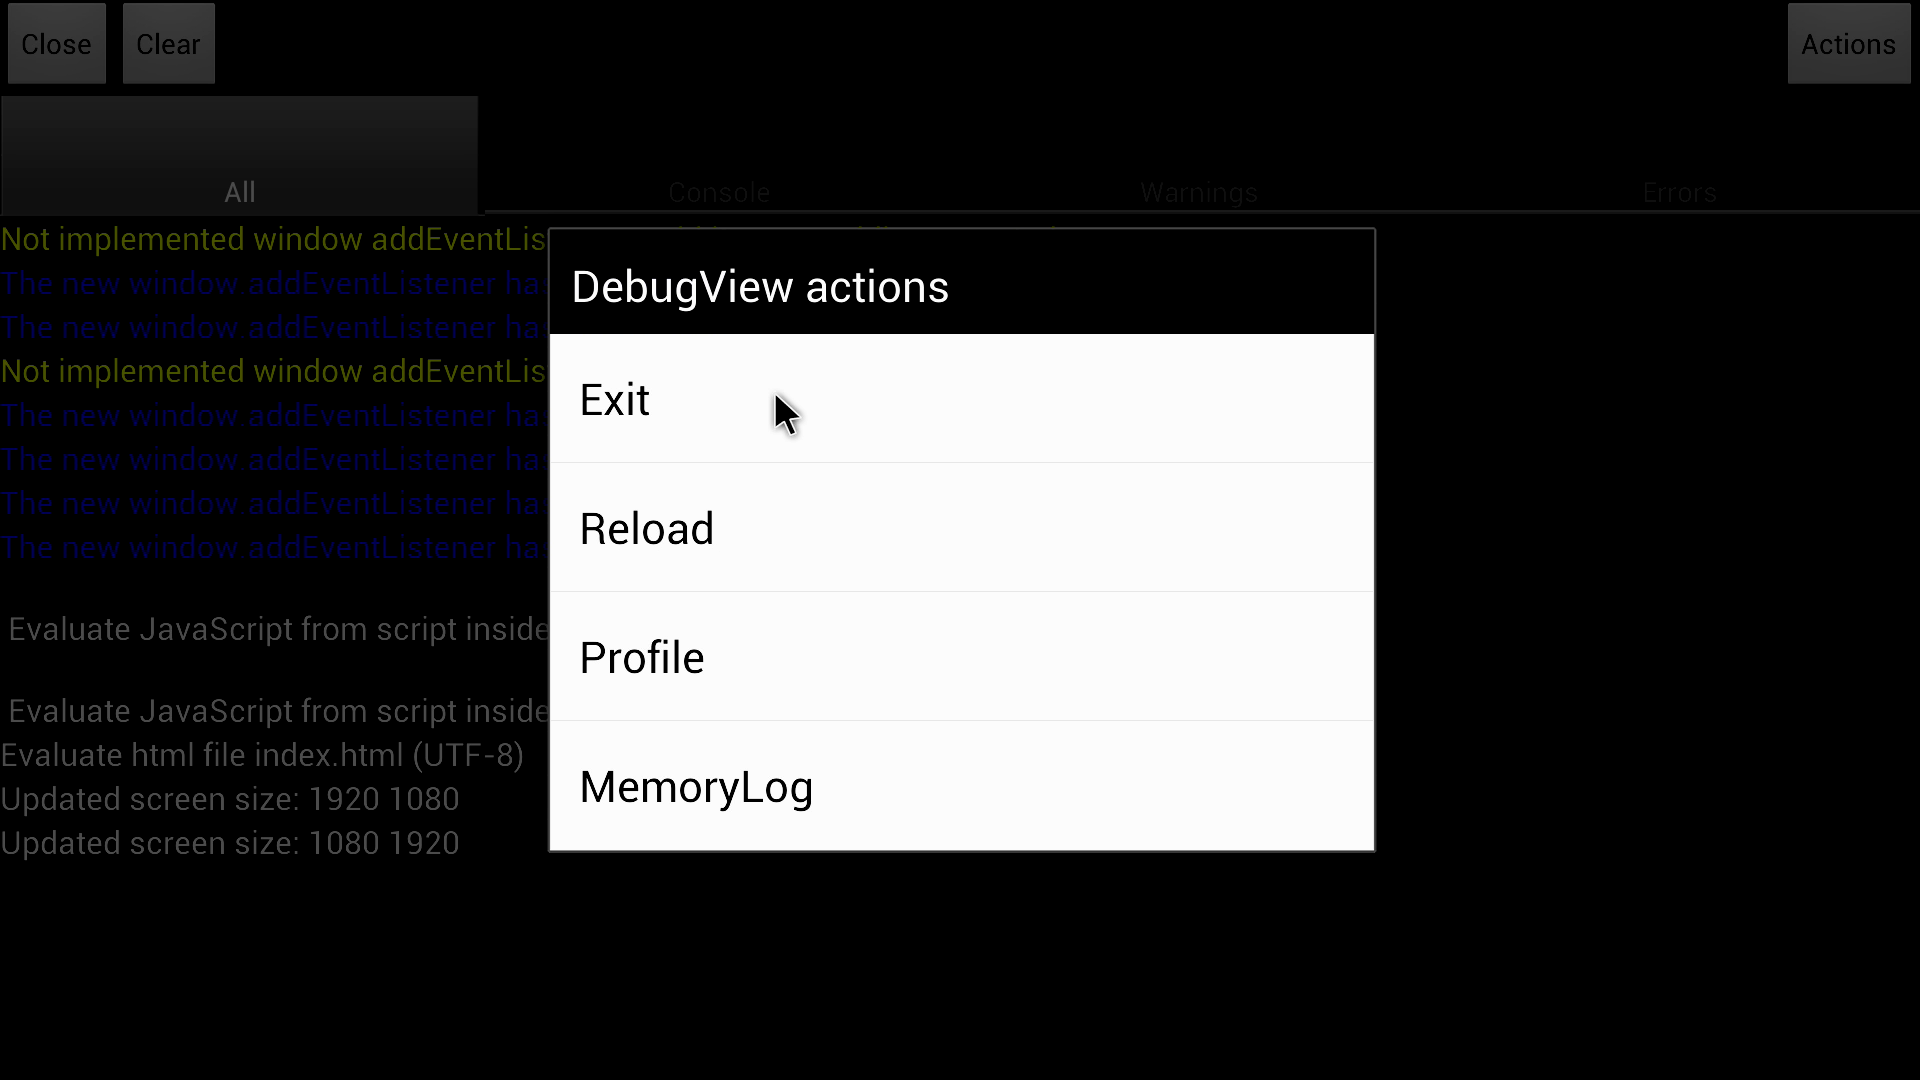
Clicking on the “Actions” button brings up a menu allowing you to Exit, Reload, Profile, or view the MemoryLog.
Choosing “Exit” closes this instance and returns you to the “YOUR APP” listing.
Removing ZIP files from the Ouya.
Because you will need to frequently test different versions of your code, you will very quickly fill up the screen space for the Custom Launcher. Therefore, it is often helpful to clean out the older tests by deleting the ZIP files off the Ouya itself. (The Custom Launcher doesn’t have the ability to edit the files, just run them.)
Using the following command will open a shell on the Android system:
adb shell
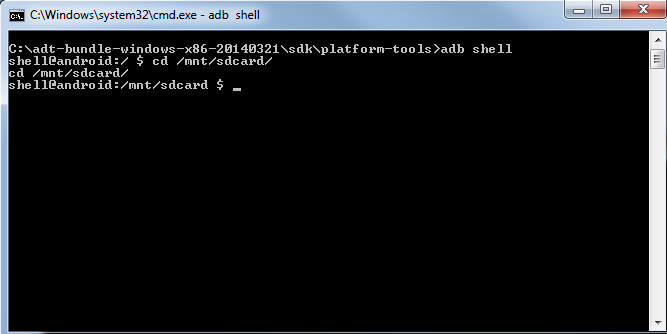
cd /mnt/sdcard/
To navigate to the “/mnt/sdcard/” directory, use the Change Directory (cd) command.
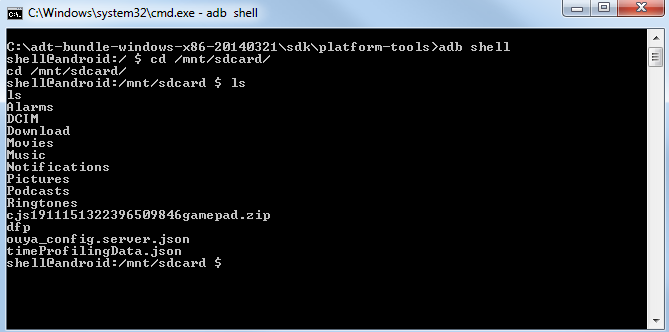
ls
Running the ls command will give a listing of the directory’s contents.
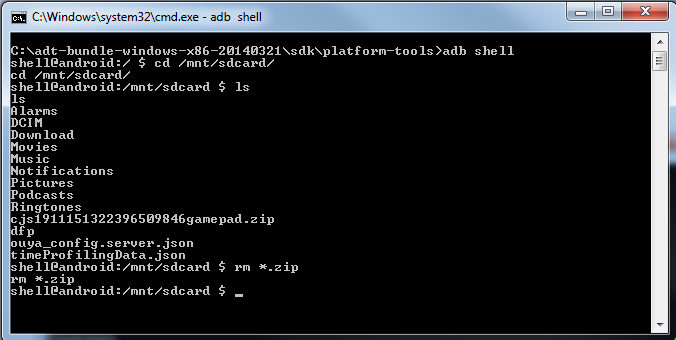
rm *.zip
Running the remove (rm) command with a wildcard for all files ending in “.zip” will delete all the ZIP files in that directory.
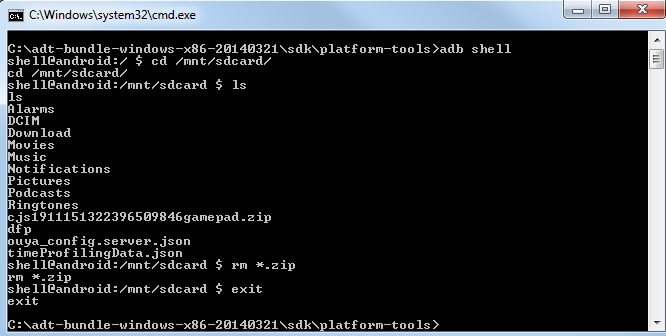
exit
Typing “exit” and pressing Enter will close the shell session.
Uninstalling the CocoonJS Compile Launcher
If you ever need to upgrade to a new version of of the Compile Launcher or want to remove it from your Ouya system, you will need to uninstall it yourself. Because it was not installed through the Ouya store, the system does not know how to completely uninstall it.
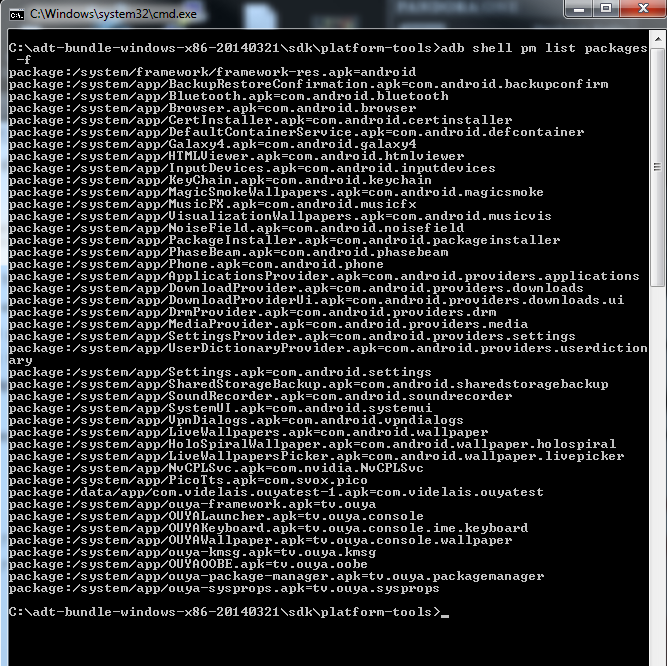
adb shell pm list packages -f
However, by the time you need to uninstall the Compile Launcher, you might have forgotten for which project you originally installed it. To find out, you can search through the installed packages on the Android (Ouya) system.
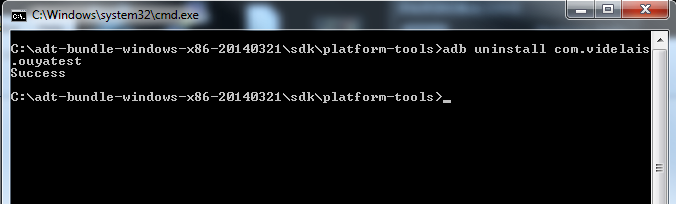
adb uninstall com.videlais.ouyatest
By supplying the package name to the “adb uninstall” command, you can remove that specific package from the system. (Because the package name might not always match the filename of the APK that installed it, it is always a good idea to either know its name ahead of time when uninstalling or search for it as I showed.)
Additional notes for gamepad input under CocoonJS on the Ouya
- As I mentioned above, the cursor on Ouya controller triggers the LEFT_JOYSTICK values for X and Y. You will need to filter for any value greater than 1 when testing for joystick input.
- The index values increase for each newly connected controller for as long as the launcher remains open. Several JavaScript libraries use controller index values for remembering and sorting inputs. This will not work with CocoonJS and Ouya.
- CocoonJS uses non-prefixed gamepad functionality. Like most modern browsers, use navigator.getGamepads() to get the array of connected controllers.
