Introduction
NodeJS is a JavaScript runtime designed for more advanced command-line and server-side usage. It can be thought of as “JavaScript outside of a web browser.”
Downloading

There are many different downloadable versions for NodsJS across most operating systems. Often, visiting the homepage will prompt with the version detected from the browser and provide the correct build.
Installing

Installing NodeJS will require administrative access to install. Once started, selecting the default options (“/usr/local/bin” for Mac and “C:\Program Files\” for Windows) when prompted is sufficient. Total installation time is usually within a couple minutes.
Once installed, it is ready for use.
Testing

Testing if NodeJS is installed and configured correctly is a quick process. Opening a Terminal window (Mac) or Command Prompt (Windows) and running “node -v” should provide a response of the current version.
NPM

Installing NodeJS also installed an additional tool called the Node Package Manager (NPM). It has a website for more easily finding projects, but can also be found through running “npm” on the command-line of in a Terminal window.
Using NodeJS

Create or use an empty folder or directory in the current user’s folder or directiry. Name this folder “nodeTesting.”

Open a Command Prompt in Widows or Terminal window on Mac.
Note: Opening the Command Prompt in Windows will default to the current user’s home folder. On Mac, opening a Terminal window will default to the user’s home directory.
Navigate to the new folder or directory. On most operating systems this will be through using the cd command and the name of the directory.

In this folder or directory, type “npm install tracery-grammar” (This will install the NodeJS version of Tracery.)
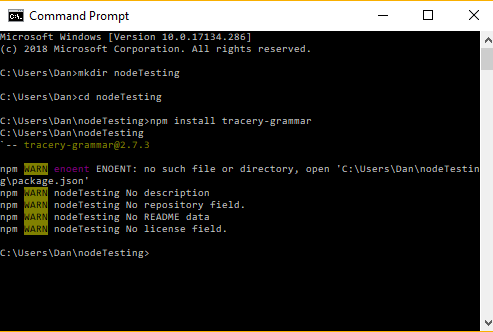
Note: NPM will produce warnings because there is not an existing “package.json” file. This can be ignored for this test.
Using either a built-in plain text editor or one like Atom, create a new file in the same folder or directory. Name this file “testing.js”
Note: NodeJS does not require that JavaScript files end in the filetype “js.” However, it is common practice and usually recommend.
Copy the following code into the file.
This file contains hidden or bidirectional Unicode text that may be interpreted or compiled differently than what appears below. To review, open the file in an editor that reveals hidden Unicode characters.
Learn more about bidirectional Unicode characters
| var tracery = require("tracery-grammar"); | |
| var symbols = { | |
| "animals": ["deer", "fox", "rabbit"] | |
| }; | |
| var grammar = tracery.createGrammar(symbols); | |
| var results = grammar.flatten("There was a #animals# in the forest."); | |
| console.log(results); |
In the Command Prompt or Terminal window, run “node testing.js”.

Successfully running the code will produce either “There was a deer in the forest”, “There was a rabbit in the forest”, or “There was a fox in the forest.”
NodeJS and NPM are now ready for use in other projects!
Recommendations
- For each new NodeJS project, create a new folder or directory. This should always be the first step and helps organize node packages better, as they will be downloaded and sometimes even compiled in the local directory by default.
- While “nodeTesting” and “testing.js” work fine for examples, naming files in useful ways can better help organize projects. Many projects use the naming scheme of “index.js” for the central or main file to be run. This is a good practice.
- Consider using an editor like Atom or Brackets to show not only the current files, but those in the same folder or directory as well.
- Search packages on the NPM website instead of using the tool itself. While npm can be used to search, the website provides a better pictures of how many other users have downloaded the same files and if the package has been updated recently or not.
