
Part 1: Configuring, Programming, and Compiling
Part 2: Placing Tiles and Moving Sprites
Part 4: Colliding Sprites and Project Management
Graphical Tables
As discussed in both Part 1 and used in Part 2, the Game Boy has a limited amount of graphical storage. You can only have 256 tiles of 8×8 pixels. This limits what you can do and, more importantly, dictates how you compose tiles on the screen as a result.
However, as glossed over in Part 2 and now explained in Part 3, you can generate the tiles and maps themselves using two sets of tools GBTD and GBMB.
Game Boy Tile Designer

Found here, the Game Boy Tile Designer will be your very best friend when it comes to create and exporting tiles. Beyond simply allowing you to design — hence the word in the title — tiles, it also allows you to copy them from one slot to another and, most importantly, uses functionality called “Split Paste” to paste content from another image program into 8×8 tiles.
For example, for Part 2, I used the following set of tiles I developed in another program. From there, I selected the whole image and copied it into the Windows clipboard.

Split-Pasting
In GBTD, go to Edit -> Split Paste.
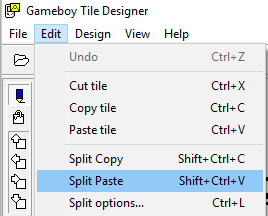
Now, all of the tiles have been arranged as an increasing set starting from what position was selected from the right-hand side. (In this case, the first, 0, position.)

Exporting
Once that is done, it is a matter of “including” them in a Game Boy program. To do that, go to File -> Export To.

On the next screen, click on the drop-down menu and choose the “GBDK C file (*.c)” option.

Select “Browse” to find the location and give the file a name. As well, change the label to something useful and finally, as a last step, set the number of tiles to export in total in the “From” field. (In this example, it is 47 tiles.)

Once exported, the “alpha” tile set will look much like the “alpha.c” file from Part 2.
alpha.c
This file contains hidden or bidirectional Unicode text that may be interpreted or compiled differently than what appears below. To review, open the file in an editor that reveals hidden Unicode characters.
Learn more about bidirectional Unicode characters
| /* | |
| ALPHA.C | |
| Tile Source File. | |
| Info: | |
| Form : All tiles as one unit. | |
| Format : Gameboy 4 color. | |
| Compression : None. | |
| Counter : None. | |
| Tile size : 8 x 8 | |
| Tiles : 0 to 47 | |
| Palette colors : None. | |
| SGB Palette : None. | |
| CGB Palette : None. | |
| Convert to metatiles : No. | |
| This file was generated by GBTD v2.2 | |
| */ | |
| /* Start of tile array. */ | |
| unsigned char alpha[] = | |
| { | |
| 0x7C,0x7C,0x86,0x86,0x8A,0x8A,0x92,0x92, | |
| 0xA2,0xA2,0xC2,0xC2,0x7C,0x7C,0x00,0x00, | |
| 0x10,0x10,0x30,0x30,0x10,0x10,0x10,0x10, | |
| 0x10,0x10,0x10,0x10,0x7C,0x7C,0x00,0x00, | |
| 0x7C,0x7C,0x82,0x82,0x02,0x02,0x1C,0x1C, | |
| 0x60,0x60,0x80,0x80,0xFE,0xFE,0x00,0x00, | |
| 0xFE,0xFE,0x04,0x04,0x18,0x18,0x04,0x04, | |
| 0x02,0x02,0x82,0x82,0x7C,0x7C,0x00,0x00, | |
| 0x0C,0x0C,0x14,0x14,0x24,0x24,0x44,0x44, | |
| 0x84,0x84,0xFE,0xFE,0x04,0x04,0x00,0x00, | |
| 0xFC,0xFC,0x80,0x80,0xFC,0xFC,0x02,0x02, | |
| 0x02,0x02,0x82,0x82,0x7C,0x7C,0x00,0x00, | |
| 0x7C,0x7C,0x80,0x80,0x80,0x80,0xFC,0xFC, | |
| 0x82,0x82,0x82,0x82,0x7C,0x7C,0x00,0x00, | |
| 0xFE,0xFE,0x82,0x82,0x04,0x04,0x08,0x08, | |
| 0x10,0x10,0x10,0x10,0x10,0x10,0x00,0x00, | |
| 0x7C,0x7C,0x82,0x82,0x82,0x82,0x7C,0x7C, | |
| 0x82,0x82,0x82,0x82,0x7C,0x7C,0x00,0x00, | |
| 0x7C,0x7C,0x82,0x82,0x82,0x82,0x7E,0x7E, | |
| 0x02,0x02,0x02,0x02,0x7C,0x7C,0x00,0x00, | |
| 0x00,0x00,0x30,0x30,0x30,0x30,0x00,0x00, | |
| 0x30,0x30,0x30,0x30,0x00,0x00,0x00,0x00, | |
| 0x08,0x08,0x2E,0x2E,0xF8,0xF8,0x28,0x28, | |
| 0x3E,0x3E,0xE8,0xE8,0x20,0x20,0x00,0x00, | |
| 0x08,0x08,0x10,0x10,0x20,0x20,0x40,0x40, | |
| 0x20,0x20,0x10,0x10,0x08,0x08,0x00,0x00, | |
| 0x00,0x00,0x00,0x00,0x7C,0x7C,0x00,0x00, | |
| 0x7C,0x7C,0x00,0x00,0x00,0x00,0x00,0x00, | |
| 0x20,0x20,0x10,0x10,0x08,0x08,0x04,0x04, | |
| 0x08,0x08,0x10,0x10,0x20,0x20,0x00,0x00, | |
| 0x3C,0x3C,0x42,0x42,0x02,0x02,0x0C,0x0C, | |
| 0x10,0x10,0x00,0x00,0x10,0x10,0x00,0x00, | |
| 0x7C,0x7C,0x82,0x82,0x9A,0x9A,0xAA,0xAA, | |
| 0xBC,0xBC,0x80,0x80,0x7C,0x7C,0x00,0x00, | |
| 0x38,0x38,0x44,0x44,0x82,0x82,0x82,0x82, | |
| 0xFE,0xFE,0x82,0x82,0x82,0x82,0x00,0x00, | |
| 0xFC,0xFC,0x82,0x82,0x82,0x82,0xFC,0xFC, | |
| 0x82,0x82,0x82,0x82,0xFC,0xFC,0x00,0x00, | |
| 0x7C,0x7C,0x82,0x82,0x80,0x80,0x80,0x80, | |
| 0x80,0x80,0x82,0x82,0x7C,0x7C,0x00,0x00, | |
| 0xF8,0xF8,0x84,0x84,0x82,0x82,0x82,0x82, | |
| 0x82,0x82,0x84,0x84,0xF8,0xF8,0x00,0x00, | |
| 0xFE,0xFE,0x80,0x80,0x80,0x80,0xFC,0xFC, | |
| 0x80,0x80,0x80,0x80,0xFE,0xFE,0x00,0x00, | |
| 0xFE,0xFE,0x80,0x80,0x80,0x80,0xFC,0xFC, | |
| 0x80,0x80,0x80,0x80,0x80,0x80,0x00,0x00, | |
| 0x7C,0x7C,0x82,0x82,0x80,0x80,0x80,0x80, | |
| 0x8E,0x8E,0x82,0x82,0x7E,0x7E,0x00,0x00, | |
| 0x82,0x82,0x82,0x82,0x82,0x82,0xFE,0xFE, | |
| 0x82,0x82,0x82,0x82,0x82,0x82,0x00,0x00, | |
| 0x7C,0x7C,0x10,0x10,0x10,0x10,0x10,0x10, | |
| 0x10,0x10,0x10,0x10,0x7C,0x7C,0x00,0x00, | |
| 0x1E,0x1E,0x04,0x04,0x04,0x04,0x04,0x04, | |
| 0x04,0x04,0x84,0x84,0x78,0x78,0x00,0x00, | |
| 0x84,0x84,0x88,0x88,0x90,0x90,0xF0,0xF0, | |
| 0x88,0x88,0x84,0x84,0x82,0x82,0x00,0x00, | |
| 0x40,0x40,0x40,0x40,0x40,0x40,0x40,0x40, | |
| 0x40,0x40,0x40,0x40,0x7E,0x7E,0x00,0x00, | |
| 0x82,0x82,0xC6,0xC6,0xAA,0xAA,0x92,0x92, | |
| 0x82,0x82,0x82,0x82,0x82,0x82,0x00,0x00, | |
| 0x82,0x82,0xC2,0xC2,0xA2,0xA2,0x92,0x92, | |
| 0x8A,0x8A,0x86,0x86,0x82,0x82,0x00,0x00, | |
| 0x7C,0x7C,0x82,0x82,0x82,0x82,0x82,0x82, | |
| 0x82,0x82,0x82,0x82,0x7C,0x7C,0x00,0x00, | |
| 0xFC,0xFC,0x82,0x82,0x82,0x82,0x82,0x82, | |
| 0xFC,0xFC,0x80,0x80,0x80,0x80,0x00,0x00, | |
| 0x7C,0x7C,0x82,0x82,0x82,0x82,0x92,0x92, | |
| 0x8A,0x8A,0x84,0x84,0x7A,0x7A,0x00,0x00, | |
| 0xFC,0xFC,0x82,0x82,0x82,0x82,0x84,0x84, | |
| 0xF8,0xF8,0x84,0x84,0x82,0x82,0x00,0x00, | |
| 0x7C,0x7C,0x80,0x80,0x80,0x80,0x7C,0x7C, | |
| 0x02,0x02,0x02,0x02,0xFC,0xFC,0x00,0x00, | |
| 0xFE,0xFE,0x10,0x10,0x10,0x10,0x10,0x10, | |
| 0x10,0x10,0x10,0x10,0x10,0x10,0x00,0x00, | |
| 0x82,0x82,0x82,0x82,0x82,0x82,0x82,0x82, | |
| 0x82,0x82,0x82,0x82,0x7C,0x7C,0x00,0x00, | |
| 0x82,0x82,0x82,0x82,0x82,0x82,0x82,0x82, | |
| 0x44,0x44,0x28,0x28,0x10,0x10,0x00,0x00, | |
| 0x82,0x82,0x82,0x82,0x82,0x82,0x92,0x92, | |
| 0xAA,0xAA,0xC6,0xC6,0x82,0x82,0x00,0x00, | |
| 0x82,0x82,0x44,0x44,0x28,0x28,0x10,0x10, | |
| 0x28,0x28,0x44,0x44,0x82,0x82,0x00,0x00, | |
| 0x82,0x82,0x44,0x44,0x28,0x28,0x10,0x10, | |
| 0x10,0x10,0x10,0x10,0x10,0x10,0x00,0x00, | |
| 0xFE,0xFE,0x04,0x04,0x08,0x08,0x10,0x10, | |
| 0x20,0x20,0x40,0x40,0xFE,0xFE,0x00,0x00, | |
| 0x1C,0x1C,0x10,0x10,0x10,0x10,0x10,0x10, | |
| 0x10,0x10,0x10,0x10,0x1C,0x1C,0x00,0x00, | |
| 0x80,0x80,0x40,0x40,0x20,0x20,0x10,0x10, | |
| 0x08,0x08,0x04,0x04,0x02,0x02,0x00,0x00, | |
| 0x70,0x70,0x10,0x10,0x10,0x10,0x10,0x10, | |
| 0x10,0x10,0x10,0x10,0x70,0x70,0x00,0x00, | |
| 0x10,0x10,0x28,0x28,0x44,0x44,0x82,0x82, | |
| 0x00,0x00,0x00,0x00,0x00,0x00,0x00,0x00, | |
| 0x00,0x00,0x00,0x00,0x00,0x00,0x00,0x00, | |
| 0x00,0x00,0x00,0x00,0xFE,0xFE,0x00,0x00 | |
| }; | |
| /* End of ALPHA.C */ |
Note: The above, pasting and exporting, were the exact steps I performed to generate the files for Part 2.
Once exported, be sure to File -> Save the set as “alpha.gbr”. (The result will be used in the next step and will allow you, when re-opening the file, to use File-> Export in the future, or simply Ctrl-E as a shortcut to update the file.)
Game Boy Map Builder

Like with GBTD, the GBMB can also be found on the same site.
GBTD and GBMB are created to feed into one another. The files saved from GBTD can be opened by GBMB to use the tile to create larger ‘maps’ of areas or as part of the creation of a meta-sprite, a sprite made up of multiple tiles.
In our example, go to File -> Map Properties and select the file created in GBTD, “alpha.gbr”
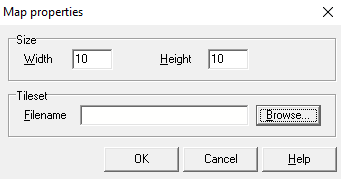
When asked for width and height, use 10×2.

Placing Tiles
In GBMB, the left-click is used to select a tile from the right-hand list of perform an action from the left-hand listing. Right-clicking places a tile on the map.

Continuing from the discussion from Part 2, we can use the fact that tile 48 is ‘blank’ to use it as a way to make the map ‘blank’ to start.

Then, using one letter at a time, we can write “HELLO WORLD” on the map.
Exporting
Once we have the map arranged as we like, we can export the map like in GBTD through the File -> “Export to…” option.

Also like in GBTD, select the “GBDK C file (*.c)” option, use “Browse” to set a location and name, and set a label.

Unlike in GBTD, click on the “Location format” tab and set “1 plane (8 bits)” and, in the properties, select “Tile number” from the drop-down menu. Once done, click the “OK” button.

The resulting file, much as “alpha.c” using GBTD was “alpha.c” from Part 2, “helloWorld.c” will be the same except for the addition of the header comment information.
helloWorld.c
This file contains hidden or bidirectional Unicode text that may be interpreted or compiled differently than what appears below. To review, open the file in an editor that reveals hidden Unicode characters.
Learn more about bidirectional Unicode characters
| /* | |
| HELLOWORLD.C | |
| Map Source File. | |
| Info: | |
| Section : | |
| Bank : 0 | |
| Map size : 10 x 2 | |
| Tile set : alpha.gbr | |
| Plane count : 1 plane (8 bits) | |
| Plane order : Tiles are continues | |
| Tile offset : 0 | |
| Split data : No | |
| This file was generated by GBMB v1.8 | |
| */ | |
| #define helloWorldWidth 10 | |
| #define helloWorldHeight 2 | |
| #define helloWorldBank 0 | |
| unsigned char helloWorld[] = | |
| { | |
| 0x30,0x30,0x18,0x15,0x1C,0x1C,0x1F,0x30,0x30,0x30, | |
| 0x30,0x30,0x27,0x1F,0x22,0x1C,0x14,0x30,0x30,0x30 | |
| }; | |
| /* End of HELLOWORLD.C */ |
Once exported, be sure to File -> Save the map. This will save you time in re-creating it and, like with GBTD, will remember the location you saved the file and allow for quick File -> Export or Cntl-E exporting.
Combining Everything
Unlike Part 1 or Part 2, there are no code changes to “main.c” in this Part. However, it is included here for reference.
main.c
This file contains hidden or bidirectional Unicode text that may be interpreted or compiled differently than what appears below. To review, open the file in an editor that reveals hidden Unicode characters.
Learn more about bidirectional Unicode characters
| #include <gb/gb.h> | |
| #include "alpha.c" | |
| #include "helloWorld.c" | |
| #include "blankScreen.c" | |
| #include "sprites.c" | |
| void init(); | |
| void checkInput(); | |
| void updateSwitches(); | |
| // The player array will hold the player's position as X ([0]) and Y ([1]) | |
| UINT8 player[2]; | |
| void main() { | |
| init(); | |
| while(1) { | |
| checkInput(); // Check for user input (and act on it) | |
| updateSwitches(); // Make sure the SHOW_SPRITES and SHOW_BKG switches are on each loop | |
| wait_vbl_done(); // Wait until VBLANK to avoid corrupting memory | |
| } | |
| } | |
| void init() { | |
| DISPLAY_ON; // Turn on the display | |
| set_bkg_data(0, 47, alpha); // Load 47 tiles into background memory | |
| // Use the 'helloWorld' array to write background tiles starting at 0,6 (tile positions) | |
| // and write for 10 tiles in width and 2 tiles in height | |
| set_bkg_tiles(0,6,10,2,helloWorld); | |
| // Load the the 'sprites' tiles into sprite memory | |
| set_sprite_data(0, 1, sprites); | |
| // Set the first movable sprite (0) to be the first tile in the sprite memory (0) | |
| set_sprite_tile(0,0); | |
| player[0] = 80; | |
| player[1] = 72; | |
| } | |
| void updateSwitches() { | |
| HIDE_WIN; | |
| SHOW_SPRITES; | |
| SHOW_BKG; | |
| } | |
| void checkInput() { | |
| if (joypad() & J_B) { | |
| // Use the 'blankScreen' array to write background tiles starting at 0,0 (tile positions) | |
| // and for 20 tiles in width and 18 tiles in height | |
| set_bkg_tiles(0,0,20,18,blankScreen); | |
| } | |
| // UP | |
| if (joypad() & J_UP) { | |
| player[1]–; | |
| } | |
| // DOWN | |
| if (joypad() & J_DOWN) { | |
| player[1]++; | |
| } | |
| // LEFT | |
| if (joypad() & J_LEFT) { | |
| player[0]–; | |
| } | |
| // RIGHT | |
| if (joypad() & J_RIGHT) { | |
| player[0]++; | |
| } | |
| // Move the sprite in the first movable sprite list (0) | |
| // the the position of X (player[0]) and y (player[1]) | |
| move_sprite(0, player[0], player[1]); | |
| } |
Note: The creation of “blankScreen.c” and “sprites.c” are not shown in this post. However, given the techniques explained, their creation, as a 20×18 map of tile 48 and sprites drawn as tiles, is fairly self-explanatory.
In Part 4, I will cover the basics of colliding sprites and project management.
