Part 1: Configuring, Programming, and Compiling
Part 2: Placing Tiles and Moving Sprites
Part 4: Colliding Sprites and Project Management
Memory Management
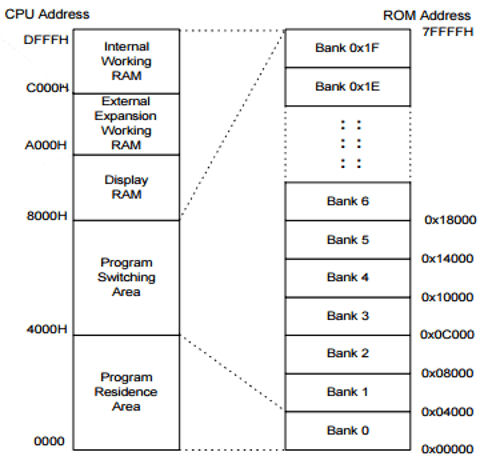
When the Game Boy was released back in 1989, using multiple megabytes of memory was inefficient from a design point-of-view because the cost of using so much memory was highly impractical for most companies to make back the initial production costs. However, as the years went by — and given Moore’s Law — the costs came down and, when it was discontinued in 2003, eight megabyte or larger cartridges were common.
However, by its original design, the Game Boy can only access 16 KB of ROM memory at a time. To get around this limitation, ROM sections of 16 KB code can be accessed through a technique called ‘banking’: one section of 16 KB code swapped for another.
By default, a Game Boy game, with no additional code or cartridge changes, is 32 KB with two 16 KB sections for all of its code, including any maps or large arrays.
GBDK Complications
Part of the way GBDK was designed was such that it doesn’t understand banking directly. Instead, it has the SWITCH_ROM_MBC1() function that can swap out existing ROM banks. However, to use additional banks requires additional compiling code instructions.
For each additional bank, the instructions “-Wf-boX -Wf-baX” need to be added where X is the bank a file represents.
To combine all the resulting files, use “-Wl-ytX -Wl-yoY -Wl-yaY” where X is the type of cartridge and Y is the number of total banks to the next power of two.
Note: If you are defining banks explicitly starting with at least one, use four total banks.
Continuing Examples
build.bat
This file contains hidden or bidirectional Unicode text that may be interpreted or compiled differently than what appears below. To review, open the file in an editor that reveals hidden Unicode characters.
Learn more about bidirectional Unicode characters
| C:\gbdk\bin\lcc -Wa-l -Wl-m -Wl-j -DUSE_SFR_FOR_REG -c -o main.o main.c | |
| C:\gbdk\bin\lcc -Wa-l -Wl-m -Wl-j -DUSE_SFR_FOR_REG -Wf-bo1 -Wf-ba1 -c -o bank1.o bank1.c | |
| C:\gbdk\bin\lcc -Wa-l -Wl-m -Wl-j -DUSE_SFR_FOR_REG -Wl-yt2 -Wl-yo4 -Wl-ya1 -o main.gb main.o bank1.o | |
| pause |
bank1.c
This file contains hidden or bidirectional Unicode text that may be interpreted or compiled differently than what appears below. To review, open the file in an editor that reveals hidden Unicode characters.
Learn more about bidirectional Unicode characters
| #include <gb/gb.h> | |
| // These are our extern(ally) defined functions we use in bank1 | |
| extern void checkInput(); | |
| extern void updateSwitches(); | |
| extern UINT8 collisionCheck(UINT8, UINT8, UINT8, UINT8, UINT8, UINT8, UINT8, UINT8); | |
| void update() { | |
| while(1) { | |
| checkInput(); // Check for user input (and act on it) | |
| updateSwitches(); // Make sure the SHOW_SPRITES and SHOW_BKG switches are on each loop | |
| wait_vbl_done(); // Wait until VBLANK to avoid corrupting memory | |
| } | |
| } |
main.c
This file contains hidden or bidirectional Unicode text that may be interpreted or compiled differently than what appears below. To review, open the file in an editor that reveals hidden Unicode characters.
Learn more about bidirectional Unicode characters
| #include <gb/gb.h> | |
| #include "tiles.c" | |
| #include "sprites.c" | |
| #include "dungeon.c" | |
| void init(); | |
| void checkInput(); | |
| void updateSwitches(); | |
| UINT8 collisionCheck(UINT8, UINT8, UINT8, UINT8, UINT8, UINT8, UINT8, UINT8); | |
| // The player array will hold the player's position as X ([0]) and Y ([1]) | |
| UINT8 player[2]; | |
| //The enemy array will hold the enemy position as X ([0]) and Y ([1]) | |
| UINT8 enemy[2]; | |
| extern void update(); | |
| void main() { | |
| init(); | |
| SWITCH_ROM_MBC1(1); | |
| update(); | |
| } | |
| void init() { | |
| DISPLAY_ON; // Turn on the display | |
| set_bkg_data(0, 23, tiles); // Load 23 tiles into background memory | |
| set_bkg_tiles(0,0,20,18,dungeon); | |
| // Load the the 'sprites' tiles into sprite memory | |
| set_sprite_data(0, 2, sprites); | |
| // Set the first movable sprite (0) to be the first tile in the sprite memory (0) | |
| set_sprite_tile(0,0); | |
| // Set the second movable sprite (1) to be the second tile in the sprite memory (1) | |
| set_sprite_tile(1,1); | |
| player[0] = 64; | |
| player[1] = 64; | |
| enemy[0] = 128; | |
| enemy[1] = 128; | |
| } | |
| void updateSwitches() { | |
| HIDE_WIN; | |
| SHOW_SPRITES; | |
| SHOW_BKG; | |
| } | |
| void checkInput() { | |
| if (joypad() & J_B) { | |
| } | |
| // UP | |
| if (joypad() & J_UP) { | |
| player[1]–; | |
| } | |
| // DOWN | |
| if (joypad() & J_DOWN) { | |
| player[1]++; | |
| } | |
| // LEFT | |
| if (joypad() & J_LEFT) { | |
| player[0]–; | |
| } | |
| // RIGHT | |
| if (joypad() & J_RIGHT) { | |
| player[0]++; | |
| } | |
| // Move the sprite in the first movable sprite list (0) | |
| // to the position of X (player[0]) and y (player[1]) | |
| move_sprite(0, player[0], player[1]); | |
| // Move the sprite in the second movable sprite list (1) | |
| // to the position of X (enemy[0]) and y (enemy[1]) | |
| move_sprite(1, enemy[0], enemy[1]); | |
| // Is the player colliding with the enemy? | |
| if(collisionCheck(player[0], player[1], 8, 8, enemy[0], enemy[1], 8, 8) == 1) { | |
| set_sprite_tile(0,1); | |
| } else { | |
| set_sprite_tile(0,0); | |
| } | |
| } | |
| // Check if two rectangles from x1,y1, and extending out h1, h2, | |
| // overlap with another, x2,y2, and extending out w2, h2 | |
| UINT8 collisionCheck(UINT8 x1, UINT8 y1, UINT8 w1, UINT8 h1, UINT8 x2, UINT8 y2, UINT8 w2, UINT8 h2) { | |
| if ((x1 < (x2+w2)) && ((x1+w1) > x2) && (y1 < (h2+y2)) && ((y1+h1) > y2)) { | |
| return 1; | |
| } else { | |
| return 0; | |
| } | |
| } |
Switching, extern, and calling functions
Once a bank has been switched, its functions cannot normally be accessed. Anything that happens in that 16 KB is limited to that bank. However, using the keyword “extern,” a reference can be maintained into a separate bank when declaring a function. To use another bank’s functions, it is as easy as using something, like in the above example: extern void update().
Using this technique opens up the ability to build on the first concept from Part 4, as well: Make your code as module as possible.
Because of the much larger amount of memory now available through banking, the storage of more maps, arrays, and other larger data structures can be separated into other banks, initially loaded through SWITCH_ROM_MBC1() calls and then referencing them through use of extern. In fact, this is a common and even recommended practice to logically break up sections of dialogue, when using tile-based displaying, or to have many in-game area maps in different sections and as part of different ROM banks.

Thx for tutorials!