Previously:
- Making a game with Flash Develop + Flixel: Part 1, Installing and Configuring
- Making a game with Flash Develop + Flixel: Part 2, Coding a simple example
- Making a game with Flash Develop + Flixel: Part 3, Input and Objects
(Want to bypass the long explanations and see the final product? Here, download this post’s code as a ZIP file.)
In Parts 1 and 2, we developed drawing a FlxSprite and then moving it around from player input. However, there was an obvious problem: move it too far and the FlxSprite would disappear off the edge of the canvas. Nothing was there to hold it back. It wasn’t colliding with anything.
To fix this issue and to start to build maps to move around within, let’s add a FlxTilemap.
(Note: If you are unfamiliar with the term, think of a tilemap as exactly as its name implies. It is a map of tiles. In other words, a collection of usually comma separated values representing a relationship between an index in the map and a position as part of something larger. By combining a series of tiles in a spritesheet and using the mapped data, a larger composite image can be created.)
Before we can add the code for a FlxTilemap, we need to cover two of its requirements: String data and a tilemap image. For the first, we can use an array to start with (as I will show shortly). However, for the second, we need to create a new image.
(Note: I’ve previously covered how to create grass and tree tiles in another series of posts. I’ll be using those here.)
To start, let’s create a new folder by selecting the “src” folder, right-clicking and then choosing Add then “New Folder…”
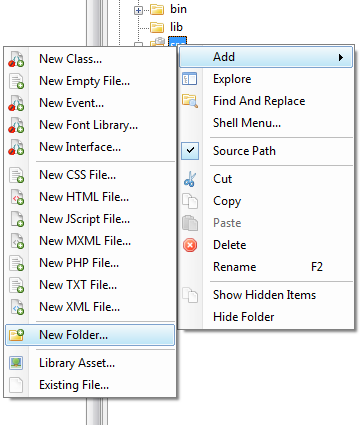
Let’s name it “data” as it will hold both the image we are able to put in it and eventually other files as well.
And, now that we have a folder to hold files, let’s add our image. (Click the following image for the actual size.)

Next, we have to move the file from wherever it was downloaded to the project directory and into the data folder.
(Go ahead and do that now.)
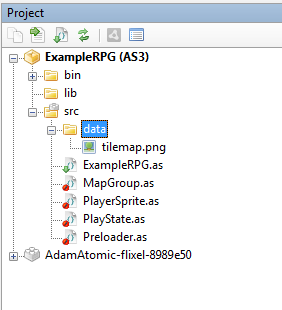 Assuming everything was downloaded and moved correctly, we should now have the “tilemap.png” file in the data folder under our “src” directory.
Finally, we can begin to use this image in our project by right-clicking on the file in the Project view and selecting Generate Embed Code above the constructor below the player variable line.
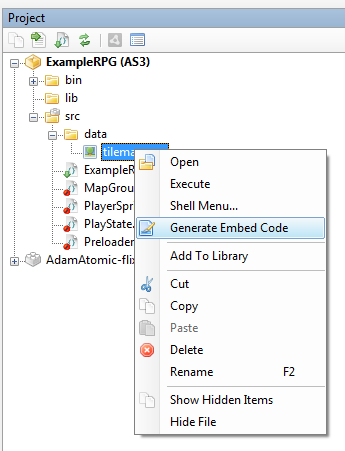
The last step is to give it a scope and type (which should be “Class”).
The updated PlayState file should look like the following:
| package | |
| { | |
| /** | |
| * ... | |
| * @author Dan Cox | |
| */ | |
| import org.flixel.*; | |
| public class PlayState extends FlxState | |
| { | |
| private var player:PlayerSprite; | |
| [Embed(source = "data/tilemap.png")] private var tilemapPng:Class; | |
| public function PlayState() | |
| { | |
| player = new PlayerSprite(); | |
| add(player); | |
| } | |
| override public function update():void | |
| { | |
| super.update(); | |
| } | |
| } | |
| } |
Well, now we have covered the tilemap image requirement. However, we still have the map data requirement to fill.
For that, we can add the following array to PlayState:
| package | |
| { | |
| /** | |
| * ... | |
| * @author Dan Cox | |
| */ | |
| import org.flixel.*; | |
| public class PlayState extends FlxState | |
| { | |
| private var player:PlayerSprite; | |
| [Embed(source = "data/tilemap.png")] private var tilemapPng:Class; | |
| private var mapData:Array = | |
| [1,1,1,1,1,1,1,1,1,1,1,1,1,1,1,1,1,1,1,1, | |
| 1,0,0,0,0,0,0,0,0,0,0,0,0,0,0,0,0,0,0,1, | |
| 1,0,0,0,0,0,0,0,0,0,0,0,0,0,0,0,0,0,0,1, | |
| 1,0,0,0,0,0,0,0,0,0,0,0,0,0,0,0,0,0,0,1, | |
| 1,0,0,0,0,0,0,0,0,0,0,0,0,0,0,0,0,0,0,1, | |
| 1,0,0,0,0,0,0,0,0,0,0,0,0,0,0,0,0,0,0,1, | |
| 1,0,0,0,0,0,0,0,0,0,0,0,0,0,0,0,0,0,0,1, | |
| 1,0,0,0,0,0,0,0,0,0,0,0,0,0,0,0,0,0,0,1, | |
| 1,0,0,0,0,0,0,0,0,0,0,0,0,0,0,0,0,0,0,1, | |
| 1,0,0,0,0,0,0,0,0,0,0,0,0,0,0,0,0,0,0,1, | |
| 1,0,0,0,0,0,0,0,0,0,0,0,0,0,0,0,0,0,0,1, | |
| 1,0,0,0,0,0,0,0,0,0,0,0,0,0,0,0,0,0,0,1, | |
| 1,0,0,0,0,0,0,0,0,0,0,0,0,0,0,0,0,0,0,1, | |
| 1,0,0,0,0,0,0,0,0,0,0,0,0,0,0,0,0,0,0,1, | |
| 1,1,1,1,1,1,1,1,1,1,1,1,1,1,1,1,1,1,1,1]; | |
| public function PlayState() | |
| { | |
| player = new PlayerSprite(); | |
| add(player); | |
| } | |
| override public function update():void | |
| { | |
| super.update(); | |
| } | |
| } | |
| } |
(Note: I’ve shortcut this process some by pre-computing the scale of the tilemap. Since I’m using 16 x 16 tiles, I matched up the dimensions of 320 / 16 = 20 and 240 / 16 = 15 for a matrix of 20 x 15 rows and columns.)
With both requirements met, we can finally write the code to show this.
We add a new variable, map, within the private scope of the PlayState object. We give it the type of FlxTilemap.
Then, within the constructor, we create a new instance of FlxTilemap, use the loadMap function, and finally add it to the PlayState.
(Note: Because we are using an Array for the data instead of the expected comma separated values, we need the extra arrayToCSV function call with arguments of the data and its number of rows.)
| package | |
| { | |
| /** | |
| * ... | |
| * @author Dan Cox | |
| */ | |
| import org.flixel.*; | |
| public class PlayState extends FlxState | |
| { | |
| private var player:PlayerSprite; | |
| private var map:FlxTilemap; | |
| [Embed(source = "data/tilemap.png")] private var tilemapPng:Class; | |
| private var mapData:Array = | |
| [1,1,1,1,1,1,1,1,1,1,1,1,1,1,1,1,1,1,1,1, | |
| 1,0,0,0,0,0,0,0,0,0,0,0,0,0,0,0,0,0,0,1, | |
| 1,0,0,0,0,0,0,0,0,0,0,0,0,0,0,0,0,0,0,1, | |
| 1,0,0,0,0,0,0,0,0,0,0,0,0,0,0,0,0,0,0,1, | |
| 1,0,0,0,0,0,0,0,0,0,0,0,0,0,0,0,0,0,0,1, | |
| 1,0,0,0,0,0,0,0,0,0,0,0,0,0,0,0,0,0,0,1, | |
| 1,0,0,0,0,0,0,0,0,0,0,0,0,0,0,0,0,0,0,1, | |
| 1,0,0,0,0,0,0,0,0,0,0,0,0,0,0,0,0,0,0,1, | |
| 1,0,0,0,0,0,0,0,0,0,0,0,0,0,0,0,0,0,0,1, | |
| 1,0,0,0,0,0,0,0,0,0,0,0,0,0,0,0,0,0,0,1, | |
| 1,0,0,0,0,0,0,0,0,0,0,0,0,0,0,0,0,0,0,1, | |
| 1,0,0,0,0,0,0,0,0,0,0,0,0,0,0,0,0,0,0,1, | |
| 1,0,0,0,0,0,0,0,0,0,0,0,0,0,0,0,0,0,0,1, | |
| 1,0,0,0,0,0,0,0,0,0,0,0,0,0,0,0,0,0,0,1, | |
| 1,1,1,1,1,1,1,1,1,1,1,1,1,1,1,1,1,1,1,1]; | |
| public function PlayState() | |
| { | |
| map = new FlxTilemap(); | |
| map.loadMap(FlxTilemap.arrayToCSV(mapData,20), tilemapPng); | |
| add(map); | |
| player = new PlayerSprite(); | |
| add(player); | |
| } | |
| override public function update():void | |
| { | |
| super.update(); | |
| } | |
| } | |
| } |
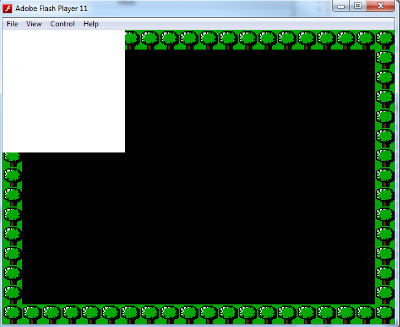
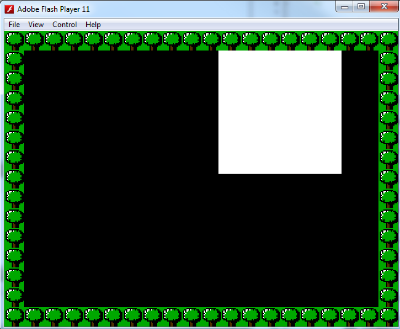
Assuming all the code is correct and there were no problems, running this new version of PlayState will show our white square on top of a map with tree sprites surrounding the edges.
Now, we can start to curtail the movement of the white square by making two changes to the code.
For the player object’s constructor, we will change the arguments to the instantiation of PlayerSprite to 50, 50. Instead of starting at 0,0, the white square will now be drawn starting at 50,50.
The other change is to introduce collision detection.
(Note: Put simply, collision detection checks if one sprite is touching or overlapping another. Usually, this is based on each object’s bounding box — the rectangle surrounding each sprite. If any of the points of each corner are inside the space of the other sprite, they are colliding.)
| package | |
| { | |
| /** | |
| * ... | |
| * @author Dan Cox | |
| */ | |
| import org.flixel.*; | |
| public class PlayState extends FlxState | |
| { | |
| private var player:PlayerSprite; | |
| private var map:FlxTilemap; | |
| [Embed(source = "data/tilemap.png")] private var tilemapPng:Class; | |
| private var mapData:Array = | |
| [1,1,1,1,1,1,1,1,1,1,1,1,1,1,1,1,1,1,1,1, | |
| 1,0,0,0,0,0,0,0,0,0,0,0,0,0,0,0,0,0,0,1, | |
| 1,0,0,0,0,0,0,0,0,0,0,0,0,0,0,0,0,0,0,1, | |
| 1,0,0,0,0,0,0,0,0,0,0,0,0,0,0,0,0,0,0,1, | |
| 1,0,0,0,0,0,0,0,0,0,0,0,0,0,0,0,0,0,0,1, | |
| 1,0,0,0,0,0,0,0,0,0,0,0,0,0,0,0,0,0,0,1, | |
| 1,0,0,0,0,0,0,0,0,0,0,0,0,0,0,0,0,0,0,1, | |
| 1,0,0,0,0,0,0,0,0,0,0,0,0,0,0,0,0,0,0,1, | |
| 1,0,0,0,0,0,0,0,0,0,0,0,0,0,0,0,0,0,0,1, | |
| 1,0,0,0,0,0,0,0,0,0,0,0,0,0,0,0,0,0,0,1, | |
| 1,0,0,0,0,0,0,0,0,0,0,0,0,0,0,0,0,0,0,1, | |
| 1,0,0,0,0,0,0,0,0,0,0,0,0,0,0,0,0,0,0,1, | |
| 1,0,0,0,0,0,0,0,0,0,0,0,0,0,0,0,0,0,0,1, | |
| 1,0,0,0,0,0,0,0,0,0,0,0,0,0,0,0,0,0,0,1, | |
| 1,1,1,1,1,1,1,1,1,1,1,1,1,1,1,1,1,1,1,1]; | |
| public function PlayState() | |
| { | |
| map = new FlxTilemap(); | |
| map.loadMap(FlxTilemap.arrayToCSV(mapData,20), tilemapPng); | |
| add(map); | |
| player = new PlayerSprite(50,50); | |
| add(player); | |
| } | |
| override public function update():void | |
| { | |
| super.update(); | |
| FlxG.collide(player, map); | |
| } | |
| } | |
| } |
Running this new code produces a different a new effect. Every time the white square collides with the tilemap, it is stopped. This is Flixel’s default collision detection code in practice. Unless overwritten, Flixel will act to separate (stop colliding) two sprites.
That’s it for Part 4. We covered creating tilemaps and basic collision (separating behavior).
In Part 5, we move to create more objects, expand our map, and start to build complex interactions from testing for player input and sprite collisions.
