![]()
Working with Ren’Py:
- Part 1: Downloading and Configuring
- Part 2: Editing and Creating Characters
- Part 3: Scenes and Showing Images
- Part 4: Menus, Labels, and Jumps
- Part 5: Variables and Conditional Statements
- Part 6: Transitions
- Part 7: Building Distributions
Advanced Ren’Py:
- Part 1: Screen Language
- Part 2: Position Style Properties
- Part 3: Animation and Transformation Language
- Part 4: Text and Button
- Part 5: Bar and VBar
- Part 6: Textbutton and Imagebutton
- Part 7: Input, Key, and Mousearea
Customizing Ren’Py:
- Part 1: Editing options.rpy
- Part 2: Editing gui.rpy
- Part 3: Style Inspector and Overriding Styles
- Part 4: Special Screen Names and Overriding Screens
- Part 5: Replacing Default GUI Images
Ren’Py + Python:
- Part 1: Setting and Using Flags
- Part 2: Python Blocks
- Part 3: User-Defined Displayables
- Part 4: User-Defined Statements
- Part 5: Custom Text Tags
Ren’Py is a engine for creating visual novels. It comes with a suite of tools for taking code and transforming it into programs that can be run on Windows, Mac, Linux, and even, with a little more work, mobile platforms like Android and iOS.
Characters
In Ren’Py, characters are a core part of how stories work. They say different things the player can read. In general, characters can be thought of in two large, loose categories of narration or defined.
Narration
Statements that are not assigned to a speaker can be thought of as narration. Instead of having a named associated with the text, it is shown by itself. Like reading a story in another medium, such statements can help provide insight into the mind of the protagonist or simply help establish the context of past or future dialogue.
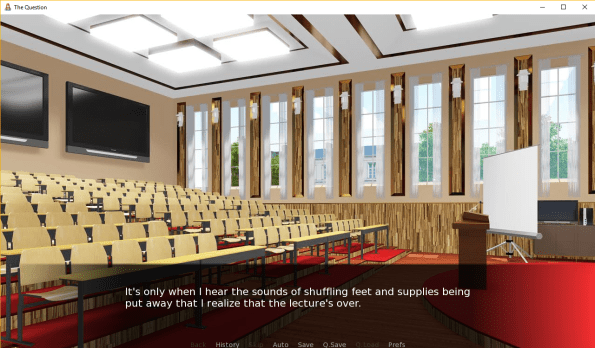
In the above image taken from “The Question”, the narration is the following.
“It’s only when I hear the sounds of shuffling feet and supplies being put away that I realize the lecture’s over.”
This helps explain the context for the player. They are the “I” in the statement, and along with the image of a classroom, can begin to put together that the character might be a student or teacher and that the lecture they attended is not finished.
Defined

Defined characters differ from more general narration in that they have one or more names associated with their statements. In such cases, a character is saying something.
In the above image taken from “The Question”, a defined character named Sylvie is saying the following:
“Hi there! How was class?”
The name of the defined character is shown with the text of their statement to show that they are saying it. Characters can have dialogue with each other by showing their names by each statement they make.
Editing Characters

Open the Ren’Py Launcher and select “The Question” from the Projects listing on the left-hand side. On the right-hand side, click on “script.rpy” under the Edit File options.
“The Question” is an example included in many version of Ren’Py to teach people how to write code, create characters, and manage different parts through a visual novel.

Opening up of the “script.rpy” file of “The Question” shows all of its code. While some parts are straightforward, others require some advanced knowledge of how Ren’Py understands variables and labels.
To start to understand “The Question”, look at the first three lines. It starts with a code comment, something added by developers to help them and others understand the context of the code around it, and then two following lines defining characters.
Since Ren’Py is based on Python, the keyword define is used to connect a value to the name of a variable. In the second line, the variable s is set to the value of a Character named “Sylvie” whose text color is to be “#c8ffc8”.
When the variable s is used in the code after being defined here, Ren’Py will understand that it is equal to the character named “Sylvie” and show that name in the color specified.

Changing Names
Changing the name of a Character is as simple as changing the text used to defined its name. In the above image, the text was changed from “Sylvie” to “Susan”.
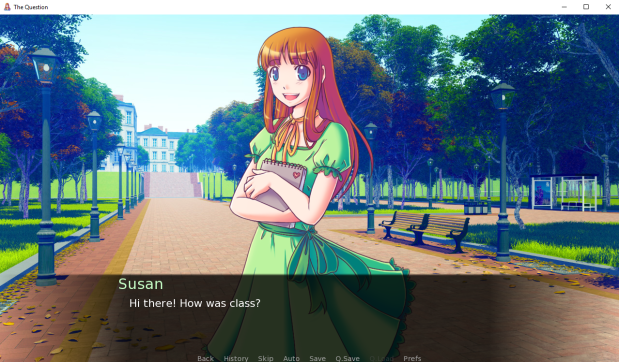
After changing the name and saving the “script.rpy”, the difference appears when clicking on “Launch Project” in the Ren’Py Launcher and moving through the visual novel again. Now, instead of “Sylvie”, the character’s name is “Susan”.
Changing Narration
While changing names and colors in how they are defined can make a difference in how characters are presented, changing narration is much simpler.

Lines 18 – 26 in “script.rpy” of “The Question” demonstrate an example of narration. Through using statements in quotations, Ren’Py understands each separate line as something that is said. Since they do not have a name associated with them, they are shown without one.

Like with changing the name of a character, narration can be changed by changing the text. Changing the existing text —
“It’s only when I hear the sounds of shuffling feet and supplies being put away that I realize that the lecture’s over.”
— to the following —
“I woke up suddenly as other students were packing up their things around me. I had fallen asleep in the class. Again.”
— changes it in the visual novel once the file is saved.

When the visual novel is launched again, the text has been changed.

Creating Characters
Like with editing existing character, creating new ones requires adding new code to the “script.rpy” file.
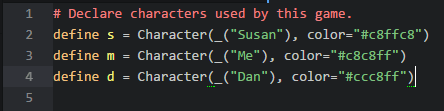
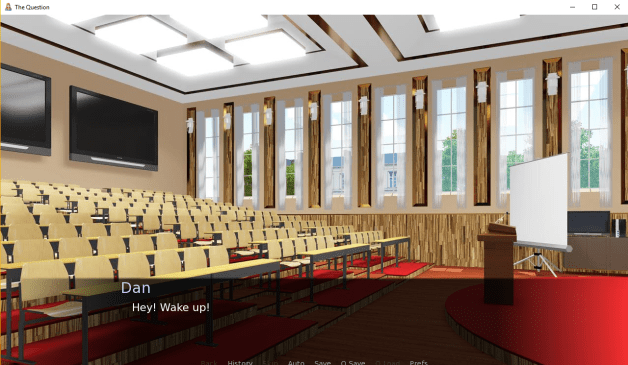
In the above image, a new character named “Dan” is added with the text color of “#ccc8ff”. It is defined as the variable d.
In order for a character to say something, its variable must proceed the statement to speak.

Lines 58 – 68 of “The Question” show an example of dialogue between two characters. The “s” on line 58 shows that “Susan” is speaking the line “Hi there! How was class?” and the “m” is responding with “Good…”. The third statement, line 63, does not have a variable in front of it and therefore is narration.
In order for the new character Dan to speak a line, it must be added with the variable d in front of it.
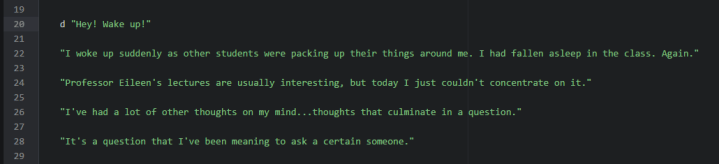
Now, with new line 20, the character of Dan defined as d is saying the statement “Hey! Wake up!”.
Through rewriting their name and text, existing character’s information and statements can be changed. To create new characters, define them at the beginning of the code and then use their variable name before some statement to have them say it.
